
User`s manual


Step-3 : Install A- and B-Size Modules
If you are installing A- or B-Size modules and C-Size modules in the same
mainframe, we recommend you install the A- and B-Size modules first.
(You will generally need more working room to install the smaller
modules.) Use Figure 4-2 or 4-3 and the following steps to install A- and
B-Size modules:
1. If the mainframe is turned on, turn the mainframe off by
pressing the button in the lower left corner of the mainframe.
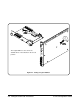
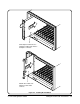
2. Install the Agilent E1403 A/B-size Module Carrier or the Agilent
E1407 A/B-size Module Carrier into the mainframe. This is done
by aligning the top and bottom of the carrier with the card guides
and slowly pushing the carrier into the mainframe. The front of the
carrier should be even with the front edges of the mainframe.
When installing the carrier in the Agilent E1421 mainframe, the
"top" of the carrier will be on the left when it is installed
horizontally.
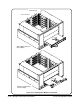
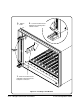
3. Slide the A- or B-Size module into the module carrier until it
connects.
4. Tighten the retaining screws on the top and bottomof the module.
Installation manuals are shipped with each carrier described.
• Agilent E1403B A/B-size Module Carrier extends the P1
connector on the VXIbus backplane and mounts the (A/B-size)
modules flush with other C-size modules. This carrier is
recommended for all Agilent Technologies B-size modules which
have only the P1 connector.
• Agilent E1407A A/B Module Carrier extends the P1 and P2
connectors on the VXIbus backplane. This carrier is recommended
for B-Size modules which have the P1/P2 connectors.
4-8 Configure and Install Instruments C-Size Configuration Guide