
Technical data


3- 14 Agilent 41000 Administration Guide, Edition 3
Using Agilent iPACE Verification Tool
Connection Check
Troubleshooting
If the proper voltage does not appear, it may be caused by the following reasons.
• Contact pins or connectors are dirty.
• Contact pins or cables are defective.
• Any instrument is defective.
NOTE If you found any defect in the system component
If you found any defect in the system component (DC source/monitor, LCR meter,
switching matrix, or probe card interface), contact your nearest Agilent Technologies
Service Center.
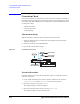
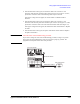
Figure 3-5 Connection Check Troubleshooting
Perform the following step to specify the defective part.
1. Check if connection pins and connectors are clean.
If they are dirty, clean them and perform the connection check again. See “Cleaning”
on page 2-27.
If you find defective contact, replace the contact pin or measurement cable and perform
the connection check again. See
“Model 300/400: Replacing Contact Pins” on page
2-28.
2. If the problem still remains, disconnect the measurement cable from the source output
connector (1 in
Figure 3-5). Then, perform the connection check at the source output
connector.
If the proper voltage does not appear, the instrument (voltage source) will be defective.
3. If the measurement result is good, reconnect the cable to the connector 1. And
disconnect cable from the switching matrix input connector (2 in
Figure 3-5). Then,
perform the connection check at the end of the measurement cable (A in Figure 3-5).
If the proper voltage does not appear, the measurement cable will be defective. Replace
the cable.
'&VRXUFHPRQLWRU
0HDVXUHPHQWFDEOH$
6ZLWFKLQJPDWUL[
3UREHFDUGLQWHUIDFH
0HDVXUHPHQWFDEOH%