
Technical data


3- 8 Agilent 41000 Administration Guide, Edition 3
Using Agilent iPACE Verification Tool
Start-Up
Start-Up
To start up the Agilent iPACE verification tool, boot the program and set the system
configuration as shown below.
1. Click Start, Programs, Agilent iPACE Verification Tool, and iPACE Verification Tool.
The Set Configuration window and the iPACE Verification Tool window will open.
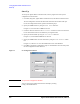
On the Set Configuration window, perform the following steps.
2. Specify the GPIB interface by using the GPIB Name combo box.
In Figure 3-1, the VISA name: GPIB0 is selected.
3. Check the check box left next to the Instrument combo box. Then do not check the
box for the instrument that is not installed in your Agilent 41000.
4. Specify the model number by using the Instrument combo box.
In Figure 3-1, the E5270B and B2200A are selected.
5. Specify the GPIB Address for each instrument by using the GPIB Address combo
box.
In Figure 3-1, address 17 is set to the E5270B and 22 is set to the B2200A.
6. Click OK to complete the configuration setup. Or click Cancel to cancel the setup. Then
the Set Configuration window will close.
Figure 3-1 Set Configuration Window
NOTE To Open Set Configuration Window
You can open the Set Configuration window manually by clicking
Config > Set GPIB Address...
'#'$
#
$:#