
Technical data


Agilent 41000 Administration Guide, Edition 3 2- 17
Installation and Operation
Installation
Procedure
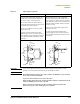
The following procedure shows how to install the Agilent B2220A. Do not remove the
contact protector and the light shielding panel before starting the procedure. See also
“Probe Card Interface” on page 6-1.
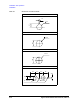
1. Place the B2220A. Then, face the contact side (bottom side) up.
2. Unscrew and remove the contact protector from the bottom cover.
Keep the protector in trust. You may need it for move in future.
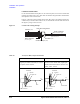
3. Mount the B2220A on your prober. See “Requirements” on page 2-15.
4. Connect the connection cables. See “Model 300/400: To Connect Measurement
Cables” on page 2-19.
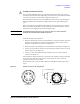
Before starting measurements
The following procedure should be done before starting the measurements. However, the
procedure is not needed or should be changed if there is any additional mechanisms such as
the microscope on the B2220A in place of the light shielding panel.
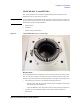
1. Unscrew and remove the light shielding panel from the top cover.
2. Fix the probe card on the prober.
3. Make contact between the B2220A and the probe card.
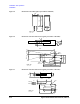
4. Place the test wafer on the wafer chuck, and perform wafer alignment.
5. Replace and screw the light shielding panel.
6. Start the measurements.