
Technical data


Agilent 41000 Administration Guide, Edition 3 2- 15
Installation and Operation
Installation
Model 300/400: To Install B2220A
This section describes how to install the Agilent B2220A probe card interface. This
information is for you who use the auto prober.
NOTE For the installation of the B2220A and the connection to the DUT interface, contact your
favorite prober vender. The prober vender will be able to provide the DUT interface and
mechanisms required to install the B2220A.
• “Requirements”
• “Procedure”
• “Before starting measurements”
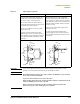
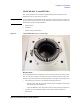
Figure 2-8 Agilent B2200A Bottom View (Contact Side)
Requirements
The Agilent B2220A has been designed to contact its output pins directly with the probe
card. So, it must be mounted on the semi-auto prober or full-auto prober accurately and
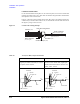
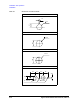
carefully. The prober should have the following features. See
Figure 2-9 and Figure 2-10.
• Arm (with hinge, spring, and so on) that has the following functions.
• To make contact with the probe card accurately and fix the B2220A on the prober
when performing test/measurement.
• To face the B2220A contact side (bottom side) up when performing maintenance.
• A pin that can press the B2220A’s prober sense switch when performing test/
measurement.