
Technical data


Agilent 41000 Administration Guide, Edition 3 2- 5
Installation and Operation
Installation
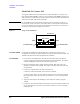
To connect
E5270B
1. Turn the Agilent E5270B off.
2. Connect the 16493M cable to the HRSMU D-sub connector.
3. Connect the 16494A triaxial cable to the HRSMU Force terminal.
4. Conect the BNC cable from the AUX In terminal to the appropriate instrument. Prepare
an adapter if the instrument does not have the BNC input connector.
NOTE Connect ASU to dedicated HRSMU
The specifications are satisfied and guaranteed for the exclusive combination of the ASU
and the HRSMU. So confirm the serial number of the ASU and connect it to the dedicated
HRSMU properly.
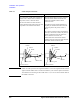
To connect 4284A 1. Turn the 4284A off.
2. Prepare two ASUs (#1 and #2).
3. Connect the Agilent 16048D/E test leads to the C meter.
4. Connect the high potential (Hp) cable of the test leads to the CMU-pot terminal of the
ASU #1.
5. Connect the high current (Hc) cable to the CMU-cur terminal of the ASU #1.
6. Connect the low potential (Lp) cable to the CMU-pot terminal of the ASU #2.
7. Connect the low current (Lc) cable to the CMU-cur terminal of the ASU #2.
8. Prepare the connection wire (both pin terminals) furnished with the ASU and connect it
between the CMU Return terminals of the ASU #1 and ASU #2 together.
NOTE Cables for ASU outputs
To perform capacitance measurements accurately, prepare the cables of the same material,
structure, and length for both of the ASU #1 and ASU #2.
Figure 2-2 To Connect ASU
&085HWXUQ$8;&RPPRQ
7R'87
7R&08
)RUFH
+S
+F
'VXE
7R608
7R&08
)RUFH
/S
/F
'VXE
7R608
7R'87
&085HWXUQ$8;&RPPRQ
)RUFH&08$8;
6HQVH
&08FXU$8;,Q
&08SRW
)RUFH
)URP608
$68
&08FXU$8;,Q
&08SRW
)RUFH
)URP608
$68
)RUFH&08$8;
6HQVH