
User's Manual


3 Operating the Power Supply Locally
34 Series N5700 User’s Guide
Turn-On Check-Out
Before Check-Out
Ensure that the power supply is configured as follows:
• The unit is connected to an appropriate AC source as
described in chapter 2.
• The POWER switch is in the off position.
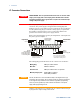
• Sense connector pins 1 and 2 are jumpered; sense connector
pins 4 and 5 are jumpered.
• All switches on Connector J2 are in the down position.
WARNING
SHOCK HAZARD Be aware that hazardous voltages can be present on the
output terminals. Do not set the output voltage above 40 VDC during the turn-
on check-out procedure.
Constant Voltage Check
• Turn the POWER switch on.
• Turn the output on by pressing the OUT ON button. The
green OUT ON indicator should be illuminated.
• The green CV indicator should also be illuminated. If the CC
indicator is illuminated, rotate the current knob until the CV
indicator becomes illuminated.
• Rotate the voltage knob while observing the DC VOLTS
display. The output voltage should vary while the knob is
turned. The voltage range is from zero to the maximum rated
output for the power supply model.
OVP Check
• Rotate the voltage knob and set the output voltage of the unit
to 50% of its full-scale rating or 30 volts, whichever is lower.
• Press the OVP/UVL button once so that the DC AMPS display
indicates OUP. The DC VOLTS display shows the OVP level.
• Use the voltage knob and set the OVP level of the unit to 75%
of its full-scale voltage rating or 40 volts, whichever is lower.
• Wait a few seconds until the DC VOLTS display returns to
show the output voltage.
• Use the voltage knob and raise the output voltage of the unit
until it approaches the OVP setting. Check to make sure that
the output voltage cannot be set higher than the OVP setting.
• Press the OVP/UVL button again. Rotate the voltage knob and
reset the OVP level of the unit to its maximum setting.