Getting Started with the Agilent Pulse Generator 81133A/81134A You only need a few minutes to get started with the Agilent 81133A and 81134A Pulse Generator. i o n, rmat , info ing Guide ing m mm gram gra Pro . pro the t CD te nd oduc a pr he Fo r m please ore ex refe amp r to l t h e es a n del Use d re iv e r G m red u o on ide t This Getting Started Brochure helps you to quickly understand the operating principles and set up your first signals.
Notice Safety Summary Copyright General Safety Precautions The following general safety precautions must be observed during all phases of operation of this instrument. Failure to comply with these precautions or with specific warnings elsewhere in this manual violates safety standards of design, manufacture, and intended use of the instrument. © Agilent Technologies, Inc. 2002. Revision Revision 1.0, August 2002 Printed in Germany Agilent Technologies, Deutschland GmbH Herrenberger Str.
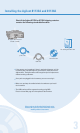
Installing the Agilent 81133A and 81134A Check if the Agilent 81133A or 81134A shipping container contains the following standard deliverables: The Agilent Pulse Generator 81133A or 81134A Agilent Pulse Genarat or This Getting Started Brochure power cable The Product CDs USB cable If the contents are incomplete, if there is mechanical damage, or if the instrument does not work within its specifications, notify the nearest Agilent office.
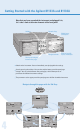
Getting Started with the Agilent 81133A and 81134A Now that you have unpacked the instrument and plugged it in, let´s take a look at the main elements of the front panel. Softkeys Numeric Keys Global inputs and outputs Navigation knob Channel-specific inputs and outputs Tab Keys to navigate between the pages Switch on the instrument. You can immediately start playing with the settings. Start by pressing the tab keys. You see that only the lower part of the panel page changes.
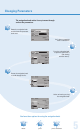
Changing Parameters The navigation knob makes it easy to move through and set the parameters. Rotate the navigation knob to move from one parameter to the next. Let’s select a parameter from a selection list. Press the navigation knob to open the selection list (like clicking with the mouse). Rotate the navigation knob to scroll through the list. Select an item by pressing the navigation knob. You have three options for using the navigation knob.
Changing Parameters Now let´s change a number field Press the navigation knob once to focus at the number field. When you rotate the navigation knob the value changes. You can do this in run time. It let’s you immediately see the changes on a scope. Turn the navigation knob to set the number Or, to change one digit Press the navigation knob once when you are done. Press and rotate the navigation knob to select the digit. You can also press the arrows next to the navigation knob.
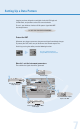
Setting Up a Data Pattern Imagine, you have designed a new digital circuit with ECL logic and 3.3 GHz clock, and you want to check its correct behavior. To test it, you decide to simulate a 32-bit pattern signal with NRZ data output format: 11110011100110010010100100000000 Protect the DUT Whenever you change a parameter, the generated signal immediately changes. To protect your DUT, make sure you disconnect the channel outputs first.
Setting Up a Data Pattern You can now set the channel mode, timing and level parameters for the channel 3 Indicates that the Parameters are set for Channel 1 4 Select the ECL level format The LEDs show the status of the outputs gray = disabled, green = enabled, crossed out = all outputs disconnected 5 Select Pulse Type NRZ Enable the Channel 1 normal Output by pressing the respective softkey 2 - Select Pulse Mode Data You can switch between the two channels by pressing this softkey 1 Switch to t
Setting Up a Data Pattern Reconnect the DUT When you are done, you can reconnect the DUT by clicking the following softkey: If you attach a scope (as DUT), you can immediately see the signal You can use the generator’s trigger output to trigger the scope. The LEDs tell you which outputs are enabled 2 Enable the Trigger Output ... ...
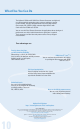
What Else You Can Do The Agilent 81133A and 81134A Pulse/Pattern Generators are high-end, easy-to-use tools for generating pulses, patterns and data at speeds up to 3.35 MHz. They are ideal instruments for testing logic devices (for example, ECL, LVPECL, LVDS) and other digital devices with clock rates from 15 MHz to 3.35 GHz. You can use the Pulse/Pattern Generators for applications where timing and performance are critical and full control over signal jitter is required.
Requirements and Possibilities for Remote Control Using the Pulse Generator's Remote Control Interfaces You can integrate the Pulse Generator in your production environment. Its remote programming interfaces (USB, LAN, GPIB) allow you to set up extensive tests that involve several instruments. The accompanying Agilent I/O Libraries for instrument control must be installed on the controlling PC. It is possible that your Generator’s firmware is not set up for USB.
Agilent Corporate Information, Product Numbers For more information, please visit us at: www.agilent.com/find/pulse_generator Ordering Information Agilent 81133A Agilent 81134A 3.35 GHz 1-channel Pulse/Pattern Generator 3.