Agilent 82357B USB/GPIB Interface Quick Start Guide Agilent Technologies
Notices © Agilent Technologies, Inc. 2006 - 2009 No part of this manual may be reproduced in any form or by any means (including electronic storage and retrieval or translation into a foreign language) without prior agreement and written consent from Agilent Technologies, Inc. as governed by United States and international copyright laws. Manual Part Number 82357-90700 Edition Fifth Edition, August 1, 2009 Printed in Malaysia Agilent Technologies, Inc.
Safety Symbols Caution, risk of danger (refer to this manual for specific Warning or Caution information) Regulatory Markings The CE mark is a registered trademark of the European Community. This CE mark shows that the product complies with all the relevant European Legal Directives. ICES/NMB-001 indicates that this ISM device complies with the Canadian ICES-001. Cet appareil ISM est confomre a la norme NMB-001 du Canada. The CSA mark is a registered trademark of the Canadian Standards Association.
Additional Safety Information The following general safety precautions must be observed during all phases of operation of this instrument. CAU TI O N • Use the device with the cables provided. • Repair or service that is not covered in this manual should only be performed by qualified personnels. WA RN ING • Do not use the device if it appears damaged or defective. • Observe all markings on the device before connecting any wiring to the device.
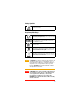
82357B USB/GPIB Interface Table of Contents Introduction 1. Before You Install the 82357B Check your shipment items 2 Check your PC operating system 2 2. Installing Agilent IO Libraries Suite Insert the Automation-Ready CD 3 Install the IO Libraries Suite 3 Look for circled IO icon 4 3. Connecting the 82357B Plug the 82357B into a USB Port 5 Observe the 82357B LEDs 5 4. Configuring the 82357B Observe the Agilent Connection Expert 6 Configure the 82357B 6 5.
82357B USB/GPIB Interface Introduction Introduction This quick start guide shows a suggested six-step process to install the 82357B and the Agilent IO Libraries Suite, to connect the 82357B to your PC, to configure the 82357B, and to program GPIB instruments via the 82357B. It also includes the product technical specifications information. NO TE The 82357B USB/GPIB Interface is supported ONLY for PCs with Windows XP Professional, Windows Vista, or Windows 7 operating systems.
82357B USB/GPIB Interface 1. Before You Install the 82357B 1. Before You Install the 82357B Check your shipment items Verify that you received the following items in your shipment of the 82357B USB/GPIB Interface: • Agilent 82357B USB/GPIB Interface • Agilent Automation-Ready CD with Agilent IO Libraries Suite • Printed copy of the Agilent 82357B USB/GPIB Interface Quick Start Guide If any item is missing or damaged, keep the shipping materials and contact Agilent Technologies.
2357B USB/GPIB Interface 2. Installing Agilent IO Libraries Suite 2. Installing Agilent IO Libraries Suite Insert the Automation-Ready CD Turn on your PC and insert the Agilent Automation- Ready CD with Agilent IO Libraries Suite into the CD-ROM drive. If the auto-run window does not appear automatically, go to Start > Run then type :autorun\auto.exe, where is your CD drive letter.
82357B USB/GPIB Interface 2. Installing Agilent IO Libraries Suite NO TE Upgrading your IO Libraries version If you are upgrading to the latest version of the IO Libraries Suite from a previous version of the IO Libraries, you must remove the following instruments and interfaces listed below before you upgrade your software. This step is necessary in order for these devices to obtain the correct drivers to work with Agilent IO Libraries. • Disconnect any USB instruments from your PC.
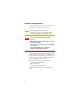
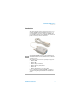
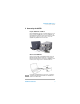
82357B USB/GPIB Interface 3. Connecting the 82357B 3. Connecting the 82357B Plug the 82357B into a USB Port Plug the 82357B USB cable into an available USB port on your PC or on a supported USB hub. To connect to USB hubs, see the 82357B User's Guide. The picture shown below is for illustration purposes only. It is not necessary to connect the 82357B to any GPIB instruments at this time. Observe the 82357B LEDs Observe the three LEDs on the 82357B. Initially, only the red FAIL LED should be illuminated.
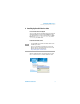
82357B USB/GPIB Interface 4. Configuring the 82357B 4. Configuring the 82357B Observe the Agilent Connection Expert Run the Agilent Connection Expert to verify your I/O configuration: In the Windows Notification area, click the IO icon ( ), then click Agilent Connection Expert. When the main screen appears, you will see a map of the system connections in the Instrument I/O on this PC pane (also called the “Explorer Pane”). At this time, the Connection Expert window should refresh.
82357B USB/GPIB Interface 5. Connecting GPIB Instruments 5.
82357B USB/GPIB Interface 6. Programming via the 82357B 6. Programming via the 82357B Use the Agilent Interactive IO to communicate with the GPIB instruments After the 82357B has been configured and connected to the GPIB instruments, you can use the Interactive IO to establish communication between your PC and the connected GPIB instruments. To run the Interactive IO for an IEEE-488.2 compliant instrument, perform the following: 1 Right click the instrument's icon in the Connection Expert window.
82357B USB/GPIB Interface Other References Other References Related documentation See the following documents for information related to the 82357B. All documents are available in electronic format by clicking on the IO icon ( ) on the Windows task bar then selecting Documentation. • Agilent 82357B USB/GPIB Interface User's Guide describes the 82357B, and provides installation and troubleshooting information.
82357B USB/GPIB Interface Other References 10 82357B Quick Start Guide
www.agilent.