
User`s guide


Performance Test Instructions Performance Tests
Agilent 81560A, 81561A, 81566A, & 81567A Optical Attenuator Modules, First Edition 45
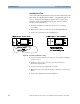
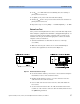
Figure 11 Insertion Loss Test Setup
9 Set attenuation [α] to 0dB and open the shutter.
10 Record the power meter reading (in dB) in the Test record.
Accuracy Test
Use the same equipment and test setup as used in Figure 11.
NOTE: With a laser source with output power < +10dBm it is not necessary to
recalculate the real attenuation.
1 Turn the instruments on and allow the devices to warm up
(20..30min).
2 Make sure that all your connectors are clean and undamaged.
3 Set the attenuator and the power meter to the actual wavelength of
the laser source.
4 Disable the laser source, zero the power meter and select
Autorange. Display [dB].
5 Enable the laser source, open the shutter and set attenuation [α] to
0 dB.
6 Set Display to Reference on the power meter.
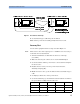
7 Set the attenuation [α] to the different values listed below and note
the power meter reading in the Test Record.
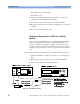
8163A 8163A
1 db 2 dB 3 dB 4 dB 5 dB
6 dB 7 dB 8 dB 9 dB 10 dB
11 dB 12 dB 13 dB 14 dB 15 dB
25 dB 35 dB 45 dB 55 dB 60 dB