
Technical data

1-25
Installing the 86100C
Step 12. Calibrate the modules
Step 12. Calibrate the modules
This is the last step required for installing the 86100C and preparing it for use.
Additional procedures in this section are provided, if needed. To learn about
using your 86100C, be sure to read Chapter 2, “Using the 86100C” and the
instrument’s built-in Help system.
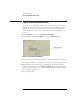
A module calibration establishes calibration factors for all installed modules.
The calibration factors compensate for imperfections in the measurement sys-
tem (for example, variations due to ambient temperature), resulting in the
best instrument precision. It is recommended that you perform this calibration
routinely for best measurement accuracy.
The module calibration is recommended whenever the following occurs:
• Instrument power has been cycled
• A module has been removed and then reinserted
• A change in the temperature of the mainframe exceeds 5°C compared to the
temperature of the last vertical (amplitude) calibration (ΔT > 5°C)
• The time since the last calibration has exceeded 10 hours
Refer to the Help for more information about instrument calibrations.
NOTE Allow the instrument, with modules installed, to warm up for a period of at least
one hour before performing a vertical calibration. This ensures that the module
reaches its equilibrium temperature.
CAUTION Electrical channel input circuits and the trigger input circuit can be damaged
by electrostatic discharge (ESD). Therefore, avoid applying static discharges
to the front-panel input connectors. Prior to connecting any coaxial cable to
the connectors, momentarily short the center and outer conductors of the
cable together. Avoid touching the front-panel input connectors without first
touching the frame of the instrument. Be sure that the instrument is properly
earth-grounded to prevent buildup of static charge. Wear a wrist-strap or heel-
strap.
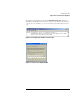
To perform a module calibration
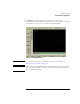
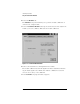
1 On the Calibrate menu, choose All Calibrations.
The All Calibrations dialog box opens. This dialog box allows you to view
the calibration status of modules and initiate the calibration.