
Technical data


4-37
Replacing Instrument Assemblies
To Remove the A1 Power Supply
To Remove the A1 Power Supply
1 Follow the instructions for removing the mainframe cover, on page 4-4.
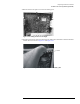
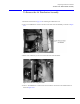
2 Use a T-15 TORX driver to remove the two screws that secure the mainframe to the top of the A1
Power Supply, as shown in Figure 4-58.
Figure 4-58. Removing the Screws Securing the Power Supply
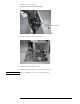
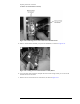
3 Remove the two screws located on either side of the hard drive, as shown in Figure 4-59.
Figure 4-59. Removing the Screws on Top of the Hard Drive
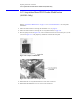
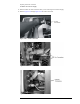
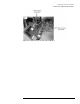
4 Disconnect all cables from the power supply.
NOTE You may need to remove the cable from the A9P2 Hard Drive connector on the A15 Disk
Drive Interface to access cables on the A4 PC Motherboard.