
Technical data


4-13
Replacing Instrument Assemblies
LS-120 Disc Drive Modification (86100A Only)
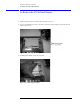
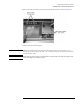
Figure 4-15. A16 LS-120 Board shown with Added Ground Strap
6 Secure the A16 LS-120 Board to the A10 Floppy Drive with two, T-10 Torx Screws. Refer to
Figure 4-14.
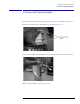
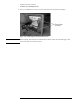
7 Secure the ribbon cable W9 to the A16 LS-120 Board. Refer to Figure 4-14.
NOTE Ensure that the red stripe on the ribbon cable, W9 is towards the fan assembly when
connection the cable to LS-120.
8 Reassemble the Mainframe Cover.
9 Perform a Read/Write test of the Floppy Drive.
• Power on the instrument, and insert any 3.5 floppy disk into the floppy drive.
• At the touchscreen select the File pull-down menu, and select “Save, Instrument Setup.”
• Select “Look In” 3.5 Floppy (A:), touch/click Save.
• Select “Open Instrument Setup” and recall the file that was just saved.
• The saved setup should be recovered properly.