
Technical data


3-6
Adjustments
86100A/B Mainframe Timebase Adjustment
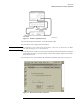
16 On the DCA screen, press Horizontal (Time base), Horizontal (Time base) Calibration (Service
Only).
17 Follow the instructions on screen.
If it is necessary to adjust the tuning capacitor:
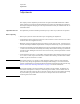
a Turn the DCA on it’s side to locate the hole plug at the bottom. See Figure 3-3.
Figure 3-3. Hole Plug Location
b Rotate the hole plug while pulling to remove it from the adjustment hole.
CAUTION Be very gentle while adjusting the capacitor as it is fragile.
c Make the adjustment then pull the adjustment tool away. Be sure to check the readings; they
may have changed.
d After the adjustment is complete, reinstall the hole plug. Wait the full ten minutes before you
proceed.
18 When the “Change source to 2 GHz” prompt appears, set the synthesized CW generator FREQ to
2 GHz.
19 When the “Change source to 16 GHz” prompt appears, set the synthesized CW generator FREQ
to 16 GHz and press continue.
20 On the Synthesized CW Generator, adjust the POWER LEVEL to 400 mV on the DCA screen’s
current reading.
NOTE If the Synthesized CW Generator does not have Option 1E1 installed, remove the
attenuator at the RF OUTPUT.
21 The message “Calibration is complete” is displayed in the message bar when the procedure is
complete.
22 Cycle the instrument power to disable the service mode.