
Technical data


2-14
Performance Verification
Jitter Performance Test
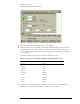
3 Set the synthesizer’s FREQ to 2.5 GHz and POWER LEVEL to 0 dBm. Make sure the RF ON/
OFF is set to ON.
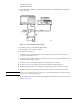
Figure 2-11. Jitter Performance Test Setup
4 On the front panel, press the Default Setup hardkey.
5 Ensure that the correct channel is enabled.
6 Turn all other channels off.
7 On the DCA screen, press Scale Offset for the channel in use, then set the scale (vertical) to
30 mV/div and the offset to 0.0 V.
8 On the DCA screen, press Time Delay, set the Reference to center, set the Scale to 500 ps/div, and
set the Delay From Trigger to 26.5 ns.
9 On the DCA screen, press Setup, Display, then set the persistence to Infinite.
10 On the DCA screen, press Trigger Level and set the Hysteresis to High Sensitivity.
11 Slightly change the frequency of the Synthesized CW Generator above and below 2.5 GHz.
12 Look for a part of the waveform that does not expand or contract as the frequency is varied.
NOTE You may have to adjust the delay setting on the Agilent 86100A/B until you find the trigger
point. Use the horizontal delay knob.
13 Place a marker on this point. Adjust the horizontal delay until the marker is centered on the screen.
Refer to Figure 2-12.