
Technical data


1-18
General Information
Preventative Maintenance
Plug-in Modules Not
Recognized by the
DCA Mainframe
Service Note 86100A-04
Serial Numbers below US4017:
On early DCA mainframes, some modules are not recognized by the DCA. Usually the problem
occurs when a clock recovery module is installed together with another module.
Various modifications were performed on the A13 Acquisition board assembly to solve this
problem. The modifications are not possible in the field.
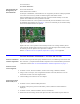
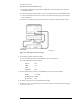
To determine whether the A13 Acquisition board assembly has been modified, remove it from
the mainframe and examine U55 (see Figure 1-1). If U55 is a Motorola part, the board assembly
has not been modified and must be replaced.
Figure 1-1. U55 location
Replace the entire A13 Acquisition board assembly with the A13 exchange assembly. DCAs
with option 001 (divided trigger) will need to have the option 001 replacement assembly. Look at
the serial tag on the rear panel to see if option 001 is installed.
Refer to ”To Remove the A13 Acquisition (Option 001)” on page 4-32 as applicable.
Perform Mainframe Maintenance—86100A and 86100B
Perform a Mainframe
Timebase Adjustment
For users who need pre-data at the yearly calibration interval, a verification process must be done
first. Otherwise, a yearly Horizontal Timebase Adjustment is recommended before performance
verification is started. Refer to “86100A/B Mainframe Timebase Adjustment” on page 3-3.
Perform a Touch
Screen Alignment
1 On the DCA screen, click/touch Utilities, Touch Screen Config, Calibration, Calibrate.
2 Using a touch screen stylus, such as Agilent Part Number 1535-5214, follow the on-screen
instructions and click on the three alignment dots.
3 Close the dialog boxes when the tests are complete.
Perform Front Panel
Knob and Key Test
1 On the DCA screen, click/touch Help and About.
2 On the DCA front panel, press the Local hardkey 5 times (until Service Mode enabled is
displayed).
3 On the DCA screen, click/touch Utilities, Service, and Self Test.
4 Perform all self-tests starting with the front panel test. Select Front Panel and press Start Test.