
Technical data


85108L System Manual
Specifications and Performance Verification
Performance Verification Procedure
4-9
On the network analyzer, press:
SYSTEM [MORE] [PULSE CONFIG] [DETECTOR:WIDE BW]
A W should appear to the left of the graticule for wide BW mode.
NOTE Select [DETECTOR:NORMAL BW] for nonpulsed-RF verification.
Frequency Offset
On the network analyzer, press:
SYSTEM [MORE] [EDIT MULT. SRC] [DEFINE: SOURCE 2] [OFFSET FREQUENCY] [20.000017 MHz] [x1]
Press [DONE] [MULT. SRC: ON/SAVE]. Leave the receiver frequency set to 20.000000 MHz.
These selections will be recalled automatically during verification.
20.Press
[RESUME]. The program will set up the 8510 and put it into LOCAL operation so you can
calibrate the system using its front panel keys.
21.Perform the calibration. The system must be warmed up for one hour before you continue. You
need a Full 2-port calibration for S-parameter test sets such as the 85110.
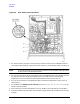
22.On the 8510, press
CAL. Then select the Cal Kit type by pressing the appropriate softkey on the
network analyzer display.
23.Select
[Full 2-PORT].
24.A series of softkey selections will appear on the display:
[REFLECT’N], [TRANSMISSION], and
[ISOLATION]. When you press one of these keys, another set of softkeys appears. Connect each
device as directed; the 8510 will underline each device label when the measurement is complete.
After all of the devices are measured (for S11 and S22), press
[DONE].
25.Press the appropriate
DONE softkey when the last measurement is complete. Then store the
calibration in a Cal Set Register (1 through 8) by pressing the accompanying softkey. If an
asterisk (*) appears alongside one of the cal set registers, it means that a calibration is already
stored there. If all of the registers are full, go ahead and press a key and respond to the prompts.
You will delete the contents of that register and store your calibration there.
When the calibration is complete, press the program
[RESUME] key and the program will reset the
8510 to REMOTE operation and return you to the System Performance Verification Menu.
Measure the Verification Standards
26.Press
[SELECT STANDARD]. The program will display the Verification Kit Device Selection Menu.
This menu is a form that allows you to select the standard you want to measure, enter its serial
number, change the averaging factor for measurement, select the Cal Set register, and enter any
comments.
A complete verification requires that you measure all devices in the kit. However, you must
select the devices, one at a time, from the Verify Standard menu.
27.When the form is complete, press
[DONE]. Insert the Verification Kit data disk into the network
analyzer disk drive and press
[RESUME]. The program will read the disk and compare device
serial numbers. If the numbers do not match, you can change them by responding to the
program prompts.