
Technical data


85108L System Manual
Specifications and Performance Verification
Performance Verification Procedure
4-8
NOTE The configuration disk files are not compatible with the 8510B network analyzer.
Instead, set the hardware and instrument states manually as shown in Appendix
B , “Hardware and Instrument States,” and then save in instrument state register
number 8 by pressing INSTRUMENT STATE SAVE [USER PRESET * 8].
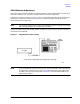
Insert the disk into the disk drive on the network analyzer. Press
DISC [LOAD] [MORE] [MACHINE
DUMP]
. Use the RPG knob on the network analyzer to select file: MD_PULS. Press [LOAD FILE].
The network analyzer will load the file into the eight instrument state registers and one
hardware state register. Set the hardware state and recall instrument state register eight.
16.Load the Cal Kit Disk as follows:
a. Insert the standards definition disk and press
TAPE/DISC, [LOAD], [CAL KIT [1-2].
b. Then press
[CAL KIT*1]. Move the knob to the desired file (to match the calibration kit you are
using) and press
LOAD FILE.
c. After the disk is loaded, remove it from the disk drive.
17.Press
CAL to verify that the proper files were loaded. The 8510 softkey field should display the
type of calibration and the revision number of the cal kit disk
18.Press
[RESUME].
19.The verification program initializes the system and can change some instrument states if the
network analyzer was not set to use USER PRESET as instructed in step 2. For pulsed-RF
system verification, these values must be reset to their initial values. The prompt Initializing
System Prior to Calibration will be displayed on the network analyzer display. To check
these values, press the following keys after the verification program has initialized the system.
NOTE Your verification will be invalid if you fail to set these states.
Power Levels
Source 1
Place the network analyzer in the normal BW, nonpulsed-RF mode by pressing:
SYSTEM [MORE] [PULSE CONFIG] DETECTOR: [NORMAL BW]
On the network analyzer, press
STIMULUS MENU [POWER MENU] [POWER SOURCE 1] [+8dBm]
If an “IF OVERLOAD” error message appears on the display, decrease the power level in 0.5 dB
increments until an “IF OVERLOAD” error message no longer appears on the network analyzer.
Source 2
On the network analyzer, press
STIMULUS MENU [POWER MENU] [POWER SOURCE 2] [+10 dBm].
On the network analyzer, press
STIMULUS MENU [POWER MENU] [POWER SOURCE 2] [SLOPE SRC2]
[ON] [2.5 dB/GHz].
Detectors
On the network analyzer, press:
STIMULUS MENU [POWER MENU] [POWER SLOPE] [SLOPE SRC2] [ON] [2.5 dB/GHz]