
Technical data


4-8 8510C Service Quick Reference Guide
Performance Verification
Automated Performance Tests
5. Insert the performance verification disk (08510-10033) into the right-hand drive 0.
Type: “LOAD SPECS_8510”, then press
EXECUTE.
NOTE There is no need to connect the 8510 to generate system specification;
therefore, ignore display prompts about connecting the 8510.
NOTE Remember for sliding load cal that lowband or broadband loads can be used
for lowband. Do not perform broadband cal if doing sliding load cal.
Running the Program
When the LED turns off, the program disk loading is completed. Note that the part
number and software revision number appear on the display. Confirm that the number
represents the latest version.
1. Set the date and time as instructed by the display. Type YES when the settings are
correct.
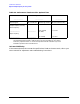
2. From the Hardware Configuration Menu file, select the equipment you plan to use.
3. Use
[NEXT] and [PREVIOUS], and the up and down arrow keys to select equipment. Refer
to the example list below.
4. Press [done] when equipment selection is completed. Wait for the files to load for each
piece of equipment.
5. From the main menu select [Verify System], then follow the CRT step by step
instructions.
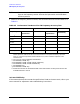
Table 4-3.
Network Analyzer Test Set Source Cal Kit Cal Type Cables Ver Kit
8510C 8515A 83631A 85052B SL (sliding
load cal)
85131D/F
3.5 mm pair of
short cables
85053B
3.5 mm