
Programming instructions


5
Performing Basic Operations
The Main window appears when you first run the Agilent AC Source GUI. From
this window you can control the output of the ac source as well as view all output
measurements.
To access an existing configuration,
a Click File, Open Configuration in the menu. Configuration files contain
Agilent AC Source GUI settings but not actual ac source instrument settings.
a Select the desired file (files have an *.set extension) and click Open.
a To create a new configuration, click File, New Configuration. This action
clears the present configuration, resets the ac source instrument to its default
values, and sets the I/O to simulation mode.
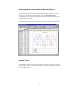
To program the output of the ac source,
a Under Output Control, program the output rms voltage, dc offset voltage,
frequency, rms current limit, and peak current limit. You can either type in
the values directly, or use the up/down arrows to adjust the present value. If
you type in the values, you must press the Enter button.
a For 3-phase ac sources, select the Phase that you want to control. You can
couple or control All phases simultaneously, or control each phase
individually.
a Select a waveshape from the Waveshape list box - either Sinewave,
Squarewave, or Clipped sinewave. For clipped sinewaves, you can specify
the clipping level in percent of amplitude, or in percent of total harmonic
distortion.
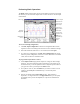
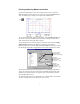
Measurement
summary
Waveform
display area.
Click to configure
measurements.
Turn on the ac
source output.
Click Enter to
apply all values
to the out
p
ut.
Select an
output
Set the output
to 120Vac. Use
F/G keys or
keyboard entry.
Click to start
a
t