
User`s guide


M3000A/M3046A/M3015A/M3016A Service Guide
2-24 Installing the Instrument
installed using steel or plywood plates sufficient to distribute the load over a large section
of the wall. /HDGH[SDQVLRQEROWVDUHQHLWKHUDGHTXDWHQRUVDIHIRUWKLVSXUSRVH
• It is the responsibility of the hospital, institution, or its designated representatives to deter-
mine that the wall is adequate to safely mount monitoring instrumentation. This includes
the selection of and proper installation of the appropriate fasteners and mounts. In a new
construction, or in a remodelled construction where the wall can be completely or partially
removed, a 16-gauge steel stud should be mounted for the purpose of attaching the wall
channel. This design safety factor is based on four times (4x) the maximum rated load.
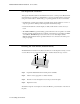
• *&;:DOO&KDQQHO Always reposition the adjustable channel safety stop under the
adapter plate when the height of the Instrument is changed.
The channel safety stop prevents the mounting device from inadvertently falling or being
pulled out of the wall channel. 'RQRWUHPRYHWKLVVWRSZKLOHWKHPRXQWLVVXSSRUWLQJDQ
,QVWUXPHQW
• Do not mount any portion of a monitoring instrument over a patient’s bed.
• Do not exceed the maximum rated load specified for each wall mount.
• Ensure that no electrical wiring, utilities, or piping interfere with the selected wall mount-
ing location.
• Do not install wall channel onto solid brick or brick veneer walls. Do not attempt to install
wall mounts onto crumbly wall material.
• Check the mounting hardware holding the wall channel or bracket to the wall every 12
months. Tighten if necessary.
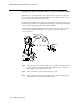
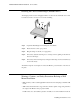
Installing the Wall Rail (M3080A #A13)
The wall rail is intended for use with the Universal Bed Hanger (#A11). To mount the rail
securely, you need 3 screws. These are not provided because the type of surface dictates the
type of screw used.
6WHS Unpack the Wall Rail and check all parts are available.
6WHS Select 3 screws (appropriate to surface material).
Rail