
User`s guide


M3000A/M3046A/M3015A/M3016A Service Guide
3-14 Maintaining the Instrument
&RQGLWLRQLQJD%DWWHU\
Batteries must be conditioned under the following circumstances:
• When indicated by the Battery Status.
• After approximately 50 charge/discharge cycles.
• The Battery Status window indicates an actual charge level that is 20% below the designed
charged level.
:$51,1*
%DWWHU\FRQGLWLRQLQJPXVWQRWEHGRQHGXULQJPRQLWRULQJRIDSDWLHQW
7RFRQGLWLRQWKHEDWWHU\
6WHS Make sure the Monitor is switched off.
6WHS Insert the battery into the Monitor (if already inserted, remove and re-insert).
6WHS Connect the AC mains power supply (check LED) and charge the battery until it is
fully charged.
6WHS Unplug the power cord.
6WHS Switch on the Monitor and leave it until it switches off automatically.
6WHS Connect the AC mains power supply again and leave to charge without interruption
until the battery is fully charged.
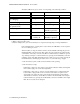
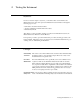
$FFHVVLQJWKH%DWWHU\6WDWXV:LQGRZ
The Battery Status window shows additional information about the battery. To access this
window, press the Setup key on the front panel and select Battery from the list. The Monitor
displays a screen similar to the following:
The meaning of the messages are described in the following paragraphs.
7LPHWR(PSW\²This refers to the approximate (+/- 10%) battery-usage time remaining in
the battery. The number is based on the average monitor-loading during the previous minute.
7LPHWR)XOO²This refers to the approximate (+/- 10%) time remaining to fully charge the
battery. The number is based on the average monitor-loading during the previous minute.
When the Time-to-Full shows 0, the battery-charge LED on the front panel remains lit until
battery calibration is complete.
([LW
&DSDFLW\&XUUHQWP$K
%DWWHU\6WDWXV
GHVLJQHGP$K&\FOHV
UHPDLQLQJP$K9ROWDJH9
7LPH7R(PSW\PLQHVWPLQDYJ
IXOO&KDUJHP$K7HPSHUDWXUH&
'XUDFHOO75961-8/6%0