M3046A M2, M3 and M4 Monitors M3000A Measurement Server & M3015A & M3016A Measurement Server Extensions Service Guide M3046-9060C Printed in Germany.
Notice This document contains proprietary information which is protected by copyright. All Rights Reserved. Reproduction, adaptation, or translation without prior written permission is prohibited, except as allowed under the copyright laws. Agilent Technologies Deutschland GmbH Herrenberger Strasse 130 71034 Böblingen, Germany Publication number M3046-9060C Printed in Germany :DUUDQW\ The information contained in this document is subject to change without notice.
Printing History New editions of this document will incorporate all material updated since the previous edition. Update packages may be issued between editions and contain replacement and additional pages to be merged by a revision date at the bottom of the page. Note that pages which are rearranged due to changes on a previous page are not considered revised. The documentation printing date and part number indicate its current edition. The printing date changes when a new edition is printed.
Introduction The M3000A Multi-Measurement Server, the M301 A and M3016A Measurement Server Extensions and the M3046A Compact Portable Patient Monitor form a flexible, portable, battery or line powered patient monitor. The M3000A Multi-Measurement Server acquires the physiological signals ECG, respiration, invasive and non-invasive blood pressure, oxygen saturation of the blood, and temperature. These signals are converted into digital data, and processed before being communicated to the Monitor.
Responsibility of the Manufacturer Agilent Technologies only considers itself responsible for any effects on safety, reliability and performance of the equipment if: • assembly operations, extensions, re-adjustments, modifications or repairs are carried out by persons authorized by Agilent, and • the electrical installation of the relevant room complies with national standards, and • the instrument is used in accordance with the instructions for use.
In this Book This Service Guide contains technical details on the Monitor, Measurement Server and Measurement Server Extensions. The purpose of this book is to provide a technical foundation for the monitoring system in order to support effective troubleshooting and repair. The book is not intended to be a comprehensive, in-depth explanation of the product architecture or technical implementation.
Notice . . . . . . . . . . . . . . . . . . . . . . . . . . . . . . . . . . . . . . . . . . . . . . . . . . . ii Warranty . . . . . . . . . . . . . . . . . . . . . . . . . . . . . . . . . . . . . . . . . . . . . ii Printing History . . . . . . . . . . . . . . . . . . . . . . . . . . . . . . . . . . . . . . . . . . . iii Introduction . . . . . . . . . . . . . . . . . . . . . . . . . . . . . . . . . . . . . . . . . . . . . . iv Responsibility of the Manufacturer . . . . . . . . . . . . . . . . . . . . . . . .
Alarm Relay . . . . . . . . . . . . . . . . . . . . . . . . . . . . . . . . . . . . . . . . 1-17 Battery Controller . . . . . . . . . . . . . . . . . . . . . . . . . . . . . . . . . . . . . . .1-17 ECG Out/Marker In Controller . . . . . . . . . . . . . . . . . . . . . . . . . . . . .1-17 Infrared (IrDA) Interface . . . . . . . . . . . . . . . . . . . . . . . . . . . . . . . . .1-18 Wireless LAN Interface . . . . . . . . . . . . . . . . . . . . . . . . . . . . . . . . . .
SpO2/PLETH Features . . . . . . . . . . . . . . . . . . . . . . . . . . . . . . . . . 1-30 Safety . . . . . . . . . . . . . . . . . . . . . . . . . . . . . . . . . . . . . . . . . . . . .1-30 PLETH Wave . . . . . . . . . . . . . . . . . . . . . . . . . . . . . . . . . . . . . . .1-30 Block Diagram of the SpO2/PLETH Circuit . . . . . . . . . . . . . . . . . 1-31 Theory of Operation . . . . . . . . . . . . . . . . . . . . . . . . . . . . . . . . . . . . 1-31 LED Current Source . . . . . . . . . . . . . . . .
M3016A Measurement Server Extension . . . . . . . . . . . . . . . . . . 1-39 Features . . . . . . . . . . . . . . . . . . . . . . . . . . . . . . . . . . . . . . . . . . . . . . .1-39 Data Management . . . . . . . . . . . . . . . . . . . . . . . . . . . . . . . . . . . . 1-39 Settings Transfer . . . . . . . . . . . . . . . . . . . . . . . . . . . . . . . . . . . . . 1-39 Alarms Reset . . . . . . . . . . . . . . . . . . . . . . . . . . . . . . . . . . . . . . . . 1-40 Server-to-Monitor Link Bar . . . . . . .
Infrared Detector, CO2 Input Amplifier, Dual Slope A/D, AZ Pulse Monoflop and Bias Regulation . . . . . . . . . . . . . . . . . . . . . . . . . . . . . . . . . . . . . . .1-55 Answers to the Tutorial for the Introduction to the Instrument . . . . . . . 1-58 Objectives. . . . . . . . . . . . . . . . . . . . . . . . . . . . . . . . . . . . . . . . . . . . . . . . 2-1 Concepts. . . . . . . . . . . . . . . . . . . . . . . . . . . . . . . . . . . . . . . . . . . . . . . . .
Site Preparation Guidelines . . . . . . . . . . . . . . . . . . . . . . . . . . . . . . . . . . .2-22 Installing the Table Mount (M3080A #A10). . . . . . . . . . . . . . . . . . . . . .2-22 Installing the Universal Bed Hanger (M3080A #A11) . . . . . . . . . . . . . .2-23 Warnings, Cautions, and Safety Precautions Relating to Wall Mount Installation2-23 Installing the Wall Rail (M3080A #A13) . . . . . . . . . . . . . . . . . . . . . . . .2-24 Installing the Tilt/Swivel Mount (M3080A #A14) . . . . . . . . . .
Battery INOP Messages . . . . . . . . . . . . . . . . . . . . . . . . . . . . . . . . . 3-15 Answers to the Tutorial for Maintaining the Instrument . . . . . . . . . . . . 3-18 Objectives. . . . . . . . . . . . . . . . . . . . . . . . . . . . . . . . . . . . . . . . . . . . . . . . 4-1 Concepts. . . . . . . . . . . . . . . . . . . . . . . . . . . . . . . . . . . . . . . . . . . . . . . . . 4-1 Test Reporting . . . . . . . . . . . . . . . . . . . . . . . . . . . . . . . . . . . . . . . . . . . .
Patient Safety Checks . . . . . . . . . . . . . . . . . . . . . . . . . . . . . . . . . . . . . . .4-24 Warnings, Cautions, and Safety Precautions . . . . . . . . . . . . . . . . . .4-24 Safety Test Procedures . . . . . . . . . . . . . . . . . . . . . . . . . . . . . . . . . . .4-24 S(1) Part 1: System Enclosure Leakage Current - NC (normal condition) 4-25 S(1) Part 2: System Enclosure Leakage current - Single Fault (open earth) 4-26 Reporting safety test S(1) in the Service record . . . . . . . . . . . . .
The Status Log and Error Codes . . . . . . . . . . . . . . . . . . . . . . . . . . 5-25 List of Error Codes . . . . . . . . . . . . . . . . . . . . . . . . . . . . . . . . . . . . . 5-26 Testing Wireless Network Connectivity . . . . . . . . . . . . . . . . . . . . . . . . 5-31 Antenna Check . . . . . . . . . . . . . . . . . . . . . . . . . . . . . . . . . . . . . . . . 5-31 Setup . . . . . . . . . . . . . . . . . . . . . . . . . . . . . . . . . . . . . . . . . . . . . .5-32 Procedure . . . . . . . . . . . .
Refitting the Connector Board . . . . . . . . . . . . . . . . . . . . . . . . . . . . .6-11 Refitting the Speaker . . . . . . . . . . . . . . . . . . . . . . . . . . . . . . . . . . . .6-11 Refitting the Power Supply . . . . . . . . . . . . . . . . . . . . . . . . . . . . . . . .6-11 Refitting the Wireless Assembly . . . . . . . . . . . . . . . . . . . . . . . . . . .6-12 Refitting the Chassis . . . . . . . . . . . . . . . . . . . . . . . . . . . . . . . . . . . . .6-12 Refitting the Battery . . . . . . . .
1 Introduction to the Instrument Objectives In order to meet this chapter’s goals, you should become familiar with the Instrument and be able to identify the Instrument’s parts in some detail. As well, you should be able to explain how the Measurement Server and Measurement Server Extensions acquire and process physiological measurements and how the Monitor displays the data.
M3000A/M3046AM3015A/M3016A Service Guide Introducing the Instrument Components The M3000A and M3000A #D06 Multi-Measurement Servers, the M3015A and M3016A Multi-Measurement Server Extensions and the M3046A Compact Portable Patient Monitor form a flexible, portable, battery, or line-powered patient Monitor. (Note: The combined devices are referred to as the ,QVWUXPHQW in this manual.
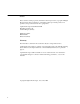
M3000A/M3046A/M3015A/M3016A Service Guide Instrument Components The Monitor, the Measurement Server, and Measurement Server Extensions are shown in the following diagram. Measurement Server (M3000A) Measurement Server Extensions M3016A M3015A Monitor (M3046A) For functional descriptions of these components, see later in this chapter.
M3000A/M3046AM3015A/M3016A Service Guide A Quick Description of the Monitor )URQW 3DQHO .
M3000A/M3046A/M3015A/M3016A Service Guide %DFN RI 0RQLWRU Locking Mechanism for the Measurement Server Connector to the Measurement Server (≤48V) Mounting Plate Protective earth connector point for additional display Catches for attaching the Measurement Server LAN/SoftwareUpdate Connector (≤5V) Connector for an additional display (VGA Interface) (≤3.
M3000A/M3046AM3015A/M3016A Service Guide A Quick Description of the Measurement Server 2YHUYLHZ RI WKH 0 $ 0HDVXUHPHQW 6HUYHU Start/Stop (for NBP) Connector to Monitor or Measurement Server Extension Zero for Press (Stat key for option #D06) Measurement Connectors Alarm Silence/Reset 0 $ 0HDVXUHPHQW &RQQHFWRUV Press Temp SpO2 ECG/Resp Note: Press and Temp cannot be used at the same time.
M3000A/M3046A/M3015A/M3016A Service Guide A Quick Description of the Measurement Server Extension 2YHUYLHZ RI WKH 0HDVXUHPHQW 6HUYHU ([WHQVLRQV 0 $ 0 $ Catches for attaching the Measurement Server Connectors to Monitor & Measurement Server Measurement Connectors 0HDVXUHPHQW &RQQHFWRUV IRU WKH 0 $ 0HDVXUHPHQW 6HUYHU ([WHQVLRQ Press Temp gas inlet Note: Press and Temp cannot be used at the same time on the same part.
M3000A/M3046AM3015A/M3016A Service Guide A Quick Description of the Main Screen Monitor Label QuickSet Time 4XLFN6HW $GXOW 6&+/$&.
M3000A/M3046A/M3015A/M3016A Service Guide Theories of Operation and Functional Descriptions The theories of operation and functional descriptions are presented in three sections: 6HFWLRQ Monitor Description •M3046A Monitor Theory of Operation •Functional Description of the Monitor Hardware 6HFWLRQ M3000A Measurement Server Description and Features •Measurement Server Theory of Operation •Functional Description of the Measurement Server Hardware •Electrocardiogram/Respiration (ECG/Resp) Measurement •
M3000A/M3046AM3015A/M3016A Service Guide Section 1 - Monitor Description The M3046A Patient Monitor is a small size, lightweight monitor with a TouchBar human interface. The monitor has a color display with a wide viewing angle, and excellent visibility from a distance, so that data can easily be recognized. For applications where a larger display is required, an additional display can be connected to the monitor via the standard VGA output.
M3000A/M3046A/M3015A/M3016A Service Guide Monitor Theory of Operation The Monitor receives data passed from the patient through the Measurement Server and, where present, the Measurement Server Extension. The Monitor displays the data in numerics and waves on the screen. The Monitor is prepared with a number of software modules, which communicate with each other as shown in the diagram below.
M3000A/M3046AM3015A/M3016A Service Guide 'LVSOD\ DQG 8VHU ,QWHUIDFH 6RIWZDUH 0RGXOH The Display and User Interface Software displays measurement data and status information on the color LCD display, and processes the operator inputs from the HIF Controller. The interface consists of the following sub-modules: • • • • Screen Configuration. Numerics and Wave Presentation. Key and TouchStrip Processing. Alarm and Status Presentation.
M3000A/M3046A/M3015A/M3016A Service Guide 3ULQWHU 0DQDJHU The printer manager formats and prints the following reports on either a locally attached printer or a remote printer connected to the Instrument via the M3 Print Server: • 7DEXODU 7UHQG 5HSRUW—The printer manager takes raw data from the trend module and generates a formatted report. The user can specify whether to print short-term or long-term trend data, and the period for which the data should be printed.
M3000A/M3046AM3015A/M3016A Service Guide 6XSSRUW 6HUYLFHV The support services software module contains miscellaneous functions that both the Monitor, the Measurement Server and the Measurement Server Extension require. These functions are as follows: • • • • Date and Time. Settings Handler. Status Revision and Display. Heart Rate Selector.
M3000A/M3046A/M3015A/M3016A Service Guide Functional Description of the Monitor Hardware The Monitor receives data from the Measurement Server and Measurement Server Extension via the Server-to-Monitor link bar and presents this data on the color LCD display. The following block diagram shows the main functional areas.
M3000A/M3046AM3015A/M3016A Service Guide The main functional areas are summarized in the following: • 6\VWHP %RDUG²Comprising a 68360 Controller, the Memory System, the Video System, LAN (network) connector link to Server, ECG-Out, Human Interface and DC/DC Converter. • &RQQHFWRU %RDUG²Connecting the System Board to the AC Power Supply and battery. The LAN (network) filter and connector, the VGA connector and the Alarm Relay Output (Nurse Call) are located on the Connector Board.
M3000A/M3046A/M3015A/M3016A Service Guide +XPDQ ,QWHUIDFH &RQWUROOHU The Human Interface Controller (HIF) is the interface between the operator and the Monitor itself. It monitors the operator controls and the Battery Controller, formats the data, and routes it to the Display & Operator Controls Manager from which it receives commands and status also. As well, the HIF controls the features listed below.
M3000A/M3046AM3015A/M3016A Service Guide ,QIUDUHG ,U'$ ,QWHUIDFH The IrDA interface provides a wireless interface to an external printer. This interface functions in the same way as a normal serial interface except that a modulated infrared beam is used to exchange data and status information instead of a wire connection. Both the Monitor and some printers are equipped with infrared transmitter/receiver units.
M3000A/M3046A/M3015A/M3016A Service Guide Section 2 - Measurement Server Description and Features The Measurement Server is a highly flexible patient measurement unit, which is the base for a variety of systems that enable easy customization to a hospital’s requirements. It provides a subset of the most important patient measurements in a convenient, single part. The Measurement Server is designed to Monitor patients in most critical and acute patient care areas of the hospital.
M3000A/M3046AM3015A/M3016A Service Guide $ODUPV 5HVHW The Silence/Reset key on the Measurement Server allows you to silence alarm tones, while retaining visual alarm messages (depending on your Monitor’s configuration). 6HUYHU WR 0RQLWRU /LQN %DU A single connector (sometimes referred to as the 6HUYHU WR 0RQLWRU connector or link bar) allows quick and easy connection to a Monitor. This allows the Monitor to show waves and alarms from the Measurement Server.
M3000A/M3046A/M3015A/M3016A Service Guide Measurement Server Theory of Operation The Measurement Server is prepared with software divided into four major conceptual layers. The Measurement Server software communicates with the Monitor via a normal local area network (LAN) link. The four conceptual layers of the Server software are divided as follows: • 7KH )LUVW /D\HU—This consists of the operating system which passes messages between the various major sections of the software.
M3000A/M3046AM3015A/M3016A Service Guide Functional Description of the Measurement Server Hardware The Server receives information signals (such as ECG, etc.) from the patient, performs some data processing, then transmits the data to the Monitor via the Server-to-Monitor link bar. The following block diagram shows the main functional components of the Measurement Server.
M3000A/M3046A/M3015A/M3016A Service Guide Electrocardiogram/Respiration (ECG/Resp) Measurement 'HVFULSWLRQ The Measurement Server has a three-channel electrocardiogram and respiration measurement. It is designed to be used with adult, neonatal, or pediatric patients in ICU and OR environments. 0HDVXUHPHQWV The ECG/Resp measurement produces continuous real-time waves for both cardiac and pulmonary activity.
M3000A/M3046AM3015A/M3016A Service Guide 6DIHW\ To ensure the safety of the patient, the patient-applied parts are isolated from ground by optical isolators and a transformer. The circuit is also encapsulated in plastic.
M3000A/M3046A/M3015A/M3016A Service Guide ([FLWDWLRQ &XUUHQW 6RXUFH The excitation current source feeds a small current into the right arm and left leg electrodes. This results in a voltage drop between the right arm and left leg which is proportional to the thorax impedance. %ULGJH $PSOLILHU The bridge subtracts an offset from the voltage between right arm and left leg. The amplifier amplifies the remaining signal.
M3000A/M3046AM3015A/M3016A Service Guide Non-invasive Blood Pressure (NBP) Measurement 'HVFULSWLRQ The Measurement Server has a non-invasive blood pressure measurement for the Monitor monitoring device. It is designed to be used with adult, paediatric, or neonatal patients, in ICU and OR environments. 0HDVXUHPHQWV The measurement produces numerics for the systolic, diastolic, and mean blood pressure values. No wave is associated with this measurement.
M3000A/M3046A/M3015A/M3016A Service Guide 1%3 0RGHV The measurement offers adult, pediatric, and neonatal modes. The following table lists the cuff inflation limits for each mode. 0RGH )LUVW ,QIODWLRQ 6XEVHTXHQW ,QIODWLRQV $ERYH 6\VWROLF 3UHVVXUH 6WDW 0RGH Adult 165 25 15 Pediatric 130 20 15 Neonatal 100 15 15 The following table lists the measurement ranges for each mode.
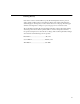
M3000A/M3046AM3015A/M3016A Service Guide %ORFN 'LDJUDP IRU 1%3 U H O O R U W Q R F R U F L $ ' $ ' $6,& 0 3 3 0 $ 0 $ ( 5 3 ( 5 3 ( 5 8 6 6 ( 5 3 3 0 8 3 ( 5 8 6 6 ( 5 3 5 2 6 1 ( 6 ) ) 8 & 1-28 Introduction to the Instrument ( 5 8 6 6 ( 5 3 5 2 6 1 ( 6 1 2 , 7 $ / ) ( ' 0 ( 7 6 < 6
M3000A/M3046A/M3015A/M3016A Service Guide &RPSRQHQWV The following components carry out the major signal processing functions within the measurement. 3UHVVXUH 3XPS—Inflates the cuff to preset limits, once or repeatedly, depending on the measurement method used. 3UHVVXUH 6HQVRU—Measures cuff pressure using solid-state technology. 2YHUSUHVVXUH 6DIHW\ 6\VWHP²Triggers alerts at given pressures and time limits, and deflates the cuff.
M3000A/M3046AM3015A/M3016A Service Guide Arterial Oxygen Saturation and Pleth (SpO2/PLETH) Measurement 'HVFULSWLRQ The Measurement Server has a pulse, arterial oxygen saturation, and plethysmogram measurement. 0HDVXUHPHQWV The measurement produces numerics for the arterial oxygen saturation value and the pulse rate, along with a real-time wave for the plethysmogram. 6S2 3/(7+ )HDWXUHV This illustration shows the user controls and connector for the SpO2/PLETH.
M3000A/M3046A/M3015A/M3016A Service Guide This illustration contains an example of a typical wave in SpO2.
M3000A/M3046AM3015A/M3016A Service Guide %DQGSDVV The bandpass stage contains a bandpass filter for the modulated signals coming in from the photo-amplifier. This filters out noise outside a passband centred on the modulation frequency. 9DULDEOH *DLQ This section amplifies the incoming signals. The gain is set by a digital to analog converter (DAC) which allows 512 gain settings. $QDORJ WR 'LJLWDO &RQYHUWHU $'& This is a 12-bit converter. Oversampling is used to get the required resolution.
M3000A/M3046A/M3015A/M3016A Service Guide the SpO2 and Pulse numeric values. The SpO2 algorithm also detects non-pulsatile or noisy signals, and generates the appropriate INOPs. The wave is communicated to the Monitor (via the operating system), the SpO2 and pulse rate are communicated to the average calculation software, and INOPs are communicated to the alarming software.
M3000A/M3046AM3015A/M3016A Service Guide Temperature and Invasive Blood Pressure (Temp/Press) measurement 'HVFULSWLRQ The Measurement Server has a measurement channel which can measure invasive pressure RU temperature. 0HDVXUHPHQWV The measurement produces a numeric for temperature; or a real-time pressure wave, together with the pulse rate and numeric readings for the systolic, diastolic, and mean blood pressure values.
M3000A/M3046A/M3015A/M3016A Service Guide 6DIHW\ To ensure the safety of the patient, the patient-applied part is isolated from ground by optocouplers and a transformer. The circuit is also encapsulated in plastic. %ORFN 'LDJUDP 7R DQG IURP SUHVVXUH WUDQVGXFHU This illustration shows the block diagram of the Temp/Press circuit.
M3000A/M3046AM3015A/M3016A Service Guide &XUUHQW 6RXUFH The current source generates a constant current for the resistor array that is used to measure the temperature. 5HVLVWRU $UUD\ The constant current is fed through four resistors in series: A test resistor, the externally connected temperature probe, a gain calibration resistor, and an offset resistor. The voltage drop across each resistor is sequentially measured and digitized.
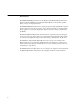
M3000A/M3046A/M3015A/M3016A Service Guide 7R DQG IURP SUHVVXUH &38 Pressure / Temperature Mode Detector ADC Controller & Data Acquisition Wave Processing & Filtering System CPU Communication 7R DQG IURP 3UHVVXUH DQG 7HPSHUDWXUH 6RIWZDUH 0RGXOH )URP WUDQVGXFHU GHWHFWLRQ FLUFXLW %ORFN 'LDJUDP RI WKH 7HPS 3UHVV 6RIWZDUH 6\VWHP &38 &RPPXQLFDWLRQ The pressure/temperature measurement section of the CPU contains a serial bi-directional data communication link to the pressure/temperature modules of the sys
M3000A/M3046AM3015A/M3016A Service Guide Each temperature value consists of 16 averaged samples and the test resistor verifies the linearity of the measurement. With an offset resistor all offsets are eliminated. 3UHVVXUH 7HPSHUDWXUH 0RGH 'HWHFWRU The CPU switches between two different A/D converter controls and wave processing algorithms depending on the connected transducer: Pressure or Temperature. To recognize the presence of a pressure transducer, a coding within the transducer is checked.
M3000A/M3046A/M3015A/M3016A Service Guide Section 3 - Measurement Server Extensions Description and Features The Measurement Server Extensions (M3015A and M3016A) are flexible patient measurement units which partner with the Measurement Server to form the base for a variety of systems that enable easy customization to a hospital’s requirements. Extensions, as convenient parts, expand on the important patient measurements provided by the Measurement Server.
M3000A/M3046AM3015A/M3016A Service Guide (such as alarm limits) are stored in the Measurement Server. This behaviour permits fast and easy transport $ODUPV 5HVHW The Measurement Server Extension responds to the Silence/Reset key on the Measurement Server which allows you to silence alarm tones, while retaining visual alarm messages (depending on your Monitor’s configuration).
M3000A/M3046A/M3015A/M3016A Service Guide M3015A Measurement Server Extension Theory of Operation The application-specific software for the second pressure/temp and CO2 runs on the main CPU in the Measurement Server (see “Measurement Server Theory of Operation” on page 1-21). The pressure/temperature and the CO2 frontends communicate the pre-processed physiological data via the Frontend Link Protocol to the application-specific software on the main CPU of the Measurement Server.
M3000A/M3046AM3015A/M3016A Service Guide +DUGZDUH %ORFN 'LDJUDP 36 - 60 Volt Power Sync RxD/TxD FEL Addresses } SRL Connector to Measurement Server Microstream CO2 BOARD Gas Inlet Gas Outlet +15V 36-60V 28Vpp +/-2% +5V Power Supply Isoblock Optocoupler and Power transformer MUX PRESS/ TEMP Pressure or Temperature Transducer 0DLQ )XQFWLRQDO $UHDV • Microstream CO2 Board - consisting of an 80C552 Controller, the memory system (Flash ROM, RAM, PLA, etc.
M3000A/M3046A/M3015A/M3016A Service Guide Sidestream CO2 Measurement 'HVFULSWLRQ The M3015A Measurement Server Extension has a sidestream carbon dioxide respiratory gas measurement for the Monitor monitoring device. It is designed to be used with the M3000A Measurement Server for adult, pediatric, or neonatal patients, in a hospital environment and during patient transport in and outside hospitals by clinical users. The patients can be intubated or non-intubated.
M3000A/M3046AM3015A/M3016A Service Guide 6LGHVWUHDP &2 )HDWXUHV This illustration shows the user controls on the Server and the connector for appropriate tubing for the sidestream CO2 measurement on the Extension. Connector for sidestream CO2 tubing. 6LGHVWUHDP &2 :DYH The two calibration marks are located at 10% and 60% of wave channel height. The lower calibration mark is labeled 0 mmHg (0.0 kPa) on all scales.
M3000A/M3046A/M3015A/M3016A Service Guide • • • 2II—The ETCO2 and IMCO2 numerics display the breath-to-breath value. VHFRQGV—The ETCO2 and IMCO2 numerics display the highes/lowest value within a moving window over a 10-second period. VHFRQGV—The ETCO2 and IMCO2 numerics display the highest/lowest value within a moving window over a 20-second period.
M3000A/M3046AM3015A/M3016A Service Guide %ORFN 'LDJUDP RI WKH 6LGHVWUHDP &2 PHDVXUHPHQW WR IURP 6HUYHU &RQWUROOHU DQG 3HULSKHUDOV 6HULDO LQWHUIDFH ZLWK )(/3 $QDORJ 6HFWLRQ 3UHVVXUH 6HQVRU ([FLWHU ,5 6RXUFH *DV 2XWOHW 'HWHFWRUV DQG 7HPS 6HQVRU )ORZ 6\VWHP 3XPS VROHQRLG WXELQJ *DV ,QOHW ZLWK 2SWLFDO &RGH 5HFRJ QLWLRQ 6DPSOH /LQH ,QOHW 7KHRU\ RI 2SHUDWLRQ IRU 0 $ VLGHVWUHDP &2 Sidestream CO2 is measured based on non-dispersive infrared absorption of breathing gas samples.
M3000A/M3046A/M3015A/M3016A Service Guide 3UHVVXUH 6HQVRU The pressure sensor is used to measure the ambient pressure during the auto zero process and to measure the pressure in the measurement cell during measurement mode. $QDORJ 6HFWLRQ The analog section amplifies and digitizes the main, reference, pressure and temperature signals.
M3000A/M3046AM3015A/M3016A Service Guide M3016A Measurement Server Extension Theory of Operation The application-specific software for the second pressure/temp and CO2 runs on the main CPU in the Measurement Server (see “Measurement Server Theory of Operation” on page 1-21). The pressure/temperature and the CO2 frontends communicate the pre-processed physiological data via the Frontend Link Protocol to the application-specific software on the main CPU of the Measurement Server.
M3000A/M3046A/M3015A/M3016A Service Guide Functional Description of the M3016A Measurement Server Extension Hardware The Extension receives information signals (such as Temp/Press and mainstream CO2) from the patient then transmits the data through the Server to the Monitor via the Server-toMonitor link bar. See the Functional Description of the Measurement Server Hardware earlier in this chapter for a description of the normal processing of measurement data.
M3000A/M3046AM3015A/M3016A Service Guide +DUGZDUH %ORFN 'LDJUDP 36 - 60 Volt Power Sync RxD/TxD FEL Addresses } Opto-coupler and Power Transformer Mainstream CO2 SRL Connector to Measurement Server CO2 Transducer Floating/Non-floating isolation 36-60V 28Vpp +/-2% Power Supply Isoblock Optocoupler and Power transformer MUX PRESS/ TEMP Pressure or Temperature Transducer 0DLQ )XQFWLRQDO $UHDV • Front-End Board - consisting of the CO2Front-End, PRESS/TEMP Front-End and the Floating/Non-floating
M3000A/M3046A/M3015A/M3016A Service Guide Mainstream CO2 Measurement 'HVFULSWLRQ The M3016A Measurement Server Extension has a mainstream carbon dioxide respiratory gas measurement for the Monitor monitoring device. It is designed to be used with the M3000A Measurement Server for adult, pediatric, or neonatal patients, in a hospital environment and during patient transport in and outside hospitals by clinical users.
M3000A/M3046AM3015A/M3016A Service Guide 0DLQVWUHDP &2 )HDWXUHV This illustration shows the user controls on the Server and the connector for the mainstream CO2 measurement transducer on the Extension. The parts are described in the paragraphs following the illustration. Connector for a mainstream CO2 transducer.
M3000A/M3046A/M3015A/M3016A Service Guide 0DLQVWUHDP &2 :DYH The two calibration marks are located at 10% and 60% of wave channel height. The lower calibration mark is labeled 0 mmHg (0.0 kPa) on all scales. The upper one is adjustable from 20 mmHg (2kPa) to 100 mmHg (13 kPa) in steps of 10 mmHg (1kPa). Calibration Marks Wave Range &2 0HDVXUHPHQW 0RGH In the measurement mode, the Extension continuously measures CO2 concentration and calculates medical parameters.
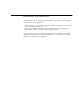
GAS CO INPUT DUAL SL0PE A/D OPTOCOUPLER MICRO AMPLIFIER PROCESSOR IR DETECTOR AZ PULSE MONOFLOP BIAS REGULATION DRIVE COIL MOTOR DRIVE SENSE COIL MOTOR PHASE COMPARATOR POSITION PULSE AMPLIFIER Temp SENSOR AMPLIFIER A/D HEATER CONTROL HEATER COUNTERS M3000A/M3046AM3015A/M3016A Service Guide EEPROM %ORFN 'LDJUDP RI WKH 0DLQVWUHDP &2 PHDVXUHPHQW 1-54 Introduction to the Instrument IR SOURCE ( / 8 ' 2 0 2 & $ 0 5 ( & 8 ' 6 1 $ 5 7
M3000A/M3046A/M3015A/M3016A Service Guide 7KHRU\ RI 2SHUDWLRQ IRU WKH 0 $ 0DLQVWUHDP &2 The signals progress through the circuit as follows: 0LFURSURFHVVRU This is in overall control of the mainstream CO2 measurement functions. As well, it performs the following functions: • Serial communication, via optocouplers. • Calculation of the calibration constants. • Calculation of the raw data of the mainstream CO2 waveform.
M3000A/M3046AM3015A/M3016A Service Guide 1-56 Introduction to the Instrument
M3000A/M3046A/M3015A/M3016A Service Guide Tutorial for the Introduction to the Instrument Question 1: Which is the complete list of what the M3000A Measurement Server measure? a. b. c. The M3000A Multi-Measurement Server acquires the physiological signals ECG, respiration, invasive and non-invasive blood pressure, oxygen saturation of the blood, and temperature.
M3000A/M3046AM3015A/M3016A Service Guide Answers to the Tutorial for the Introduction to the Instrument 1) a. (See page 1-2 for more details.) 2) b. (See page 1-13 for more details.) 3) c. (See page 1-21 for more details.
2 Installing the Instrument Objectives In order to meet this chapter’s goals, you should be able to complete the installation of the Monitor with a Server and an Extension including all of the following tasks: • • • • • Install the Instrument. Configure the hardware. Perform post-installation checks. Connect a printer. Comply with safety requirements. As well, you should be able to perform site preparation and assemble any of the following mounting options: • • • • • • • Table Mount.
M3000A/M3046A/M3015A/M3016A Service Guide Warnings, Cautions, and Safety Precautions 3DWLHQW 6DIHW\ To better secure patient safety, become familiar with the details of the “Monitor and Measurement Server Specifications” chapter of the User’s Guide. 3DWLHQW /HDNDJH &XUUHQW The patient leakage current is less than 10µA at 230V/50Hz. The equipment has floating inputs (Type CF) that are protected against the effects of defibrillation and electrosurgery.
M3000A/M3046A/M3015A/M3016A Service Guide :$51,1* 'LVFRQQHFW WKH 0RQLWRU IURP WKH $& VRXUFH E\ XQSOXJJLQJ WKH SRZHU FDEOH IURP WKH $& VRXUFH UHFHSWDFOH RU IURP WKH $& SRZHU FRQQHFWRU DW WKH VLGH RI WKH 0RQLWRU 7KH 2Q 2II 6WDQGE\ EXWWRQ GRHV QRW GLVFRQQHFW WKH 0RQLWRU IURP WKH $& PDLQV VXSSO\ :$51,1* 'R QRW RSHUDWH WKH 0 $ 0RQLWRU RQ D ZLUH $& VXSSO\ Connect the grounding wire to the equipotential grounding post on the Monitor.
M3000A/M3046A/M3015A/M3016A Service Guide (QYLURQPHQW To ensure a completely safe electrical installation, follow the instructions described later in “Installing the Monitor”. The environment where the system will be used should be reasonably free from vibration, dust, corrosive or explosive gases, extremes of temperature, humidity, and so on. Allow at least 2 inches (5cm) clearance around the Instrument for proper air circulation.
M3000A/M3046A/M3015A/M3016A Service Guide ([SODQDWLRQ RI V\PEROV XVHG Standby for switching the Monitor on and off. Attention, consult accompanying documents. Infra-red Connector for connection to a printer. On the Measurement Server - Defib Data In, that is the ECG marker pulse sent from the defibrillator to the Monitor. The marker pulse is then processed with the ECG signal and displayed on the Monitor.
M3000A/M3046A/M3015A/M3016A Service Guide SN: XXXXXXXXXX Prod No. M3046A Opt. Radio module inside FCC ID IMKRL2630M Agilent CLASS 1 LASER PRODUCT D-71034 Boeblingen, Germany Made in Germany 5 1999-02 157/ & The printer port uses LED devices for infrared communication with the printer. These LED devices are measured to be AEL Class 1 LED Products per IEC 825-1 and CENELEC EN60825-1 Standards.
M3000A/M3046A/M3015A/M3016A Service Guide The box containing your Measurement Server contains only the Measurement Server. The box containing an M3016A Measurement Server Extension contains only the Measurement Server Extension. The box containing an M3015A Measurement Server Extension contains the Measurement Server Extension and the associated accessories. In addition you should receive all of the options and accessories that you have ordered.
M3000A/M3046A/M3015A/M3016A Service Guide 6WHS Enter Config Mode and press the Setup key. 6WHS Select Altitude 6WHS Select the value from the list which is closest to the altitude of the hospital.
M3000A/M3046A/M3015A/M3016A Service Guide Connecting the M3000A Measurement Server... ZLWK WKH 0 $ 0HDVXUHPHQW 6HUYHU GLUHFWO\ RQ WKH 0RQLWRU You can connect the Measurement Server to the Monitor by mounting it directly on the Monitor: 6WHS Make sure that your Monitor has a link bar: Latch Link Bar Plug to Measurement Server If your Monitor does not have a link bar, a. b. c. Position the link bar as shown in the diagram above.
M3000A/M3046A/M3015A/M3016A Service Guide To remove the Measurement Server from the Monitor, move the latch (in the middle at the top of the Monitor) toward the front of the Monitor, and slide the Measurement Server away from the link bar.
M3000A/M3046A/M3015A/M3016A Service Guide ZLWK WKH 0 $ 0HDVXUHPHQW 6HUYHU $WWDFKHG WR DQ 0 $ 0 $ 0HDVXUHPHQW 6HUYHU ([WHQVLRQ The Measurement Server can be used in conjunction with a Measurement Server Extension.When the Measurement Server is used together with a Measurement Server Extension, CO2, a second temperature (TEMP) and/or a second invasive pressure (PRESS) may be measured. An M3015A/M3016A Measurement Server Extension PXVW be used with an M3000A Measurement Server.
M3000A/M3046A/M3015A/M3016A Service Guide Attaching the Measurement Server to a Mount 6WHS Make sure the Measurement Server is oriented correctly relative to the mount (see the picture below). 6WHS Place the Measurement Server on the back mount. If it is not tight against the mount, slip it in the direction of the measurement connectors until it is. 6WHS Slip the Measurement Server forward until it clicks into place.
M3000A/M3046A/M3015A/M3016A Service Guide 6WHS Press and hold the mount latch toward the clamp screw. Mount Latch Rotate the Measurement Server and mount until you get it to the position you want. 6WHS Release the mount latch, and make sure it is clicked into one of the four slots on the back of the mount. Connecting to the Nurse Call Relay The nurse call relay is a 3.5mm, mono phone jack socket. It is completely isolated from the rest of the circuitry.
M3000A/M3046A/M3015A/M3016A Service Guide Connecting to the ECG Output or Marker Input See the specifications for the ECG Output and for the Marker Input under Interfaces in the Monitor Performance Specifications section of the Specifications chapter of the User’s Guide, and the documentation for the device you are connecting. Configuring the Monitor See the Basic Operation chapter of the User’s Guide as well as the setup sections for each of the measurements for more information on Monitor setup.
M3000A/M3046A/M3015A/M3016A Service Guide Installing an Additional Display An additional display must be installed by an Agilent Technologies service engineer or authorized Service Representative. By the addition of a display, the M3/M4 Monitor becomes a system and must be tested as such after installation. The required tests are described in Chapter 4, “Testing and Inspecting”. There are two displays available from Agilent Technologies which have been tested for use with the Monitor.
M3000A/M3046A/M3015A/M3016A Service Guide ,QVWDOODWLRQ 5HTXLUHPHQWV $FFRUGLQJ WR ,(& a) An Isolation Transformer: To meet the requirements of IEC 601-1-1, an isolation transformer must be used with the display (for example HP M1389A). The power cable connection to the display must be secured so that the transformer cannot be disconnected by hand.
M3000A/M3046A/M3015A/M3016A Service Guide Installing the 12V Adapter The 12V adapter (order number M3080A #C32) is used with a vehicle 12V supply to power an M3/M4 Monitor. The Adapter must be connected to ground or to the vehicle chassis. Detailed instructions can be found in the Instruction sheet delivered with the Adapter (M3080-9011A). After installation, a safety test must be performed as described in Chapter 4, “Testing and Inspecting”.
M3000A/M3046A/M3015A/M3016A Service Guide Connecting a Printer 6HOHFWLQJ D 3ULQWHU If you are printing locally, you can use either of the following accessories: • a DeskJet 400/420, with an infrared-to-parallel converter (JetEyeR Printer wireless infrared connector), which you can order as M3080A Option #H05, or • a LaserJet 6P or 6MP with a built-in infrared interface. You can also use the LaserJet with the JetEye, but then you will also need a Centronics printer extension cable.
M3000A/M3046A/M3015A/M3016A Service Guide b. If any Remote printers are available, there will always be three printers shown irrespective of the actual number of printers connected via the M3 Print Server. The correlation to actual printers on the network is configured at the M3 Print Server.
M3000A/M3046A/M3015A/M3016A Service Guide Installing the Wireless Infrared Printer Connector (M3080A #H02) If the Monitor is to be used within the SDWLHQW YLFLQLW\ when it is connected to a printer, the connection must only be made using the JetEye Printer wireless infrared connector. To use this, you need a Centronics printer extension cable.
M3000A/M3046A/M3015A/M3016A Service Guide Connecting a Local Printer :$51,1* 7KH SULQWHU DQG DQ\ RWKHU QRQ PHGLFDO HTXLSPHQW VXFK DV WKH LQIUDUHG WR SDUDOOHO FRQYHUWHU DUH QRW DOORZHG WR EH XVHG ZLWKLQ WKH SDWLHQW YLFLQLW\ P IW If you are using an infrared to parallel converter, do the following: 6WHS Connect the parallel port to the printer.
M3000A/M3046A/M3015A/M3016A Service Guide Site Preparation Guidelines Although the Instrument (Monitor and Measurement Server or, where present, Measurement Server Extension) is primarily a portable Monitor, some site preparation must be done before using it in certain locations. Additionally, good operating practices are also recommended. • Check that the operating environment is reasonably free from dust, vibration, corrosive or explosive gases and is within specified temperature and humidity ranges.
M3000A/M3046A/M3015A/M3016A Service Guide Installing the Universal Bed Hanger (M3080A #A11) The hanging mount is used for hanging the Monitor on the bed footboard/headboard or a rail. It is delivered ready-to-use and does not require installing. Slider 6WHS Unpack the Bed Hanger and check all parts are available. 6WHS Rotate the arms to their open position. 6WHS Hang the hanger on the rail (or as appropriate).
M3000A/M3046A/M3015A/M3016A Service Guide installed using steel or plywood plates sufficient to distribute the load over a large section of the wall. /HDG H[SDQVLRQ EROWV DUH QHLWKHU DGHTXDWH QRU VDIH IRU WKLV SXUSRVH • It is the responsibility of the hospital, institution, or its designated representatives to determine that the wall is adequate to safely mount monitoring instrumentation. This includes the selection of and proper installation of the appropriate fasteners and mounts.
M3000A/M3046A/M3015A/M3016A Service Guide 6WHS Insert the 3 screws through the screw holes provided in the plate. 6WHS Tighten the screws. 6WHS Hang the bed hanger over the wall rail.
M3000A/M3046A/M3015A/M3016A Service Guide Installing the Tilt/Swivel Mount (M3080A #A14) The Tilt/Swivel mount can be used in the following situations: • Screwed directly to a wall. • Mounted to the GCX Wall Channel #A15 (described in the following section). • Attached to the Universal Pole Clamp. • Attached directly to the Monitor. 6FUHZHG 'LUHFWO\ WR D :DOO This option is used to mount the Monitor on a wall but to also provide tilt and swivel capability.
M3000A/M3046A/M3015A/M3016A Service Guide 0RXQWHG WR WKH *&; :DOO &KDQQHO This option is used to mount the Monitor to a GCX Wall Channel but to also provide tilt and swivel capability. Rail 6WHS Unpack the Tilt/Swivel mount and check all parts are available. 6WHS Make sure the wall channel end-stop has been fitted. 6WHS Secure the rail to the Tilt/Swivel mount with the 2 screws provided. 6WHS Slide the adapter plate down the wall channel.
M3000A/M3046A/M3015A/M3016A Service Guide $WWDFKHG WR D 8QLYHUVDO 3ROH &ODPS This option is used to attach the Tilt/Swivel mount to a Universal Pole clamp. The Monitor can then be mounted on a pole or rail and can provide tilt and swivel capability. Rail 6WHS Unpack the Tilt/Swivel mount and check all parts are available. 6WHS Remove the adapter plate (this is only necessary for the GCX Wall Channel). 6WHS Secure the rail to the Tilt/Swivel mount with the 2 screws provided.
M3000A/M3046A/M3015A/M3016A Service Guide $WWDFKHG WR WKH 0RQLWRU This option is used to attach the Tilt/Swivel mount directly to the rear of the Monitor. The Monitor can then be mounted on the GCX Wall Channel or can be used together with the Universal Pole Clamp. 6WHS Unpack the Tilt/Swivel mount and check all parts are available. 6WHS Secure the tilt/swivel mounting to the Monitor rear panel with the 2 screws provided. 6WHS Tighten the screws.
M3000A/M3046A/M3015A/M3016A Service Guide Installing the Universal Pole Clamp (M3080A #C05) This option is used to mount the Monitor on a pole or rail. 6WHS Unpack the clamp and check all parts are available. 6WHS Decide whether the clamp is to be secured for vertical positioning (on a pole) or for horizontal positioning (on a rail). The rear of the Monitor is provided with 4 screw holes to cover both positioning possibilities. 6WHS Secure the clamp to the Monitor with the 2 screws provided.
M3000A/M3046A/M3015A/M3016A Service Guide Installing the Measurement Server Mounting Options To allow the Measurement Server to be mounted remotely from the Monitor, special mounting plates are available. One plate can be used to mount the Server to a wall or other fixture. The second type can be used for vertical or horizontal mounting on a pole or rail. 6HUYHU 0RXQWLQJ 3ODWH 0 $ $ This option includes a pack of 5 mounting plates. To mount the plate securely, you need 2 screws per plate.
M3000A/M3046A/M3015A/M3016A Service Guide 6HUYHU 0RXQWLQJ 3ODWH 0 $ $ This option is used for mounting the Server on a rail or pole. The rotatable clamp gives 4 fixed positions. It is delivered ready-to-use and does not require installing. Latch Lever 6WHS Unpack the assembly and check all parts are available. 6WHS Secure the clamp to a pole or rail. The Server snap-fits onto the plate.
M3000A/M3046A/M3015A/M3016A Service Guide Disposing of the Monitor, Measurement Server and Measurement Server Extensions :$51,1* 7R DYRLG FRQWDPLQDWLQJ RU LQIHFWLQJ SHUVRQQHO WKH VHUYLFH HQYLURQPHQW RU RWKHU HTXLSPHQW PDNH VXUH WKH HTXLSPHQW KDV EHHQ DSSURSULDWHO\ GLVLQIHFWHG DQG GHFRQWDPLQDWHG EHIRUH GLVSRVDO The battery can be easily removed (see "Maintaining the Instrument" as well as the Using Your Monitor in Patient Transport chapter in the User’s Guide for information on using batteries), and c
M3000A/M3046A/M3015A/M3016A Service Guide 2-34 Installing the Instrument
M3000A/M3046A/M3015A/M3016A Service Guide Tutorial for Installing the Instrument Question 1: For patient safety, where and how should monitoring equipment be mounted? a. b. c. d. Do not mount any portion of monitoring equipment over a patient’s bed. Lead expansion bolts are neither adequate nor safe to use when mounting equipment on plaster board walls. It is important not to remove the channel safety stop on the GCX Wall Channel while the mount is supporting monitoring equipment.
M3000A/M3046A/M3015A/M3016A Service Guide Answers to the Tutorial for Installing the Instrument 1) b. (See page 2-23 for more details.) 2) e. (See entire chapter for more details.) 3) b. (See page 2-3 for more details.
3 Maintaining the Instrument Objectives In order to meet this chapter’s objectives, you should be able to perform light maintenance and preventive maintenance for the Monitor, the Measurement Server and, where present, the Measurement Server Extension through the following tasks: • • • • Inspection of the Instrument. Cleaning of the Instrument. Replacement of Preventive Maintenance Parts Battery Handling, Maintenance, and Good Practices.
M3000A/M3046A/M3015A/M3016A Service Guide Recommendations for Maintenance Frequency The maintenance checklist appears in the next section of this chapter. The listed procedures should be performed as indicated in the Suggested Maintenance Timetable below. The checklist may be photocopied and should be completed by the maintainer. It should be filed for future reference. The owner of the equipment is responsible for the performance of the maintenance activities in line with the schedule below.
M3000A/M3046A/M3015A/M3016A Service Guide Maintenance Checklist Check Here See Page Topics in this Chapter 333,QVSHFWLQJ WKH ,QVWUXPHQW 333Inspect Cables, Cords and Housing 3-4 3UHYHQWLYH 0DLQWHQDQFH 7DVNV Replacing the Backlight Tube Assembly 3-5 M3000A NBP Calibration and Performance tests M3015A • Replacement of the Infrared Lamp 3-7 • Replacement of the Pump and CO2 Scrubber 3-7 • Sidestream CO2 Performance Test 4-12 *HQHUDO &OHDQLQJ RI WKH ,QVWUXPHQW Cleaning Guidelines 3-8 %DWWHU\ +
M3000A/M3046A/M3015A/M3016A Service Guide Inspecting the Instrument 6WHS Examine the exterior of the Measurement Server, if present, the Measurement Server Extension, and the Monitor for cleanliness and general physical condition. Ensure that plastic housings are intact, that all hardware is present and tightly-fitted, and that there are no spilled liquids or other serious abuse. 6WHS Inspect Server-to-Monitor link for cleanliness and good condition.
M3000A/M3046A/M3015A/M3016A Service Guide Preventive Maintenance Tasks 0 $ Preventive maintenance for the Monitor comprises the following activities: • Perform visual inspection (see“Inspecting the Instrument” on page 4) • Replace the Backlight Tube Assembly (if required). 5HSODFLQJ WKH %DFNOLJKW 7XEH $VVHPEO\ The intensity of the fluorescent tube used for backlight illumination of the LCD Display gradually decreases over time. As a result, periodic replacement is necessary.
M3000A/M3046A/M3015A/M3016A Service Guide VHUYLFH SURFHGXUHV DUH QRW SRVVLEOH DQG WU\LQJ WR VWDUW WKHP ZLOO UHVXOW LQ D PHVVDJH ³6HUYLFH 2SHUDWLRQ )DLOHG´ LQ WKH VWDWXV OLQH RQ WKH 0RQLWRU :DLW XQWLO WKH 0RQLWRU KDV FRPSOHWHG WKH FXUUHQW RSHUDWLRQ WKHQ UHVWDUW WKH VHUYLFH SURFHGXUH Preventive maintenance comprises of the following activities: • Perform visual inspection (see “Inspecting the Instrument” on page 3-4) • Check the operating time for the IR lamp (IR SourceTime), pump and CO2 scrubbers (Pu
M3000A/M3046A/M3015A/M3016A Service Guide • IR lamp (M3015-XXXXX) • Pump assembly and CO2 scrubber (M3015-29303) 5HSODFHPHQW RI WKH 3XPS DQG &2 6FUXEEHU The procedure for replacing the Pump and CO2 Scrubber is found in "Repairing the Instrument". The effectiveness of the Pump and the CO2 Scrubber gradually decreases over time. As a result, periodic replacement is necessary. Agilent Technologies recommends replacement as follows: • After 15,000 to 20,000 hours of use, max.
M3000A/M3046A/M3015A/M3016A Service Guide mended that you replace the Pump and the CO2 Scrubber at the same time. After fitting the new part(s), go to Service Mode and reset the appropriate counters. The procedure for resetting the counters is found in "Repairing the Instrument". General Cleaning of the Instrument The Monitor, the Measurement Server, and the Measurement Server Extension should be kept free of dust and dirt.
M3000A/M3046A/M3015A/M3016A Service Guide &OHDQLQJ $JHQWV Any solution categorized under the following generic products, apart from those listed in the cautionary guidelines above, can be used as a cleaning agent: • • • • • • Dilute ammonia Dilute formaldehyde 35-37%. Hydrogen peroxide (3%). Ethyl alcohol. Isopropyl alcohol. Dilute sodium hypochlorite (laundry bleach).
M3000A/M3046A/M3015A/M3016A Service Guide Battery Handling, Maintenance and Good Practices This section provides some information on how to handle and maintain the battery in order to get the best usage from it. Additionally, some good working practices are also given regarding the correct disposal of the battery. $ERXW WKH %DWWHU\ The rechargeable battery used in the Monitor is regarded as a 6PDUW battery because it has built-in circuitry.
M3000A/M3046A/M3015A/M3016A Service Guide • INOP messages. The AC Power LED is only on when the power cord is connected and AC power is available to the Monitor. In this case, the battery can be either charging or fully charged.
M3000A/M3046A/M3015A/M3016A Service Guide The battery LED can be green, yellow, or red depending on the following conditions: $& SRZHU = 5 minutes of operation left) battery empty no battery battery malfunction 1R on or off on off green off off yellow not applicable not applicable 1.5 red flashes per sec. not applicable off yellow red flash if On-Off / Standby is pressed.
M3000A/M3046A/M3015A/M3016A Service Guide &KDUJLQJ WKH %DWWHU\ Battery charging should be done in stable temperature conditions within the range 0... 35oC in order to ensure correct and full loading of the battery. Battery status is displayed in the bottom right corner of the resting display. The inner white bar shows the charge status of the battery. The bigger the bar, the more charge there is in the battery: almost full almost empty If the battery is empty, the inner bar is gray.
M3000A/M3046A/M3015A/M3016A Service Guide &RQGLWLRQLQJ D %DWWHU\ Batteries must be conditioned under the following circumstances: • When indicated by the Battery Status. • After approximately 50 charge/discharge cycles. • The Battery Status window indicates an actual charge level that is 20% below the designed charged level. :$51,1* %DWWHU\ FRQGLWLRQLQJ PXVW QRW EH GRQH GXULQJ PRQLWRULQJ RI D SDWLHQW 7R FRQGLWLRQ WKH EDWWHU\ 6WHS Make sure the Monitor is switched off.
M3000A/M3046A/M3015A/M3016A Service Guide %DWWHU\ ,123 0HVVDJHV The following battery-related INOP messages are issued by the Monitor. All INOPs continue until the Monitor is plugged into the AC power or the INOP condition is fixed. BATTERY LOW—This is a hard INOP which indicates that the remaining battery-operating time is less than approximately 20 minutes.
M3000A/M3046A/M3015A/M3016A Service Guide 3-16 Maintaining the Instrument
M3000A/M3046A/M3015A/M3016A Service Guide Tutorial for Maintaining the Instrument Question 1: What is battery conditioning and how often must it be performed? a. b. c. Conditioning a battery refers to the complete discharge of a charged battery by allowing it to die out while in non-critical use. The empty battery may then be recharged and put back into use. The battery used in the Instrument cannot be conditioned. Discard it after use.
M3000A/M3046A/M3015A/M3016A Service Guide Answers to the Tutorial for Maintaining the Instrument 1) c. (See pages 3-1 and 3-10 for more details.) 2) d. (See page 3-4 for more details.) 3) a.(See pages 3-8 and 3-9 for more details.
4 Testing the Instrument Objectives In order to meet this chapter’s objectives, you should be able to test the Monitor, the Measurement Server and, where present, the Measurement Server Extension through the following types of tests: • Performance Assurance Checks and Tests. • Accuracy, Calibration and Performance Procedures. • Patient Safety Checks. This chapter provides a checklist of testing procedures for the Measurement Server, the Measurement Server Extensions and the Monitor.
M3000A/M3046AM3015A/M3016A Service Guide Test Reporting The following table shows what must be recorded on the Service Record after completing the tests in this chapter.
M3000A/M3046AM3015A/M3016A Service Guide Recommendations for Test Frequency The testing checklist appears in the next section of this chapter. The listed procedures should be performed as indicated in the Suggested Testing Timetable below. The checklist may be photocopied and should be completed by the tester. It should be filed for future reference.
M3000A/M3046AM3015A/M3016A Service Guide Test Map The test map shows which tests are required in which situations. Service Event (When performing ...) Test Blocks Required ......
M3000A/M3046AM3015A/M3016A Service Guide Testing Checklist Check Here Topics in this Chapter See Page )XQFWLRQDOLW\ $VVXUDQFH 7HVWV Performance Assurance Test 4-7 Quick System Check 4-7 System Self-Test 4-8 3UHYHQWLYH 0DLQWHQDQFH 7HVWV NBP Accuracy, Leakage, Linearity and Valve Test 4-10 Sidestream CO2 Performance Test 4-12 $FFXUDF\ DQG 3HUIRUPDQFH 3URFHGXUHV Temperature Accuracy 4-19 ECG/Resp Performance 4-19 Invasive Pressure Performance Test 4-20 SpO2 Performance Test 4-21 Mainstrea
M3000A/M3046AM3015A/M3016A Service Guide Serial Numbers When recording test results, these are always associated with a particular instrument by means of the serial number. The serial numbers for the Monitor and the Measurement Server can be seen in the “Revisions” window (press Setup key then select “Revisions”). However, if a Measurement Server Extension (M3015A or M3016A) is in use, the number will not appear and must be noted down from the back of the Extension.
M3000A/M3046AM3015A/M3016A Service Guide PO:P or PO:F where P=pass, i.e. the monitor boots up displaying no error codes and displays an ECG wave and F=fail Functionality Assurance Tests The following functionality assurance checks are recommended to verify proper operation daily before the Instrument is used to Monitor a patient: Functionality assurance checks fall into two parts: Verification of overall operation by completing the Performance Assurance Test.
M3000A/M3046AM3015A/M3016A Service Guide 7KH 7HVW²Press the 6HWXS button, move the highlight to (&*, and press on the TouchStrip. 7KH 5HVXOW²The ECG window should appear verifying that the System Board and Measurement Server are communicating with each other.
M3000A/M3046AM3015A/M3016A Service Guide 6\VWHP 6HOI 7HVW 9DOXHV 0RGXOH 7HVW 1XPHULF /LPLWV 7HVW :DYHIRUP ECG 100 bpm in ADULT mode 125 bpm in NEO/PEDI mode Simulated squarewave and numeric Resp 15 rpm in ADULT mode 30 rpm in PEDI mode 55 rpm in NEO mode Simulated Resp wave and numeric ECG and ECG/Resp Pressurea Simulated squarewave and numerics Systolic Diastolic SpO2/Pletha 120 mmHg ADULT 60 mmHg PEDI/NEO 0 mmHg ADULT/PEDI/NEO 777 9 100% Wave on display Numeric only Simulated wave Temperat
M3000A/M3046AM3015A/M3016A Service Guide Preventive Maintenance Tests Preventive Maintenance refers specifically to the series of tests required to make sure the Instrument measurement results are accurate. When authorized Agilent Technologies personnel service the Instrument, they will report these results back to Agilent. The collected data forms a database to be used in product development. The measurements requiring these reported tests are NBP and sidestream CO2.
M3000A/M3046AM3015A/M3016A Service Guide 6WHS Select “Close Valves: On” 6WHS Raise the pressure to 280 mmHg with the manometer pump. 6WHS Wait 10 seconds for the measurement to stabilize. 6WHS Compare the manometer values with the displayed values. 6WHS Document the value displayed by the M3046A (x1). 6WHS If the difference between the manometer and displayed values is greater than 3 mmHg, calibrate the Server. If not proceed to the Leakage test.
M3000A/M3046AM3015A/M3016A Service Guide 6WHS After these 10 seconds, compare the manometer value with the displayed value. 6WHS Document the value displayed by the M3046A (x3) 6WHS If the difference is greater than 3 mmHg, calibrate the Server (see steps 10 to 12 in the Accuracy Test procedure). 9DOYH 7HVW 6WHS Raise the pressure again to 280 mmHg. 6WHS Select “Close valves: Off”. 6WHS Wait 5 seconds then document the value displayed. The value should be less than 10 mmHg.
M3000A/M3046AM3015A/M3016A Service Guide This test uses calibration equipment that can be ordered (see "Replacement Parts" for the part number). The procedure is summarised in the following steps. Refer to the documentation accompanying the equipment for detailed instructions. 7RROV 5HTXLUHG • Standard tools, e.g. screwdriver, tweezers • Electronic flowmeter, M1026-60144.
M3000A/M3046AM3015A/M3016A Service Guide Note: the selected value must be within ±10% of the current measured ambient pressure, otherwise an error message will occur at restarting the Monitor. 6WHS Confirm the barometric pressure setting. 6WHS Check that the ambient pressure displayed in the status line at the bottom of the screen is the same as the value which you selected from the list in step 5.
M3000A/M3046AM3015A/M3016A Service Guide accompanied by an audible increase in pump noise. (Do not block the inlet for longer than 25 seconds as this will lead to an “Occlusion” INOP.) If the value is within the tolerance limits, there are no leakages and the leakage check is completed; proceed to the Pump Check. 6WHS If the value is not within the tolerance limits, there is a leakage between the FilterLine inlet and the pump inlet.
M3000A/M3046AM3015A/M3016A Service Guide 1RLVH &KHFN 6WHS Check that the Monitor is in Service Mode and in the CO2 window. 6WHS Disconnect the flowmeter and connect the 5% calibration gas and flow regulator in its place. 6WHS Open the valve to apply the 5% Calibration Gas and wait until the value is stable. 6WHS Check the Noise Index (x6) displayed nect to the CO2 value on the M3046A display (this indicates the level of noise on the CO2 wave).
M3000A/M3046AM3015A/M3016A Service Guide 6WHS Select the value for the calibration gas. (The default value is 5.0%.) 6WHS Open the valve on the calibration gas to allow CO2 gas to flow into the Extension. Allow the value to stabilize before the start of the calibration. Leave the valve open until the instrument gives a prompt that gas can be removed. 6WHS The Extension calibrates and prompts when calibration is successful.
M3000A/M3046AM3015A/M3016A Service Guide 7DEOH 'RFXPHQWLQJ &2 7HVW 5HVXOWV Test Expected Test Results What to record on service record Barometric Pressure Check X1 = difference between the reference pressure and the measured ambient pressure displayed on the M3046A (X1<12 mmHg) Leakage Check parts 1 and 2 X2 = Value of part 1 leakage check on Flowmeter (X2< 4.0 ml/min) X3 = Value of part 2 leakage check on Flowmeter (X3< 4.
M3000A/M3046AM3015A/M3016A Service Guide Accuracy and Performance Procedures The following accuracy, calibration, and performance procedures are designed to be completed to verify the accuracy and performance of the Instrument. They must be performed once every two years and when the Instrument is repaired or when Instrument parts are replaced. 7HPSHUDWXUH $FFXUDF\ This test checks the performance of the temperature parameter. The temperature accuracy test is required once every two years.
M3000A/M3046AM3015A/M3016A Service Guide — Base impedance line 1500 Ohm. — Delta impedance 0.5 Ohm — Respiration rate 40 rpm. 6WHS The value should be 40 rpm +/- 2 rpm. ,QYDVLYH 3UHVVXUH 3HUIRUPDQFH 7HVW This test checks the performance of the invasive pressure parameter. The Invasive Pressure performance test is required once every two years. 7RROV UHTXLUHG Patient Simulator. 6WHS Connect the Patient Simulator to the Pressure connector on the Measurement Server or the Measurement Server Extension.
M3000A/M3046AM3015A/M3016A Service Guide 6S2 3HUIRUPDQFH 7HVW This test checks the performance of the SpO2 parameter. The SpO2 performance test is required once every two years. 7RROV UHTXLUHG none 6WHS Connect an adult SpO2 transducer to the SpO2 connector on the Measurement Server. 6WHS Measure the SpO2 value on your finger (this assumes that you are healthy).
M3000A/M3046AM3015A/M3016A Service Guide 1XUVH &DOO 5HOD\ 3HUIRUPDQFH 7HVW This test checks the operation of the Nurse Call Relay. The Nurse Call Relay test is required once every two years and when the Instrument is repaired or when Instrument parts are replaced. The Nurse Call relay functions as follows: • Standard Operation—Relay open. • Alarm Condition—Relay closed. 7RROV UHTXLUHG Ohmmeter. 6WHS Plug a phono connector into the Nurse Call Relay connector. 6WHS Connect the ohmmeter.
M3000A/M3046AM3015A/M3016A Service Guide Testing the Instrument 4-23
M3000A/M3046AM3015A/M3016A Service Guide Patient Safety Checks :DUQLQJV &DXWLRQV DQG 6DIHW\ 3UHFDXWLRQV • The tests described in the following paragraphs are recommended to be performed DW OHDVW once per year DQG following any installation, major repair or upgrade procedure as a proven means of detecting abnormalities that if undetected could prove dangerous to either the patient or the operator. • All tests can be performed using commercially available 6DIHW\ $QDO\]HU test equipment.
M3000A/M3046AM3015A/M3016A Service Guide 6 3DUW 6\VWHP (QFORVXUH /HDNDJH &XUUHQW 1& QRUPDO FRQGLWLRQ 0HGLFDO HOHFWULFDO V\VWHP ,QVWUXPHQW XQGHU WHVW 6LJQDO SDUWV (**) 6LJQDO SDUWV LQ DQG RU LQ DQG RU RXWSXW RXWSXW / 1 2WKHU 6 ,QVWUXPHQW 6 $SSOLHG SDUW 1 / 6 3( 0' (*) Not present in Class 2. (**) Can be multiple different connections to different equipment at same time.
M3000A/M3046AM3015A/M3016A Service Guide 6 3DUW 6\VWHP (QFORVXUH /HDNDJH FXUUHQW 6LQJOH )DXOW RSHQ HDUWK 0 H G L F D O H O H F W U LF D O V \ V W H P , Q V W U X P H Q W X Q G H U W H V W 6 L J Q D O S D U W V ( ** ) 6 LJ Q D O S D U W V LQ D Q G R U LQ D Q G R U R X W S X W R X W S X W / 1 2 WK H U 6 ,Q V WUX P H Q W 6 $ S S O LH G S D U W 1 / 6 0 ' 3( (** ) C a n b e m u ltip le d iffe re n t c o n n e c tio n s to d iffe re n t e q u ip m e n t a t
M3000A/M3046AM3015A/M3016A Service Guide 6 3URWHFWLYH (DUWK &RQWLQXLW\ ,QVWUXPHQW XQGHU WHVW / 1 1 / 5L $SSOLHG SDUW 3( (*) 2KP 9 (*) +] $ RU ,U ,QVXODWLQJ SDG If equipotential connection present : measure also with yellow/green E.P. conductor connected.
M3000A/M3046AM3015A/M3016A Service Guide 6 3DWLHQW /HDNDJH FXUUHQW 6LQJOH )DXOW &RQGLWLRQ 6 ) & PDLQV RQ DSSOLHG SDUW (*) Not present in Class 2 ,QVWUXPHQW XQGHU WHVW / 1 6 6 $SSOLHG SDUW 1 / (*) 3( 6 0' 6LJQDO SDUW LQ DQG RU RXWSXW ,QVXODWLQJ SDG 6 / 1 6 5 1 / Expected test results: Maximum leakage current, x = 50µA @ 250V (IEC601-1 and UL2601-1) Measures patient leakage current from applied Part to earth caused by external main voltage on applied Part with
M3000A/M3046AM3015A/M3016A Service Guide Tutorial for Testing the Instrument Question 1: According to this chapter, which of these statements correctly identifies the distinction between Preventive Maintenance and Performance Testing? a. b. c. d. Performance testing includes safety testing and checks. It refers to all accuracy and performance tests to be made on the Instrument other than NBP calibration and sidestream CO2 calibration.
M3000A/M3046AM3015A/M3016A Service Guide Answers to the Tutorial for Testing the Instrument 1) d. (See page 4-1 for more details.) 2) a. (See entire chapter for more details.) 3) c. (See page 4-21 for more details.
5 Troubleshooting the Instrument Objectives In order to meet this chapter’s objectives, you should be able to diagnose and isolate hardware failures to the level of the “field replaceable part”. As well, this chapter describes how to troubleshoot problems using error codes and other support functions including: • How to use the Status Log to check for error codes, and other service information. • How to interpret error codes and how to use them to isolate faults.
M3000A/M3046A/M3015A/M3016A Service Guide ,123V DQG (UURU &RGHV 5-2 Troubleshooting the Instrument These are the types of messages that generate and display to inform the user when the Instrument has been unable to perform an operation.
M3000A/M3046A/M3015A/M3016A Service Guide Part 1 Troubleshooting Checklists &KHFNV IRU 2EYLRXV 3UREOHPV When first troubleshooting the Instrument, check for obvious problems by answering basic questions such as the following: Is the power switch turned on? Is the battery adequately charged? If running from mains power supply, is the AC power cord connected to the Instrument and plugged into an AC outlet? Are the Measurement Server and, if present, the Measurement Server Extension inserted co
M3000A/M3046A/M3015A/M3016A Service Guide &KHFNV ZLWK WKH ,QVWUXPHQW 6ZLWFKHG 2Q $& FRQQHFWHG ZLWKRXW %DWWHU\ • AC Power LED is on (green). • After pressing the On-Off/Standby switch, the following sequence occurs: • • • • • The On/Off LED switches on immediately. The Alarm LED and the Suspend LED both switch on (red) and the Battery LED switches on (yellow). After 1 second, the Alarm LED switches to yellow then, after 1 second more, all three LEDs (Alarm, Suspend & Battery) switch off.
M3000A/M3046A/M3015A/M3016A Service Guide 7URXEOHVKRRWLQJ WKH )URQW 3DQHO /('V When the Monitor is first switched on, all the front-panel LEDs and keys light up momentarily. The meaning of the front-panel LEDs under normal operation is given in the following table together with a brief summary of possible defect conditions: LED Normal Operation Defect Condition On Off/Standby Green: The Monitor is on. Off: The Monitor is in standby mode. The LED remains off: Suspect: 1. Monitor Bezel cable connection.
M3000A/M3046A/M3015A/M3016A Service Guide 7URXEOHVKRRWLQJ WKH 6\VWHP %RDUG /('V Switch the Monitor off then on again to observe the System Board LEDs. These can be viewed through the top left corner of the rear panel. (You need to remove the Server to view these LEDs).
M3000A/M3046A/M3015A/M3016A Service Guide • At power-on, the ECG OUT LED switches on for about 1 second then switches off. • Every time the ECG_OUT communicates with the Server, the ECG OUT LED blinks twice. • Every time an error in the ECG_OUT communication to the Server is detected, the ECG OUT LED switches on for 1-2 seconds. 7URXEOHVKRRWLQJ WKH 'LVSOD\ $GDSWHU %RDUG /(' The green LED on the Display Adapter Board can be seen if the chassis is removed from the plastic housing.
M3000A/M3046A/M3015A/M3016A Service Guide 5DGLR /(' The radio LED blinks yellow when the Ethernet Adapter is transmitting data packets over its radio. 6\QF /(' The yellow Sync LED is on continuously when the unit is synchronized to a master. The Wireless assembly is always set as a station. Note: This LED may blink occasionally even when the unit is synchronized to a master. /LQN /(' The green Link LED is on continuously to indicate an Ethernet link between the Ethernet Adapter and the System Board.
M3000A/M3046A/M3015A/M3016A Service Guide Yellow Main CPU status LED—When on and blinking, this LED indicates normal CPU operation. Starts to blink 2 times per second after the red Error LED switches off then slows down to blink 1 time per second after the red Error LED switches off when the system boot has finished (approximately 2 seconds). If permanently on or off, indicates a hung CPU. Red Error LED—When on, this LED indicates an error.
M3000A/M3046A/M3015A/M3016A Service Guide nector Board is blown or the System Board is defective. If necessary, replace the Connector Board. • If the Monitor still remains off, the battery control circuit on the System Board is defective. (Replace the System Board). ,QLWLDO ,QVWUXPHQW %RRW 3KDVH The following steps are to ensure that the Monitor finishes its first boot phase and the application software starts running.
M3000A/M3046A/M3015A/M3016A Service Guide 127( Do not try to remove the video flex layer because, if snapped on correctly, removing it can easily damage the SMT solder joints. • Check that the cables of the backlight tubes are seated correctly into the backlight inverter. • Check the backlight tubes are working correctly (broken, damaged, or worn). • If the display still remains dark either the Display Assembly or the System Board is defective. It is recommended to replace the Display Assembly first.
M3000A/M3046A/M3015A/M3016A Service Guide 'DWD )ORZ 0DUNHU ,Q DQG (&* :DYH The following illustrates the data flow for Marker In and ECG Wave: Defib <—> Monitor <—> Measurement Server: Defib Cable Marker ECG_OUT Conn. ECG Wave Display Assembly DEFIB Monitor System Board Isolat.
M3000A/M3046A/M3015A/M3016A Service Guide Part 2 Isolating and Solving Instrument Problems ,123 0HVVDJHV The following table explains the technical INOP messages that the Monitor can issue, and suggests a course of action. Where actions are numbered, always try them in the order given and only proceed to the next action if the current one is not successful in solving the problem.
M3000A/M3046A/M3015A/M3016A Service Guide CHECK INPUT DEVICE The Monitor has detected 5 minutes or more of constant user interface operation, or the user interface is faulty. 1. Make sure nothing is pressing on the keys or the TouchStrip. 2. Check that the Monitor Bezel is mounted securely and for damage. 3. Check the Monitor Bezel assembly cables. 4. Replace the Monitor Bezel. 5. Replace the System Board. MEAS SERV UNPLUGGED No Server is connected or communication is not possible. 1.
M3000A/M3046A/M3015A/M3016A Service Guide CO2 CAL FAILED (M3016A) Calibration aborted due to power failure, unstable signal during calibration or transducer placed on the wrong calibration cell. 1. Verify power source. 2. Perform calibration procedure again. 3. Replace transducer and repeat calibration again. 4. Replace the extension. CO2 CHECK CAL (M3016A) CO2 value is less than -4mmHg, greater than 150 mmHg. Check that calibration values are within specified limits by performing an accuracy check.
M3000A/M3046A/M3015A/M3016A Service Guide CO2 OCCLUSION (M3015A) 1. The FilterLine or exhaust tube is blocked to the extent that a measurement sample cannot be taken, or 2. The outlet is occluded at Power On 3. This INOP also appears after the Pump Op Time is reset. CO2 OVERRANGE (M3015A) The CO2 value is outside the measurement range. CO2 AUTOZERO An AutoZero is in progress.
M3000A/M3046A/M3015A/M3016A Service Guide ,VRODWLQJ WKH 'HIHFWLYH &RPSRQHQW You can use the following table to isolate and solve problems which may occur in the Instrument. 6\PSWRP &DXVH RI )DLOXUH 5HPHG\ The battery symbol is not displayed. A battery is not present in the Monitor, the battery is defective, or there is a bad connection. Install a charged battery. If a battery is already present, remove it and check the charge-level (press the button on the battery).
M3000A/M3046A/M3015A/M3016A Service Guide Monitor screen is blank. Power not connected or not switched on. Battery is not installed, is empty, or battery fuse is blown. AC Fuse is blown. Power supply defective. System board is defective. Poor connection to display. Display backlight tubes worn. Display defective. Connect to AC power supply or fit charged battery and switch on the Monitor. Check and replace defective fuse (the Power Supply contains two fuses).
M3000A/M3046A/M3015A/M3016A Service Guide Printing is not possible. Defective printer. Infrared connection is not correctly aligned. Defective sender. Try printing with another Monitor. Line-up the sender and receiver. Try another Monitor Bezel and replace if necessary. Check cable. Check/exchange the System Board. No sound from Monitor. Tone is switched low or off. Switch Monitor off then on again. Tone should sound when Monitor first boots up. Check cable and connections to the speaker.
M3000A/M3046A/M3015A/M3016A Service Guide “Measurement Server ConfiguA Measurement Extension ration not supported” status mes- (M3015A or M3016A) is sage connected to an M3000A Measurement Server with Option #D06 (noninvasive measurements only) and an M3046A Monitor. No measurements (CO2 , 2nd Press/ Temp) from the Measurement Extension are available. Use extensions only with standard Measurement Servers (not #D06). If this message appears when a standard Server is connected, try restarting the monitor.
M3000A/M3046A/M3015A/M3016A Service Guide Message appears: New display detected, please enter new display specs” The display has been exchanged and the Monitor needs the new specifications. Use the Upgrade Tool to upgrade the monitor with the latest display specifications. TouchStrip discolored, cracked or surface is deformed. Cleaning agents, abrasive material, or strong solvents were used to clean the Instrument.
M3000A/M3046A/M3015A/M3016A Service Guide No waves. Measurement Server defective. LEDs on display unit blink but Server LED does not. Check green LED on Server. Exchange the Server. Connection between the Server and the display is lost. Exchange the Server. No ECG data or waveform displayed when both defib sync and balloon pump are done together. 2-circuit cable used in a 3circuit ECG output jack. Use a bud box when setting up ECG. Red ECG LED is on. System Board is defective. Defib.
M3000A/M3046A/M3015A/M3016A Service Guide No wave displayed and no channel present 1.Measurement Extension is used with a monitor and/or Measurement Server with Release A software (A.xx.xx) 2.CO2 Data Aaquisition hardware is incompatible with wireless network (major revision number <10 and minor revision number <30) and Measurement Server Extension is used on a monitor with wireless network option. 3.No FilterLine attached 4.CO2 measurement switched off 5. Pump defective 6.
M3000A/M3046A/M3015A/M3016A Service Guide Accuracy problems Incorrect N2O setting Incorrect humidity correction setting (BTPS/STPD) Incorrect Max Hold setting Invalid calibration Check Settings: - N2O correction - BTPS or STPD - Max Hold or standard averaging 2. Perform accuracy check on calstick and calibrate, if necessary. No wave displayed and no channel present 1.Measurement Extension is used with a monitor and/or Measurement Server with Release A software (A.xx.xx) 2.
M3000A/M3046A/M3015A/M3016A Service Guide Part 3 Using Support Functions There are various support functions available in the monitor to assist in fault diagnosis. These are desribed below. If diagnostic and error information is to be communicated to Agilent Technologies, this should always associated with a particular instrument by means of the serial number. The serial numbers for the Monitor and the Measurement Server can be seen in the “Revisions” window (press Setup key then select “Revisions”).
M3000A/M3046A/M3015A/M3016A Service Guide The following table explains the contents of the Status Log. The first entry on the left side of the Status Log corresponds to the top entry under Field Title in the table. Field Title Description H, C, or N H and C—These denote fatal errors which have caused a +ot start (like switching the Instrument off/on) or a &old start (like performing a System Test). N—This denotes a non-fatal error.
M3000A/M3046A/M3015A/M3016A Service Guide 7DEOH (UURU &RGHV IRU 5HOHDVH $ Severity Device ID Error Code Information / Action required N 17316 12100 Software Condition H 16400 610 Software Condition H 16400 941 Software Condition H 17250 20005 Hardware failure, replace system board 0 $ 0HDVXUHPHQW 6HUYHU N 16400 2130 Software Condition N 16400 2131 Software Condition N 16400 2132 Software Condition N 16400 2133 Software Condition N 17203 20705 Software Condition
M3000A/M3046A/M3015A/M3016A Service Guide ,I D FRGH ODEHOHG 6RIWZDUH &RQGLWLRQ RFFXUV RQFH LW UHTXLUHV QR DFWLRQ ,I LW RFFXUV UHSHDWHGO\ SDVV WKH LQIRUPDWLRQ RQ WR \RXU $JLOHQW 7HFKQRORJLHV UHSUHVHQWDWLYH IRU DQDO\VLV 7DEOH (UURU &RGHV IRU 5HOHDVH % Severity Device ID Error Code Information/Required Action 0 $ 0HDVXUHPHQW 6HUYHU N 17300 20001 Software Condition N 17300 20046 Software Condition N 17300 20047 Software Condition N 17300 20088 Software Condition N 17300 20101
M3000A/M3046A/M3015A/M3016A Service Guide 7DEOH (UURU &RGHV IRU 5HOHDVH % Severity Device ID Error Code Information/Required Action N 17215 21480 Software Condition N 17215 21580 Software Condition N 17250 20502 Software Condition N 17250 20525 Software Condition N 17303 21104 Software Condition N 17315 20010 Software Condition N 17315 20014 Software Condition N 17315 20016 Software Condition N 17316 20004 Software Condition N 17316 20010 Software Condition N
M3000A/M3046A/M3015A/M3016A Service Guide 7DEOH (UURU &RGHV IRU 5HOHDVH & Severity Device ID Error Code Information/Required Action N 17303 20006 Software Condition N 17303 20703 Software Condition N 17303 20803 Software Condition N 17303 20810 Software Condition N 17303 21104 Software Condition N 17315 20080 Software Condition N 17315 22042 Software Condition N 17316 20004 Software Condition N 17316 20010 Software Condition N 17316 20011 Software Condition N
M3000A/M3046A/M3015A/M3016A Service Guide Testing Wireless Network Connectivity Using the Site Survey Tool1 you can check the antenna functionality . $QWHQQD &KHFN This test gives a Received Signal Strength Indication (RSSI) and will indicate if the antenna is in order. 1. The recommended Site Survey Tool is available from Connectronics (www.connectronics.com). The part number is 82-6332 7402-05, Range LAN2/PCMCIA Card (One-piece with Snap-on antenna).
M3000A/M3046A/M3015A/M3016A Service Guide 6HWXS The M3046A should be approximately 15 feet away from the test PC. Configure the Wireless LAN assembly of the M3/M4 and the Site Survey & Configuration Tool for the same Domain and Security ID. Configure using the Wireless Configuration Tool available on the Agilent Information Center CD-ROM. Check that the RangeLAN2 Site Survey and Configuration tool is running (if not, double click on the RangeLAN2 Configuration Icon to start it).
M3000A/M3046A/M3015A/M3016A Service Guide Click on the Site Survey button in the main window to bring up the Site Survey window, which appears as shown below: In this example, the Node Address shows one unit (this is the MAC address of the radio board 0020a6338fdb) with a Received Signal Strength of 90%. The number to the right of the bar graph is the indicator. $FFHSWDQFH &ULWHULD The RSSI should be greater than 80 %.
M3000A/M3046A/M3015A/M3016A Service Guide This coldstart test executes a reboot with a more intensive system Self-Test than a normal reboot. The coldstart test is also executed in the Server and in the Extension if either one is connected. Executing the coldstart test automatically returns the Instrument to Monitoring Mode. To execute a coldstart test, do the following: 6WHS Switch the Monitor into Service Mode. 6WHS Press the Setup key. 6WHS Select Status Log.
M3000A/M3046A/M3015A/M3016A Service Guide 'LVSOD\ 7HVW This test is a non-destructive, visual test of the SGRAM video memory. From left to right, top to bottom a small square consisting of colored bars moves over the whole screen during approximately 30 seconds. During this test, the memory content of the video display (consisting of small blocks of memory) is read into other memory and stored.
M3000A/M3046A/M3015A/M3016A Service Guide • After 15,000 to 20,000 hours (max 20 000 hours). • If the flow cannot be adjusted to the desired value. • If the Pump makes considerably more noise than new Pumps. After replacing the pump, perform a CO2 calibration check as described in “CO2 Gas Measurement Calibration Check” on page 4-16. 127( When replacing the pump in the M3015A Measurement Server Extension (sidestream CO ), you should also replace the CO scrubber at the same time.
M3000A/M3046A/M3015A/M3016A Service Guide &$87,21 Make sure that the Line Frequency is set correctly for the country option ordered. The factory default is 60 Hz for all units regardless of country option. +RZ 7R $FFHVV WKH 0RQLWRU DQG 6HUYHU 5HYLVLRQ 6FUHHQ Press 6HWXS. Move the highlight to 5HYLVLRQ. Depending on which screen you want to display, toggle between 0RQLWRU 5HYLVLRQ and 0HDV6HUY 5HYLVLRQ.
M3000A/M3046A/M3015A/M3016A Service Guide 7URXEOHVKRRWLQJ ZLWK 6HOI 7HVW $ODUP 0HVVDJHV :KHQ
M3000A/M3046A/M3015A/M3016A Service Guide 7URXEOHVKRRWLQJ :KHQ 7KHUH LV 1R 0HVVDJH RQ WKH 6FUHHQ 6\PSWRP 3RVVLEOH &DXVH :KDW 7R 'R Some or all of the numerics or waves are missing from the screen. No measurements connected Check that a Measurement Server and all the required transducers are connected Connect a Measurement Server. No transducers connected Connect the required transducers. Defective transducer Replace the suspect transducer.
M3000A/M3046A/M3015A/M3016A Service Guide Troubleshooting the Printer Connection Here is a list of some easily corrected troubleshooting cases. If the fault is not described below, investigate further as soon as possible. For more information, see "Testing the Instrument" and "Repairing the Instrument". 0HVVDJH :KDW 7R 'R You cannot find the print softkeys, or the Print Screen SmartKey is inactive. Make sure that the printer is configured (see Connecting a Printer in "Installing the Instrument").
M3000A/M3046A/M3015A/M3016A Service Guide Tutorial for Troubleshooting the Instrument Question 1: According to this chapter, what troubleshooting support functions are built-in to the Instrument? a. b. c. The Status Log and error codes are the only built-in troubleshooting support functions. The Coldstart Test, Display Test, Backlight Test, Reset PumpOpTime, Reset IRSourceTime, Self-Test Cycles, OpTimeMon, OpTimeMeasS, and NBP Cycles are the only built-in troubleshooting support functions.
M3000A/M3046A/M3015A/M3016A Service Guide Answers to the Tutorial for Troubleshooting the Instrument 1) c. (See page 5-25 for more details.) 2) a. (See page 5-36 for more details.) 3) e. (See pages 5-2 to page 5-11 for more details.) 4) c. (See pages 5-25 for more details.
6 Repairing the Instrument Objectives To meet the goals of this chapter, you should be able to disassemble the Instrument down to replacement part level. The main replaceable assemblies for the Monitor are as follows: • • • • • The Power Supply. The System Board. The Connector Board. The LCD Assembly. The Display Backlight Tubes. The removal and replacement procedures for the Monitor are easy to complete when you follow the step-by-step procedures in this chapter.
M3000A/M3046A/M3015A/M3016A Service Guide Warnings, Cautions and Safety Precautions • Do 127 disassemble the product past the point described in these procedures. • +LJK 9ROWDJH :DUQLQJ—Voltages dangerous to life are present in the Instrument when it is connected to the mains Power Supply. Do not perform any disassembly procedures other than Server and Extension removal with power applied to the Instrument. Failure to adhere to this warning could cause serious injury or death.
M3000A/M3046AM3015A/M3016A Service Guide 6WHS Switch on the Instrument and disconnect the AC power cord from both the Instrument and the mains power source (after 20 seconds, the capacitors on the Power Supply board are drained). 6WHS Push a thin-bladed screwdriver into the hole next to the cover. 6WHS Release the cover. 6WHS Remove the two anti-vibration screws. (These are the only anti-vibration screws and must be refitted. Do not lose these screws.) 6WHS Slide out the Power Supply.
M3000A/M3046A/M3015A/M3016A Service Guide 6WHS Push a thin-bladed screwdriver into the hole next to the cover. 6WHS Release the cover. 6WHS Prise open the clip on the Server-to-Monitor link bar and slide it off. On newer monitors just turn the catch (holding the link bar) into the vertical position. 6WHS Lay the Monitor on its rear panel and pull out the two latches - there is one on each side of the Monitor Bezel.
M3000A/M3046AM3015A/M3016A Service Guide 6WHS Remove the white plastic clamp securing the ribbon cable connections. To remove, push the latch at the top left corner to the left. 6WHS Use a small screwdriver to remove the Monitor Bezel assembly cable. 127( Do not touch the LCD display. 6WHS Remove the four screws from the rear panel.
M3000A/M3046A/M3015A/M3016A Service Guide 6WHS Remove the Power Supply as described previously in this chapter. 6WHS Remove the chassis as described previously in this chapter. 6WHS Remove the screw which secures the connector board, then pull out the Connector Board. 1 6WHS Use a small screwdriver to disconnect the Display Assembly cable. 6WHS 1 Lay the chassis face down on a clean, scratch-free surface. 6WHS Disconnect the loudspeaker cable (1).
M3000A/M3046AM3015A/M3016A Service Guide 6WHS Withdraw the board from the chassis towards and slightly to the right of you to avoid hitting the chassis. 5HPRYLQJ WKH :LUHOHVV $VVHPEO\ IRU 0RQLWRUV ZLWK :LUHOHVV /$1 ,QWHUIDFH RQO\ 6WHS Remove the Server as described previously in this chapter. 6WHS Remove the battery as described previously in this chapter. 6WHS Remove the chassis as described previously in this chapter.
M3000A/M3046A/M3015A/M3016A Service Guide 6WHS &$87,21 Push the complete assembly (including the rubber cushion, the LCD display, and the cables) out from the rear of the chassis. Start pushing from the top being careful not to damage or bend the 6 clips around the cushion: Never touch the front of the display assembly (the screen), or the backlight tubes, with your fingers. Doing so can reduce the lifetime of the parts.
M3000A/M3046AM3015A/M3016A Service Guide 6WHS Press down the retaining lever to release the backlight tube. Backlight Tube Press Lever Down to Release 6WHS Slide out the tube and repeat for the second tube. 5HPRYLQJ WKH &RQQHFWRU %RDUG To remove the Connector Board, do the following: 6WHS Remove the chassis as described previously in this chapter. 6WHS Remove the Power Supply as described previously in this chapter.
M3000A/M3046A/M3015A/M3016A Service Guide 6WHS Remove the chassis as described previously in this chapter. 6WHS Remove the Power Supply. 6WHS Remove the Connector Board. 6WHS Disconnect the speaker cable running to the System Board. 6WHS Rotate the two plastic holders retaining the speaker. 6WHS Remove the speaker.
M3000A/M3046AM3015A/M3016A Service Guide Refit Procedures for the Monitor 5HILWWLQJ WKH 6\VWHP %RDUG To refit the System Board, complete the steps for removing the System Board in reverse. When refitting the System Board please observe the following: • Be careful not to strike the metal chassis with parts. • Make sure the speaker cable is not trapped when the System Board is inserted.
M3000A/M3046A/M3015A/M3016A Service Guide 5HILWWLQJ WKH :LUHOHVV $VVHPEO\ To refit the wireless assembly, complete the steps for removing the wireless assembly in reverse. 5HILWWLQJ WKH &KDVVLV To refit the chassis, complete the steps for removing the chassis in reverse. When reconnecting the Antenna Cable, observe the following: • Route the free end of the antenna cable through the middle hole (1, below) in the right-hand column of three holes, as viewed from the back side of the sheet metal.
M3000A/M3046AM3015A/M3016A Service Guide Disassembly Procedures for the Measurement Server Extension It is recommended that you replace all the replaceable parts in the Extension (CO2 Scrubber, Infrared Lamp and Pump) after 15 000 hours (approximately 3 years) of continuous use. See Chapter 3 Maintaining the Instrument for more details on caring for the Extension. 7RROV 5HTXLUHG • A thin-bladed screwdriver. • A pair of large tweezers.
M3000A/M3046A/M3015A/M3016A Service Guide 6WHS Position the Extension on the dual link bar with the measurement connector hardware facing upwards and the arm of the dual link bar towards you. There are four long mounting pins threaded into the Extension in each of the four corners under the cover. Locate the heads of the two long mounting pins on the side away from you. 6WHS Use tweezers to prise the pins gently out enough to be removed by hand.
M3000A/M3046AM3015A/M3016A Service Guide The following illustration shows the location of the replaceable parts in the M3015A Measurement Server Extension.
M3000A/M3046A/M3015A/M3016A Service Guide 5HPRYLQJ WKH &2 6FUXEEHU To remove the CO2 Scrubber, do the following: 6WHS Locate the CO2 Scrubber in the Extension. 6WHS Being careful not to touch anything else in the Extension, use tweezers to pull the body of the CO2 Scrubber out of the bracket . 6WHS Holding the body of the CO2 Scrubber with your fingers, carefully disconnect the Extension intake tube from the scrubber end and remove the CO2 Scrubber from the Extension.
M3000A/M3046AM3015A/M3016A Service Guide 6WHS Holding the spring with your finger, gently pull the red lamp removal band to dislodge the Infrared Lamp and the Contact Housing from the assembly. 127( Now that it is exposed, do 127 allow anything to fall into the Infrared Lamp assembly. 127( After replacing the Infrared Lamp, reset the value displayed on the Reset IRSourceTime selection to zero (Service Mode>CO2 Setup).
M3000A/M3046A/M3015A/M3016A Service Guide 5HPRYLQJ WKH 3XPS To remove the Pump, do the following: 6WHS Locate the Pump in the Extension. 6WHS Being careful not to touch anything else in the Extension, unscrew the screw holding the pump bracket in position. Lift the top part of the bracket away and lift out the pump. Screw holding pump bracket 6WHS Gently disconnect the flow tubing attached to the Extension from the Pump.
M3000A/M3046AM3015A/M3016A Service Guide Refit Procedures for the Measurement Server Extension 7RROV 5HTXLUHG • A thin-bladed screwdriver. • A pair of large tweezers. • In addition, for refitting the Pump, you will need a large-bladed screwdriver.
M3000A/M3046A/M3015A/M3016A Service Guide 5HILWWLQJ WKH ,QIUDUHG /DPS To refit the Infrared Lamp, do the following: 6WHS Fit the spring over the infrared lamp. 6WHS Making sure the red lamp-removal-band lies flat in the bottom of the assembly, and holding the spring onto the end of the Infrared Lamp with a finger, place the lamp into the assembly.
M3000A/M3046AM3015A/M3016A Service Guide 5HILWWLQJ WKH 3XPS To refit the Pump, do the following: 6WHS Gently connect the power lead to the Extension. 127( The power lead can only be connected one way.Do not try to force the power lead into position. Instead, align it correctly and connect it gently. 6WHS Connect the flow tubing to the Pump. 127( Be sure to reconnect the inlet tube to the inlet valve and the outlet tube to the outlet valve.
M3000A/M3046A/M3015A/M3016A Service Guide General Reassembly/Refitting Comments • Battery Door—When inserting the Monitor chassis, always open the battery compartment door to avoid striking the door clip. • Ribbon Connections—Make sure male-female ribbon connections are correctly lined-up. • Open Component—Do not allow anything to fall into the open component. Following Reassembly Once you have reassembled the Instrument, you must perform a safety and performance check on the Instrument.
M3000A/M3046AM3015A/M3016A Service Guide Tutorial for Repairing the Instrument Question 1: What must be kept open when inserting the Monitor chassis? a. b. c. When inserting the chassis, the Monitor Bezel and the link bar must QRW be kept open. When inserting the chassis, the LCD assembly must be open and the backlight tubes must be exposed. When inserting the chassis, always open the battery compartment door to avoid striking the door clip.
M3000A/M3046A/M3015A/M3016A Service Guide Answers to Tutorial for Repairing the Instrument 1) c. (See pages 6-3, 6-12 and 6-22 for more details.) 2) d. (See pages 6-1 and 6-2 for more details.) 3) b. (See page 6-2 for more details.
7 Replacement Parts Objectives After reading this chapter, you will be able to identify the replaceable components and know which subassemblies you can order for the Instrument. The Instrument is comprised of several components which may be replaced or exchanged if they break. This chapter provides you with exploded views and part numbers for all fieldreplaceable components. The Measurement Server and the M3016A Measurement Server Extension do not contain any serviceable parts.
M3000A/M3046A/M3015A/M3016A Service Guide What’s New in this Service guide The following table describes the main changes to the Instrument that are new with this edition of the Service Guide.
M3000A/M3046AM3015A/M3016A Service Guide &RPSDWLELOLW\ 0DWUL[ 5HOHDVH $ WR 5HOHDVH % 1(: &RQQHFWRU %RDUG 9*$ FRYHU 0 0 0RQLWRU 3RZHU 6XSSO\ 0 0HWDO &KDVVLV 3ODVWLF +RXVLQJ 0 0 $ 0RQLWRU %H]HO 0 << 2/' 0DLQ 6\VWHP %RDUG 0 H[FKDQJH 0 0DLQ 6\VWHP %RDUG 0 ;;$ n/a no no yes yes &RQQHFWRU %RDUG QR 9*$ FRYHU? 0 0 yes n/a yes yes yes 0RQLWRU 3RZHU 6XSSO\ 0 no yes n/a y
M3000A/M3046A/M3015A/M3016A Service Guide 2OG 3RZHU 6XSSO\—An old version Power Supply can be used with all new parts H[FHSW the new Main System Board. If an old Power Supply is replaced or exchanged, it must be replaced with the old version Power Supply which is still available. A new Power Supply cannot be used with an old Main Board. This part will remain available for replacement use in existing Monitors.
M3000A/M3046AM3015A/M3016A Service Guide 3DUW 1XPEHU 'HVFULSWLRQ ,WHP M3046-62243a Monitor Bezel, Simplified Chinese 1 M3046-62244a Monitor Bezel, Portugese 1 M3046-62245a Monitor Bezel, Greek 1 M3046-62247a Monitor Bezel, Russian 1 M3046-62250a Monitor Bezel, Polish 1 M3046-66502a Monitor System Board, English software preloaded (Rev A)b 2 M3046-60001 Monitor Power Supply assembly (old) 3 M3046-60002 Monitor Power Supply assembly (new) 3 2110-0495 (Only type: SCHURTER SPT0001.
M3000A/M3046A/M3015A/M3016A Service Guide 3DUW 1XPEHU 'HVFULSWLRQ ,WHP M3046-47411 Rubber Buttons for Monitor bezelc M3080-61602 External video cable, 3m M3080-61603 External video cable, 10m M3046-55900 Antennac M3046-42310 Fan Holderc M1022-60170 Fanc M3046-60603 Shield for wireless LAN operationc M3046-61301 Loudspeakerc M3015-44131 M3015A Front Bezel, English (also for French, Danish, Traditional Chinese and Simplified Chinese) 1A M3015-44133 M3015A Front Bezel, German Not Sho
M3000A/M3046AM3015A/M3016A Service Guide 3DUW 1XPEHU 'HVFULSWLRQ ,WHP M3016-44131 M3016A Front Bezel, English (also for French, Danish, Traditional Chinese and Simplified Chinese) Not Shown M3016-44133 M3016A Front Bezel, German Not Shown M3016-44134 M3016A Front Bezel, Dutch Not Shown M3016-44135 M3016A Front Bezel, Spanish Not Shown M3016-44136 M3016A Front Bezel, Italian Not Shown M3016-44137 M3016A Front Bezel, Norwegian Not Shown M3016-44138 M3016A Front Bezel, Swedish Not Sho
M3000A/M3046A/M3015A/M3016A Service Guide $ $ ([FKDQJH 3DUWV /LVW Exchange parts are parts that have been returned to Agilent Technologies and reconditioned for further use. Parts offered as exchange parts are in excellent service order according to rigorous Agilent Technologies standards but offer a considerable price advantage to the user. 3DUW 1XPEHU M3046-68502 7-8 Replacement Parts 'HVFULSWLRQ exchange Monitor System Board, English software preloaded (Rel.
M3000A/M3046AM3015A/M3016A Service Guide 3DUW 1XPEHU 'HVFULSWLRQ ,WHP M3000-6801A exchange Measurement Server, English (Rel. A) Not Shown M3000-6802A exchange Measurement Server, French (Rel. A) Not Shown M3000-6803A exchange Measurement Server, German (Rel. A) Not Shown M3000-6804A exchange Measurement Server, Dutch (Rel. A) Not Shown M3000-6805A exchange Measurement Server, Spanish (Rel. A) Not Shown M3000-6806A exchange Measurement Server, Italian (Rel.
M3000A/M3046A/M3015A/M3016A Service Guide 3DUW 1XPEHU 'HVFULSWLRQ ,WHP M3000-6806B exchange Measurement Server, Italian (Rel. B) Not Shown M3000-6807B exchange Measurement Server, Norwegian (Rel. B) Not Shown M3000-6808B exchange Measurement Server, Swedish (Rel. B) Not Shown M3000-6809B exchange Measurement Server, Finnish (Rel. B) Not Shown M3000-6810B exchange Measurement Server, Japanese (Rel. B) Not Shown M3000-6811B exchange Measurement Server, Danish (Rel.
M3000A/M3046AM3015A/M3016A Service Guide 3DUW 1XPEHU 'HVFULSWLRQ ,WHP M3000-6841B exchange Measurement Server, Opt. #D06, Danish (Rel. B) Not Shown M3000-6842B exchange Measurement Server, Opt. #D06, Traditional Chinese (Rel. B) Not Shown M3000-6843B exchange Measurement Server, Opt. #D06, Simplified Chinese (Rel. B) Not Shown M3000-6844B exchange Measurement Server, Opt. #D06, Portugese (Rel. B) Not Shown M3000-6845B exchange Measurement Server, Opt. #D06, Greek (Rel.
M3000A/M3046A/M3015A/M3016A Service Guide a. Use the M3/M4 Support Tool to configure the software for a specific release/language, if necessary. b.
$ AC Power connector, 1-4 LED, 1-4 Accuracy and Calibration Procedures, 4-19 Accuracy and Performance Procedures, 4-19 adjustments, v alarm limit, 1-8 message, 1-8 analog ECG signal, 2-5 anesthetics operation in presence of flammable, 2-4 Arterial Oxygen Saturation and Plethysmography (SpO2/PLETH) Module Block Diagram, 1-31, 1-35 Description, 1-30, 1-34 Features, 1-30 PLETH Waveform, 1-30 Safety, 1-30 Measurements, 1-30, 1-34 Theory of Operation, 1-31, 1-35 assembly, v % Backlight Test, 5-35 Backlight Tub
CO2 CAL FAILED INOP description, 5-15 CO2 CAL MODE INOP description, 5-15 CO2 CAL RUNNING INOP description, 5-15 CO2 CHANGE SCALE INOP description, 5-15 CO2 CHECK CAL INOP description, 5-15 CO2 EQUIP MALF INOP description, 5-14 CO2 Gas Measurement Calibration Check, 4-16 CO2 NO TRANSDUCER INOP description, 5-14 CO2 NO TUBING INOP description, 5-15 CO2 OCCLUSION INOP description, 5-16 CO2 OVERRANGE INOP description, 5-16 CO2 PURGING INOP description, 5-16 CO2 Scrubber replacement, 3-7 CO2 SENSOR WARM UP INOP
analog, 2-5 ECG EQUIP MALF message, 5-38 ECG Sync Performance Test, 4-22 ECG synch, 4-22 ECG/Resp Performance check, 4-19 theory of operation, 1-23 Electrocardiogram/Respiration (ECG/RESP) Module Block Diagram, 1-24 Components, 1-24 Description, 1-23 Features, 1-23 ECG Modes, 1-23 RESP Modes, 1-23 Safety, 1-24 Measurements, 1-23 Theory of Operation, 1-24 electrosurgery protection, 2-2 equipment combining, 2-3 equipotential grounding post, 1-4, 2-3 Error Code Description, 5-26 Error Codes, 5-25 listing, 5-26
wave, 1-8 leakage current patient, 2-2 LED AC Power, 1-4 battery, 1-4 LEDs, System Board, 5-6 Line Frequency, 5-36 0 M3000A Measurement Connectors, 1-6 M3015A Measurement Connectors, 1-7 Theory of Operation, 1-41 M3016A measurement connectors, 1-7 theory of operation, 1-48 Main, A-1 Main Screen button, 1-4 Mainstream CO2 Performance Test, 4-21 Mainstream CO2 Measurement, 1-51 Maintenance Frequency, 3-2 NBP calibration and performance tests, 3-5 preventive, 3-5 Maintenance Checklist, 3-3 marker pulse (ECG),
Measurements, 1-26 Theory of Operation, 1-29 numeric, 1-8 numeric label, 1-8 nurse call connector, 1-5, 2-15 Nurse Call Relay Performance Test, 4-22 2 On-Off/Standby button, 1-4 3 Parts listing, 7-4 parts and accessories, v Parts History, 7-2 Passwords, 4-6 patient leakage current, 2-2 name, 1-8 safety, 2-2 Patient safety checks, 4-24 performance, v Performance Assurance Test, 4-7 Power On Test, 4-6 Power Supply related problems, 5-20 PRESS zero button, 1-6 Press performance check, 4-20 Press/Temp, Extens
Reset IRSourceTime, 5-36 Reset PumpOpTime, 5-35 RESP EQUIP MALF message, 5-38 Revision Screen, 5-37 6 safety, v patient, 2-2 Safety Analyzer, 4-24 Safety Tests Procedures, 4-24 Serial Numbers, 4-6 server, overview, 1-2 SERVERLINK MALF INOP description, 5-14 Service Mod, 5-33 Service Mode, 5-33 setting default, 1-8 Setup button, 1-4 Sidestream CO2 Measuremen, 1-43 Sidestream CO2 Performance Test, 4-12 Silence/Reset button, 1-4, 1-6 Site Preparation Guideline, 2-22, 5-40 SmartKey label, 1-8 software update c
9 vibration, 2-4 Visual Test, 4-6 : wave, 1-8 label, 1-8 = Zero button, 1-6 Zero key, 1-41, 1-48 vii