
User`s guide


B - Verification and Calibration
144
Overvoltage Protection Calibration
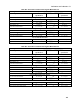
Action Display
13.
Press Shift Cal, scroll to CAL VOLT PROT, and press Enter.
CAL:VOLT:PROT
14. Wait for the dc source to compute the OVP calibration constant. The
display returns to Meter mode when the calculation is complete.
Current Programming and High-Range Measurement Calibration
Action Display
15. Connect the appropriate current monitor as shown in figure B-1A.
Connect the DMM (in voltage mode) across the current shunt.
16.
Press Shift Cal, scroll to CAL CURR, and press Enter.
CAL:CURR
17.
Press Shift Cal, scroll to CAL LEV, and press Enter to select the
first calibration point.
CAL:LEV P1
18.
Press Shift Cal and scroll to CAL DATA. Wait for the DMM reading
to stabilize. Then read the DMM and compute the first current value
(DMM reading ÷ shunt resistance). Press Enter Number and enter
the first current value in amperes.
CAL:DATA 0.00
19.
Press Shift Cal, scroll to CAL LEV, use ä to scroll to P2 (the
second calibration point), and press Enter.
CAL:LEV P2
20.
Press Shift Cal and scroll to CAL DATA. Wait for the DMM reading
to stabilize. Then read the DMM and compute the second current
value (DMM reading ÷ shunt resistance). Press Enter Number and
enter the second current value in amperes.
CAL:DATA 0.00
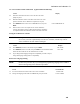
Low-Range Current Measurement Calibration (Agilent Model 66311B Only)
Action Display
21 Disconnect all loads from the dc source but leave the sense
jumpers in place. Do not connect any equipment to the output
until after step #22.
22.
Press Shift Cal, scroll to CAL CURR MEAS LOW, and press
Enter.
CAL:CURR:MEAS:LOW
23. Connect the 800 ohm calibration load resistor as shown in figure
B-1B. Connect the DMM (in current mode) in series with the load.
24.
Press Shift Cal, scroll to CAL LEV, and press Enter to select the
first calibration point.
CAL:LEV P1
25.
Press Shift Cal and scroll to CAL DATA. Wait for the DMM
reading to stabilize. Press Enter Number and enter the current
reading displayed on the DMM in amperes.
CAL:DATA 0.00