
User`s guide

4 - Turn-On Checkout
32
Checkout Procedure
The tests in this section checks for output voltage and current on the dc source.
NOTE: To perform the checkout procedure, you will need a wire for shorting the output
terminals together.
The following procedure assumes that the unit turns on in the factory-default state. If you need more
information about the factory default state, refer to the *RST command in chapter 4 of the Programming
Guide. Note that the values shown in the Display column may not exactly match the values that appear
on the front panel of your unit.
If you have not already done so, connect the power cord to the unit and plug it in.
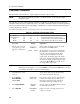
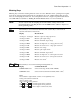
Table 4-1. Checkout Programming Values
Model Voltage OV Prot Current Note:
6611C
6612C/66312A
6613C
6614C
8
20
50
100
12
22
55
110
5
2
1
0.5
The checkout procedure is written for models
6612C and 66312A. If you have another
model, enter the correct values from the table
where the procedure calls for an <input>.
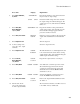
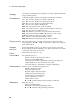
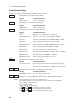
Procedure Display Explanation
1. Turn the unit on. The dc
source undergoes a self-
test when you first turn it
on.
**********
ADDRESS 5
0.002V .0006A
During selftest, all display segments are briefly
lit, followed by the GPIB Address.
The display then goes into meter mode with the
Dis annunciator on, and all others off. In Meter
mode the
*****V
digits indicate the output
voltage and the
*****A
digits indicate the
output current. The flashing digit on the display
indicates the digit that will be affected if changes
are made to the displayed values using the rotary
control or the Ë and Ì keys. You will only see
the changes if the output is ON.
NOTE: Press the Meter key to exit a menu at any time and return to meter mode. If the Err
annunciator on the display is on, press the Shift key followed by the Error key to see the
error number. See table 4-2 at the end of this chapter.
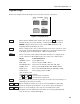
2. Check that the dc source
fan is on
You should be able to hear the fan and feel the
air coming from the back of the unit.
3.
Press Voltage,
Enter Number,
<2, 0>, Enter
VOLT 0.000
VOLT <20>
Programs the output to 20 volts. After the value
is entered, the display returns to Meter mode.
Because the output has not been enabled, the
meter still indicates approximately 0 volts.
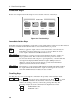
4.
Press Output On/Off
<20.003>V
0.0006A
Turns the output on. The Dis annunciator should
be off and CV should be on.
5.
Press Shift, OV
VOLT:PROT
<22.00>
Display shows the overvoltage protection trip
voltage for your unit.