
Printer Accessories User Manual


FRONT PANEL CONFIGURATION
General Information
The ULTRA front panel can be used to set the most-used parameters of the
general configuration options. Due to the use of non-volatile, battery-
backed RAM, the configuration changes will be stored in the ULTRA even
when it is powered off.
To make changes to the general configuration from the ULTRA front panel,
make certain that the power is ON. Set dip switch B8 in the ON (down)
position, then press the RESET button on the front panel. This will place
the ULTRA in front panel configuration mode. When the ULTRA is in
front panel configuration mode, POWER is the only status indicator light
that is lit on the front panel.
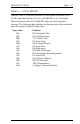
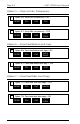
Now press the four-key sequence for the menu option to be changed. If the
entry is valid, all of the status light will come on. If the entry is invalid, all
of the status lights will flash until the entry is cleared by pressing the
RESET button. Continue making other changes with the four-key
sequences until the ULTRA is properly configured.
To exit front panel configuration mode, set dip switch B8 in the OFF (up)
position, then press the RESET button. The status indicator lights will
confirm that the unit is in normal operating mode. To verify the changes,
press the TEST button to print out the new configuration.
Translate tables and PFS definitions can be modified only via a coax host
terminal or via an alternate host. Refer to Section 9 Coax Host
Configuration and Section 10 Alternate Host Configuration for
information on modifying translate tables and PFSs.
SECTION 8