
Instruction manual


216 Chapter 10
Storing and Retrieving 4287A Internal Information and File Management
Saving Screen Displays
Saving Screen Displays
Follow this procedure to save the 4287A’s current screen display on a storage device
(built-in nonvolatile memory or floppy disk) in the Windows bitmap format (.bmp).
Step 1. Set the 4287A to show the screen display that you want to record.
Step 2. Press the [Capture] key (same as [Display] key) on the instrument state block of the front
panel to temporarily store the screen display in the internal memory.
NOTE When the Capture key is pressed, the Display softkey menu appears and the displayed
screen is simultaneously stored in the internal memory.
Step 3. Press the [Save/Recall] key on the instrument state block of the front panel to display the
Save/Recall softkey menu.
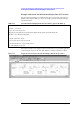
Step 4. Press the SAVE GRAPHIC softkey to display the Save As dialog box for saving the screen
display.
Figure 10-3 Save As dialog box for saving screen display
Step 5. Enter the filename in the File name box. If you want to enter the filename using the mouse,
see
“Entering the Filename using the Mouse” on page 215.
NOTE The user is not required to add the extension following the filename (the “.bmp” filename
extension is automatically added).
NOTE The size of the screen’s image file is sometimes above 720 kB and cannot be save onto a
2DD (720 kB) floppy disk. When you try to save the image, the system indicates “save
error” and the image will not be stored. In this case, use a 2HD (1.44 MB) disk to save the
image.
Step 6. Press the Save key to save the temporarily stored screen display.