
Instruction manual


136 Chapter 6
Calibration and Compensation
Calibration and Compensation Procedure without Using Dedicated Test
Fixture
tables, follow these steps to select the active table.
NOTE When performing calibration data measurement for all of the measurement point tables at
once, it is not necessary to select individual measurement point tables.
Step 1. Press the [Stml Select] key on the front panel to display the Stml Select softkey menu.
Step 2. Press the TABLE No. [ ] key in the softkey menu to display the TABLE No. [ ] softkey
menu.
Step 3. In the softkey menu, press the key (TABLE 1 to TABLE 8) corresponding to the
measurement point table for which calibration and compensation data measurement should
be performed.
3. How to display the Calibration Dialog box
Step 1. Press the [Cal/Compen] key on the front panel to display the Cal/Compen softkey menu.
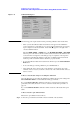
Step 2. Press the CAL DIALOG key in the softkey menu to display the Calibration Dialog box
(
Figure 6-14).
Figure 6-14 Calibration Dialog box
NOTE The following points require attention when performing calibration data measurement.
• When you start the calibration data measurement, a bar appears in the Calibration
progress indicator box of the dialog box to show how the measurement is progressing.
Upon completion of data measurement, a blue mark () appears to the right of the
executed calibration button.
•When the OPEN, SHORT, or LOAD button or the DC OPEN, DC SHORT, or DC LOAD
button is pressed, the value of the DC resistance (Rdc) measured as the calibration data
is shown in the lower-right area of the dialog box upon completion of the respective
measurement. Checking this indication at the time of calibration data measurement
makes it possible to determine that the standard is properly attached.
• To erase all calibration data after measurement is finished, press the Clear Calibration
Data
button.
• To close the dialog box during calibration, press the Close button.