
Programming instructions


Front-Panel Operation 51
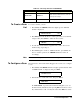
3. To enable a trigger pulse output from the selected line, turn the knob
to select “ENABLE”; or select “DISABLE”;
4. Press Enter, the instrument returns to “CONF EXT TRIG”. Press
Menu again to exit this operation, the CONFIG annunciator turns off
accordingly.
Note In SCPI mode, once a new pair of control lines is selected, the newly
selected trigger-in line is immediately ready to accept the trigger signal
from an external instrument. However, in 3488A mode, only after the
newly selected pair is enabled, will the previously enabled pair be disabled.
Otherwise, the previously enabled pair is still in effect.
To Configure the
Power-on State
[1]
The power-on state of the Agilent 3499A/B/C with Firmware REV 4.0 or
later can be set to the reset state, or to a stored state. The instrument will
return to the specified state the next time it is turned on. To configure the
power-on state:
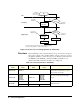
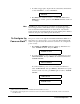
1. Press Menu, the CONFIG annunciator lights up. Turn the knob to
select “POWER ON SET”, then press Enter;
2. To set the instrument power-on to reset state, turn the knob to select
“PWR ON RESET”, then press Enter, the instrument will return to
“POWER ON SET”;
To set the instrument power-on to a stored state, turn the knob to
select “USER SET UP”, then press Enter
[2]
. Turn the knob to specify
a memory location (i.e. 05), press Enter again to return to “POWER
ON SET”;
ENABLE
[1]. This section is only intended for 3499A/B/C with Firmware REV 4.0 or later.
[2]. “NO DATA” will be displayed if no state had ever been stored, then the instrument automatically returns to the first level
of the Menu menu.
POWER ON SET
PWR ON RESET
USER SET UP
POWER ON 05