
Programming instructions
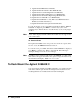

Getting Started 23
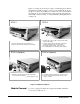
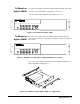
Figure 2-1 on Page 23 shows the procedure to install a plug-in module into
the mainframe 3499B, as well as to attach a screw terminal block onto the
module. For 3499A, the installation procedure is the same as in 3499B. For
the details about screw terminal blocks, crimp-and-insert terminal blocks
and/or DIN-to-D cables wiring, see “Plug-in Modules Wiring Information”
on Page 110.
Figure 2-1. Module installation
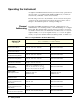
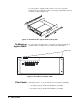
Module Removal To remove a plug-in module from an Agilent 3499A/B/C mainframe,
reverse the procedures above.
STEP 4 (Optional)
STEP 2STEP 1
STEP 3 (Optional)
1.
2. Select a slot in which the module is to be installed.
Face the mainframe rear panel towards you;
1. Hold the sides of the module, component side down,
by the metal shields;
2. Insert the module into the slot guides and slide the
module towards the front of the instrument;
3. Push firmly until the module “snaps” into place.
4. Push both plastic levers inward to lock the module.
1. Wire the screw terminal block (module dependent,
refer to Chapter 8 for details);
2. .Attach the screw terminal block onto the plug-in module
1. Push firmly until the terminal block “snaps” into place;
2. Lock the screw terminal block with the two screws
(Torque < 8 in-lbs).
).