
Programming instructions


22 Chapter 3 Adjustment Procedures
The resultant accuracy of the multimeter depends on the accuracy of the
equipment used, the thermal characteristics of the short. and the type of
cabling used. We recommend high impedance, low dielectric absorption
cables for all connections.
Preliminary Adjustment Procedure
Perform the following steps prior to adjusting the 3458A:
1. Select the adjustment area. You can adjust the 3458A on the bench or
in a system cabinet. The temperature of the adjustment environment
should be between 15°C and 30°C. The more thermally stable the
environment is, the more accurate the adjustment.
2. Connect the 3458A to line power and turn the multimeter on. Refer to
"Installing the Multimeter" in Chapter 1 of the 3458A User’s Guide
for information on setting the line voltage switches and installing the
line power fuse.
3. Remove all external input signals from the front and rear input
terminals.
4. Select the DCV function (use the DCV key) and the 100 mV range
(repeatedly press the down arrow key until the range no longer-
changes). (Refer to Chapter 2 of the 3458A User’s Guide for more
information on front panel operation.)
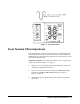
5. Set the front panel Terminals switch to the Front position.
6. Allow the multimeter to warm up for 4 hours from the time power was
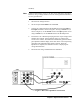
applied. (At this point. you can connect the 4-terminal short to the
front terminals as shown in Figure 1 on page 23 to prepare for the
Front Terminal Offset Adjustment.)