
Technical data


Zero Adjustment
Each time you perform a zero adjustment, the multimeter stores a new
set of offset correction constants for every measurement function and
range. Separate offset correction constants are stored for the front and
rear input terminals. The multimeter will sequence through all required
functions and ranges automatically and store new zero offset calibration
constants. All offset corrections are determined automatically. You may
not correct a single range or function without re-entering
ALL zero offset
correction constants automatically. This feature is intended to save
calibration time and improve zero calibration consistency.
Caution Never turn off the multimeter during Zero Adjustment.
This may cause
ALL calibration memory to be lost.
Zero Adjustment Procedure
The automatic zero adjustment procedure takes about 5 minutes to
complete for each terminal set calibrated (front or rear terminal).
Follow the steps outlined below. Review “Test Considerations” on
page 64 before beginning this test. Also see example 2 in chapter 3,
“Menu Tutorial,” starting on page 55, for an example of how to initiate
a zero calibration.
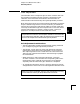
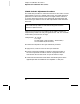
1 Select the DC V function and apply a 4-wire short (copper) across
the
Input HI-LO and Sense HI-LO terminals as shown below
(front or rear terminal).
4
Chapter 4 Calibration Procedures
Zero Adjustment
77