Agilent B1500A Semiconductor Device Analyzer Self-paced Training Manual Agilent Technologies
Notices © Agilent Technologies 2005 - 2008 Manual Part Number No part of this manual may be reproduced in any form or by any means (including electronic storage and retrieval or translation into a foreign language) without prior agreement and written consent from Agilent Technologies, Inc. as governed by United States and international copyright laws.
In This Manual This document is the self-paced training manual to help you to understand what is Agilent B1500A, what functions the B1500A has, how to use the B1500A, and what applications the B1500A contributes to. CAUTION The test setup data described in this manual are only examples. If these example data damage your devices, Agilent is NOT LIABLE for the damage. • Module 1. Introduction This module explains the product concept and the key features of the B1500A/ EasyEXPERT.
• Module 11. Advanced Definitions and Operations This module explains how to control external GPIB devices, how to call an execution file, how to perform a repeat measurement, and how to use the prober control script. • Module 12. Miscellaneous Operations This module explains what is the status indicator, what is the automatic data export function and the automatic data record function, how to perform selftest and calibration, how to perform SMU zero offset cancel, and such. • Module 13.
Class Exercises Class exercises use the test setup listed below. The test setup data are only examples and included in the Demo.xpg file stored in the Manual CD-ROM.
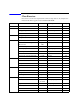
Module Exercise Device Test setup/definition/data Page Module 8 C-V sweep measurement MOSFET CV-1MHz 8-6 Module 9 Modifying application test definition MOSFET Trng IdVd Vth.xtd 9-14 Trng idvd idvg2.xtd 9-29 Trng idvd idvg3.xtd 9-32 Using auto analysys twice MOSFET Vth gmMax and Id 9-34 Using vector data MOSFET Trng Cgg-Vg 9-42 Module 10 Creating application test definition MOSFET Trng idvd idvg.
Test Setup for Class Exercises The Demo preset group contains the following test setup. The setup data are only examples for the class exercises. The following table lists the test setup name in alphabetical order. Test Setup Name Description ALWG monitor 511 kohm sampling measurement with SPGU ALWG output Charge Pumping 4T 0.
Test Setup Name Description Trng List MOSFET Vth-gmmax measurement using I/V List Sweep Trng Multi Multi Channel I/V Sweep (Bipolar transistor and LED) Trng Sampling 0.
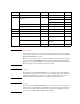
Required Devices for Class Exercises To perform the class exercises, you need the device set (Agilent part number 04156-87001) which contains the following devices. Description Quantity N-channel MOSFET 2 ea. NPN Bipolar Transistor 1 ea. Red Miniature LED 1 ea. 0.1 μF Capacitor 50 V 1 ea. 1.0 Ω Resistor 1/8 W 1 ea. 1.1 kΩ Resistor 1/8 W 1 ea. 511 kΩ Resistor 1/8 W 1 ea. N-ch MOSFET NPN bipolar Transistor LED Brown Black Black Silver 1 ohm Resistor Brown Brown Black Brown 1.
Required Accessories for Class Exercises To perform the class exercises, you need the following accessories. Prepare the accessories shown below. Designation 1 Description Test Fixture Model No. Qty. 16442A/B a 1 ea. 28 pin socket module 1 ea. Connection wire 6 ea. 2 Triaxial Cable 16494A 4 ea. 3 Interlock Cable 16493J 1 ea. 4 Kelvin Triaxial Cable, for Module 5 16493K 1 ea. 5 CMU Cable, for Module 8 N1300A 1 ea. 6 Atto Sense/Switch Unit, for Module 6 E5288A 1 ea.
To perform the flash memory class exercise in Module 13 and if you use the ASU, you need the following accessories. Description Model No. Qty. E5288A Total 3sets 16494A or equivalent Total 7ea. BNC-SMA Cable 16493P 3 ea. SMA-SMA Cable, for synchronization of SPGU 16493Q 2 ea. ASU (Atto Sense/Switch Unit) with control cable Triaxial Cable To perform the flash memory class exercise in Module 13 and if you use the selector, you need the following accessories. Description Model No. Qty.
Contents Module 1. Introduction • New Features • EasyEXPERT • To Perform Easy Application Test • User Interface • Modular Mainframe • SCUU/GSWU • ASU • SMU/Pulse Generator Selector • B2200/E5250 Switch Control • Desktop EasyEXPERT Module 2.
Contents Module 3. Data Display and Management • Data Display window • Graph Analysis Tools • Data Status • To Change Graph/List/Display Setup • To See Print Preview • To Print Display Data • To Copy Graph Plot/List Data • To Save Analysis Result • To Use Preview Window Module 4.
Contents Module 5. Basic Measurement • SMU Fundamentals • Classic Test Environment • SMUs Connected in Series or Parallel • Cabling and Fixture Issues • Kelvin and Driven Guard • Probes and Prober Connections • Triax and Coax Adapters • Safety Interlock Issues Module 6.
Contents Module 7. Measurement Functions • SMU Pulsed Sweep Measurement • I/V-t Sampling Measurement • Negative Hold Time for High Speed Sampling • Auto Analysis • SMU Filter • SMU Series Resistor • Standby Function • Bias Hold Function Module 8.
Contents Module 9. Modifying Application Test Definitions • To Open Application Test Definition • To Modify Test Definition • To Use Debug Tools • To Use Built-in Functions • To Add Data Display • To Use Auto Analysis • To Use Test Setup Internal Variables • To Use Auto Analysis twice (as Class Exercise) • To Use Vector Data (as Class Exercise) Module 10.
Contents Module 11. Advanced Definitions and Operations • To Control External GPIB Devices • To Call Execution Files • To Perform Repeat Measurements • Prober Control Script Module 12.
Contents Module 13.
Contents Contents-8
7 Measurement Functions
Module 7 Measurement Functions In This Module • SMU Pulsed Sweep Measurement • I/V-t Sampling Measurement • Negative Hold Time for High Speed Sampling • Auto Analysis • SMU Filter • SMU Series Resistor • Standby Function • Bias Hold Function There are too many measurement functions to conveniently cover in one module. Ultra low current measurement and capacitance measurement are covered in separate modules. This module covers the key features listed above.
Module 7 Measurement Functions SMU Pulsed Sweep Measurement z z z z z z Use PULSE mode for precise force/measure timing z Pulse down to 500 μs width z Use current ranges from 1 nA to 1 A (HPSMU) z Use voltage ranges from 2 V to 200 V (HPSMU) Use PULSE mode for repeatable 1 A measurements z Eliminate heating during IV sweeps z Avoid device damage Only one pulsed source is available Only one measurement channel is available Set the expected maximum measurement value to Compliance Measurement integration
Module 7 Measurement Functions SMU Pulse Mode VAR1 Sweep output voltage or current stop pulse period pulse width start base hold time time When you select VPULSE or IPULSE on the Channel Setup screen, the SMU Pulse area will appear on the Measurement Setup screen. Pulse period may be adjusted from 5 ms to 5 s in 100 us steps. Pulse period is measured from the base value to peak value transition, between two consecutive pulses. Pulse width may be adjusted from 0.5 ms to 2 s in 100 us steps.
Module 7 Measurement Functions SMU Pulse Mode Pulse On Primary Source VAR1 Primary VAR2 Secondary One SMU can pulse while another follows. Either VAR1 or VAR2 may be pulsed, but not both. The settings above could be used to pulse a drain while stepping the gate.
Module 7 Measurement Functions Hints on Pulsing the HPSMU Use the HPSMU or GNDU as the current return path z Use Kelvin connections (must use on GNDU) z Use 16493L GNDU cable for the GNDU connection z HRSMU or MPSMU S F HPSMU 1.0 A F S GNDU 4.2 A The 1 A SMU (HPSMU) cannot use another MPSMU or HRSMU as the current return. It must be used with the other HPSMU or the GNDU that can sink enough current. The GNDU is the unit that you can use without defining in the Channel Setup.
Module 7 Measurement Functions SMU Pulse Mode Limitations z Minimum pulse width is 500 us z Only one pulsed source is available z Only one measurement channel is available z Measurement range is always compliance range z Integration time cannot be changed 7-7
Module 7 Measurement Functions Class Exercise SMU Pulse Mode z z z You will observe a MOS FET family of curves You will edit VAR1 from V mode to VPULSE mode You will learn how to properly define a "pulsed" algorithm To Get Started: z z z Use the next several pages as you guide Get the IDVD setup Follow the instructions on the following pages You will setup a basic MOS family of curves without VPULSE. Then change VAR1 to VPULSE.
Module 7 Measurement Functions SMU Triax Connection Force Lines to Fixture 1,2,3,4 Ports CMU 16442A/B Fixture SMU4 SMU3 SMU2 SMU1 GNDU B1500A Rear View This is the SMU cable setup that will be used in the remainder of the class exercises. Connect the cables between the B1500A and test fixture as follows.
Module 7 Measurement Functions Jumper Leads – MOS transistor F 1 G F F 2 1 1 PGU F VSU VMU SMU F 4 G G G 1 F 3 F 5 F G GNDU 6 F S G 2 2 2 4 5 6 9 10 11 12 14 15 16 17 18 20 21 22 23 24 1 2 7 8 13 19 28 3 15 25 26 27 28 14 1 S D G Sub 1: Substrate 2: Source 3: Gate 4: Drain For all class exercises, you need the 28-pin dual in line socket which comes standard with the 4145 fixture (16058A) or the newer fixture (16442A/B).
Module 7 Measurement Functions VPULSE Data Display Window Make a measurement to verify the setup is correct. You should see the above family of curves. The algorithm is defaulted to standard staircase sweep on VAR1 (no pulsed SMU).
Module 7 Measurement Functions VPULSE Channel Setup Enter new name before save Drain pulse Switch VAR1 from V mode to VPULSE mode. A new panel will pop up on the Measurement Setup. Before saving this new setup, enter new name into the Setup Name field, then click the Save button.
Module 7 Measurement Functions VPULSE Measurement Setup Range and ADC/Integ are disabled This box pops up only if VPULSE or IPULSE is set on Channel Setup. Maximum measurement value Default pulse conditions for the Measurement Setup are shown here. The base is 0, and the pulse duty cycle is 10 %. These settings are OK for this class exercise. Click the Single button to start a pulsed sweep measurement. Range and ADC/Integ buttons are disabled for pulsed measurement.
Module 7 Measurement Functions I/V-t Sampling Measurement Voltage or current Starts sampling Time=Hold time + a Time=Hold time + Interval + b a b Source Channel 1 output Interval Time=0 (origin) Voltage or current : Measurement Hold Time Measurement time Bias hold time Source Base Channel 2 output a, b : time from measurement start to integration start Time B1500A supports the sampling measurement which performs the operation shown above.
Module 7 Measurement Functions I/V-t Sampling Measurement z LINEAR z Sampling interval: z z >= 2 ms 0.1 ms to 1.99 ms (limited) Number of samples: 1 to 100001 LOG z Sampling interval: >= 2 ms z Number of samples: 1 + number of data for 11 decades z Remaining data: 10/25/50/100/250/500 data are plotted into one decade of the log scale in the same distance There are two sampling mode.
Module 7 Measurement Functions Class Exercise Sampling Measurement You will: z z z Monitor the charging voltage of an RC circuit Learn LOG10 data interval Learn how to properly define a sampling algorithm To Get Started: z z z z Use the instrument setup as same as the SMU pulse exercise Connect the RC components as shown in the next page Get and run the RC-sampling-log setup Change the range or ADC and perform append measurement 7-16
Module 7 Measurement Functions Jumper Leads – Sampling Exercise F 1 G F F 2 G 1 1 PGU F VSU F 3 SMU F 4 F G G 5 F G VMU F S G 2 2 1 2 7 8 13 14 19 28 20 3 4 5 6 9 10 11 12 15 16 17 18 22 23 0.1 uF 21 15 25 1 GNDU 6 2 27 24 26 28 0.5 M 28: SMU1 0.5M 25: SMU2 0.1 uF 22: SMU4 14 1 The 0.5 M ohm and 0.1 uF values were chosen because these values are readily available, and they give a RC time constant suitable for observing 2 ms time steps.
Module 7 Measurement Functions Sampling Exercise – LOG10, 2 ms interval RC Measurement X data 10 data 10 data 10 data Y data X + Y = 20 5 decades 200 s 2 ms The RC-sampling-log setup is for the LOG10 sampling with 2 ms interval and 51 samples. LOG10 sampling obtains 10 data in one decade. And the data will be plotted on the log scale in the same distance. However this rule cannot be kept at the beginning of sampling because of long interval.
Module 7 Measurement Functions Sampling Exercise – LOG10, 2 ms interval 10 data/decade 10 data/decade 10 data/decade 7-19
Module 7 Measurement Functions Sampling Exercise Channel Setup Variable for time data 7-20
Module 7 Measurement Functions Sampling Exercise Measurement Setup FIXED range High speed ADC Use the FIXED range and the high speed A/D converter to get 2 ms interval. Change the range to AUTO. Or change the ADC to the high resolution ADC. And perform append measurement. You may not get 2 ms interval at the beginning of sampling.
Module 7 Measurement Functions Negative Hold Time Available for Interval < 2 ms -90 ms =< Hold Time =< -0.1 ms, 0.1 ms step Bias starts at 0 s For the sampling measurement, the available hold time value is 0 to 655.35 s, in 10 ms step. However, the negative hold time -90 ms to -0.1 ms, in 0.1 ms step is also available for the high speed sampling which the Interval is less than 2 ms. This measurement result example is obtained by the setup shown in the following pages.
Module 7 Measurement Functions Jumper Leads – Negative Hold Time F 1 G F F 2 G 1 1 PGU F VSU F 3 SMU F 4 G G F 5 F G VMU F S G 2 2 4 5 6 9 10 11 12 14 15 16 17 18 20 21 22 23 1 2 7 8 13 19 28 3 15 25 1 GNDU 6 2 27 24 26 28 0.5 M 14 1 7-23 28: SMU1 0.
Module 7 Measurement Functions Negative Hold Time Channel and Measurement Setup Current source Interval < 2 ms Negative Hold Time 7-24
Module 7 Measurement Functions Auto Analysis GM max Hands-off marker and line fitting * Early Voltage Isub max Vth Auto analysis automates the task of doing scalar calculation on swept data. Computed parameters such as Vth or GMmax can be displayed in the Parameters area on the Data Display window. The built-in user functions allow data to be plotted and analyzed according to any arbitrary formula.
Module 7 Measurement Functions Auto Analysis Vth Example Here we see a full-featured example of auto analysis. GMmax and Vth are automatically calculated each time a measurement is made. Even if you alter the analysis, say by moving the line, you can restore the original analysis by clicking the Apply button on the Auto Analysis Setup screen. IMPORTANT! Please note that formulas for auto analysis are not hard coded into the B1500A.
Module 7 Measurement Functions Vth Measurement A Tedious Process Now Automated z Plot square root of the drain current (SQRT Id) z Plot rate of change of SQRT Id (PEAK) z Find Peak Value of the PEAK plot z Drop down to the SQRT Id plot z Draw a tangent line on the SQRT Id plot z Read the X-intercept of the tangent line as Vth22 In the previous example of graphically determining Vth, the above steps were automated.
Module 7 Measurement Functions Class Exercise Auto Analysis You will: z Make a MOS threshold voltage (Vth) measurement z Observe how parameters for the analysis are defined z Observe how the user functions and analysis functions are used in the analysis To Get Started: z z z z Use the standard MOS device and pin connections Get the GMMAX setup Make a measurement and turn the knob Click the Apply button to restore the analysis In this exercise you will observe how auto analysis works.
Module 7 Measurement Functions Vth Measurement Damaged MOS FET Device? * * Good BAD Continuous Curve No Static Damage Broken-Lumpy Curve Severe Static Damage The class exercise uses a packaged MOS FET device which is very susceptible to static damage. If the device has been handled or moved in and out of the socket a few times, you may see a BAD response as indicated above. Replace the device with a new one. At the wafer level, you can have the same problems.
Module 7 Measurement Functions Vth Measurement Channel and Measurement Setup Nothing new here. This slide is included for completeness. You will notice that these variables are heavily used on the Function Setup screen.
Module 7 Measurement Functions Vth Measurement Function Setup Here are definitions for the Y1-axis plot (SQRT_ID) and the Y2-axis plot (PEAK). @L1X means the X-axis intercept of LINE 1. @L1G^2 means the squared gradient value of LINE 1. In this case, it is just calculating line 1 slope. It is squared to account for the fact that the Y1-axis is a square root. Click Help > Agilent EasyEXPERT Help to open the online help. And visit the Read Out Functions page for all of these functions.
Module 7 Measurement Functions Vth Measurement Display Setup Page VTH and BETA are values which will be displayed at the Parameters area on the Data Display window. These variables are defined in the Function Setup screen.
Module 7 Measurement Functions Auto Analysis Analysis Setup Page This screen is the heart of auto analysis. You define custom procedures for graphical analysis with fill-in-the-blank ease.
Module 7 Measurement Functions SMU Filter Filter OFF Force V/I DAC Filter ON SMU (V or I mode) Series Resistor (1 M ohm) Sense Time Filter setting The filter is mounted on each SMU. It assures clean source output with no spikes or overshooting. However, using a filter may increase the SMU settling time. If measurement speed is top priority, set the SMU Filter OFF.
Module 7 Measurement Functions SMU Filter SMU Filter: ON (add filter) or OFF (no filter) To change the SMU filter setup, open the Advanced Setup window by clicking the Advanced button on the Measurement Setup screen. And specify ON or OFF by using the SMU Filter pull down menu. In the power on state, the Classic Test sets the SMU Filter to ON.
Module 7 Measurement Functions SMU Series Resistor Use short cable to minimize the guard capacitance Series Resistor (1 M ohm) Force GNDU Guard Sense line is internally disconnected during the series resistor is connected Sense SMU The series resistor (approx. 1 Mohm) is mounted on each SMU. The series resistor may be used for the device protection, negative resistance measurement, and so on. It depends on the characteristics of test device and measurement environment.
Module 7 Measurement Functions Class Exercise SMU Series Resistor You will: z z z Measure 0.5 M ohm without Series Resistor Measure the same device with Series Resistor Learn how the Series Resistor works To Get Started: z z z z Use the instrument setup as same as the SMU pulse exercise Connect 0.
Module 7 Measurement Functions Jumper Leads – SMU Series Resistor F 1 G F F 2 G 1 1 PGU F VSU F 3 SMU F 4 G G F 5 F G VMU F S G 2 2 4 5 6 9 10 11 12 14 15 16 17 18 20 21 22 23 1 2 7 8 13 19 28 3 15 25 1 GNDU 6 2 27 24 26 28 0.5 M 14 1 7-38 28: SMU1 0.
Module 7 Measurement Functions SMU Series Resistor 1.5 M ohm (with Series Resistor) 0.5 M ohm (device only) The measurement result without the SMU series resistor shows about 0.5 M ohm I-V characteristics. By setting the SMU series resistor, the measurement result shows about 1.5 M ohm characteristics. The IV-res setup uses the analysis function and auto analysis function to draw the regression line and get the slope of the line.
Module 7 Measurement Functions SMU Series Resistor Series R: 1MOHM (add 1 M ohm) or NONE (thru) To change the SMU series resistor setup, open the Advanced Setup window by clicking the Advanced button on the Measurement Setup screen. And specify NONE or 1MOHM by using the Series R pull down menu. In the power on state, the Classic Test sets the Series R to NONE.
Module 7 Measurement Functions SMU Series Resistor Function Setup and Auto Analysis Setup to draw regression line to get slope of the line The analysis function and the auto analysis function are used to calculate the resistance value. This auto analysis setup will draw the regression line for the X-Y1 curve. And the analysis function @L1G is used to pass the slope of the line to the R1 variable.
Module 7 Measurement Functions SMU Series Resistor Compensation 1.5 M ohm (with Series Resistor) Calculated value If you use the SMU series resistor, you will need to compensate the measurement data to eliminate the effects of the series resistor (1 M ohm). This is a compensation example by using the following user function. Vcalc = V1 – I1 * 1000000 The Rcalc value is obtained by using the analysis function and the auto analysis function as same as the IV-res setup.
Module 7 Measurement Functions Standby Function Standby function sets any SMUs (except HRSMU with ASU) to specific output values and compliances before starting or after stopping measurement. Standby function is useful for power supplies of complicated device (eg. Smart TEG), defect analysis, and so on. This slide shows the standby and measurement operation in the following setup.
Module 7 Measurement Functions To Use Standby Function Click the Standby Channel Definition button to open the Standby Channel Definition window. Define Standby channels (Unit, Mode, Source, and Compliance). Click the Standby ON button to set standby channel outputs. The Standby indicator will change from OFF to ON.
Module 7 Measurement Functions Bias Hold After Measurement End of Single measurement or Start of next measurement Bias Hold ON Source or Base value for Sampling CONST VAR1/VAR1’/CMU Stop or Start value VAR2 Stop value Bias Hold OFF CONST OV VAR1/VAR1’/CMU OV VAR2 OV Bias hold function keeps bias output after a measurement is made. For instance, the user may need to keep one or more SMUs on between measurements to bias up a Vcc pin of an IC.
Module 7 Measurement Functions Class Exercise Bias Hold Function You will: z z z Perform Repeat Measurement Measure the LED I-V characteristics Monitor LED during Repeat Measurement To Get Started: z z z Use the connection as same as the SMU pulse exercise Add an LED and jumper leads per following pages Get the LED setup 7-46
Module 7 Measurement Functions Jumper Leads – Bias Hold Exercise F 1 G F F 2 G 1 1 1 PGU F VSU VMU F 3 SMU F 4 G G F 5 F G GNDU 6 F S G 2 2 2 4 5 6 9 10 11 12 14 15 16 17 18 20 21 22 23 1 2 7 8 13 19 28 3 15 26 27 28 14 14 24 25 1 13 Shorter Lead Connect test leads as shown. And add the LED between terminals 13 and 14 of the 28-pin dual in line socket.
Module 7 Measurement Functions Bias Hold Exercise Channel and Measurement Setup SMU1 Function to VAR1 Vh = 0 to 2.5 V Bias Hold to ON Output Value to STOP Set the SMU1 Function to VAR1. The VAR1 output 0 to 2.5 V is enough to light the LED. Set the Bias Hold after Measurement field to ON to enable the bias hold function. And set the Output Value after Measurement field to STOP. This setup keeps 2.5 V output between sweep measurements. So the LED can light between the measurements.
Module 7 Measurement Functions Bias Hold Exercise Repeat Measurement Setup Repeat button Repeats three times Click Run to start measurement Click Repeat button to open this window which is used to set and run the repeat measurement. This example performs the LED I-V sweep measurement three times and then finishes the repeat measurement.
Module 7 Measurement Functions Bias Hold Exercise LED lights on LED lights off During the measurement, leave the fixture lid open. And monitor the LED. This measurement does not force dangerous voltage. At the start of measurement, LED lights off. Beyond the threshold voltage, the LED lights on. After the measurement, the LED keeps lighting until start of the next sweep measurement. And this cycle is repeated until the end of the repeat measurement. After the repeat measurement, the LED lights off.
8 Capacitance Measurement
Module 8 Capacitance Measurement In This Module • CMU Fundamentals • Classic Test Environment • CMU Calibration • SCUU for IV/CV Switching • GSWU for Accurate Capacitance Measurement • ASU for IV/CV Switching 8-2
Module 8 Capacitance Measurement B1500A Multi Frequency CMU • Occupies 1 slot of B1500A • Four terminal pair configuration • Spot & Sweep measurements • Faster measurement time • 1 kHz to 5 MHz frequency range • +/-25V DC bias (+/-100V with SCUU) • Cable length auto detection (1.5 or 3 m) • Higher accuracy below 100pF The multi frequency CMU (capacitance measurement unit) adds the CV measurement capability to the B1500A.
Module 8 Capacitance Measurement CMU Block Diagram Four-Terminal Pair Configuration CMU Generally, any mutual inductance, interference of the measurement signals, and unwanted residual factors in the connection method incidental to ordinary termination methods will have significant effects on the measurements, especially at a high frequency.
Module 8 Capacitance Measurement C-V Sweep Source Single Sweep Double Sweep Linear Sweep Up to +/- 25 V, using only CMU Up to +/- 100 V, using SCUU (Agilent N1301A-100) CMU supports the linear single sweep and the linear double sweep. The CMU can sweep up to a value and then back down (double sweep). This feature is useful when the device must be tested without abruptly removing the forcing condition. The CMU can force up to 25 V DC bias.
Module 8 Capacitance Measurement Class Exercise C-V Sweep Measurement z z You will make the MOS FET Cgs-Vg measurement You will learn how to properly define a C-V sweep algorithm To Get Started: z z z Use the next several pages as you guide Get the CV-1MHz setup Follow the instructions on the following pages 8-6
Module 8 Capacitance Measurement Cable Connections CMU 16442A/B Fixture SMU4 SMU3 SMU2 SMU1 GNDU B1500A Rear View The following cables are required to perform this class exercise. CMU cable (Agilent N1300A-001/002), 1 ea. Triax cable (Agilent 16494A-001/002), 2 ea. One side of the CMU cable forms the attachment used to join and fix it to the CMU. And the other side provides four BNC connectors used to connect the fixture as shown. Connect the cables between the B1500A and the test fixture as follows.
Module 8 Capacitance Measurement Jumper Leads – MOS transistor F 1 F G F 2 PGU F 1 2 CMUL 1 VMU F 4 G F 5 F G GNDU 6 F S G 2 CMUH VSU SMU G G 1 F 3 2 4 5 6 9 10 11 12 14 15 16 17 18 20 21 22 23 24 1 2 7 8 13 19 28 3 15 25 26 27 28 14 1 S D G Sub 1: Substrate 2: Source 3: Gate 4: Drain For all class exercises, you need the 28-pin dual in line socket which comes standard with the 4145 fixture (16058A) or the newer fixture (16442A/B).
Module 8 Capacitance Measurement Capacitance Measurement Measurement Example Cgs Conductance This is the measurement example of the MOS FET Cgs-Vg characteristics. To make the measurement, set SMU1 and SMU2 to COMMON. And set the CMU as shown in the next page.
Module 8 Capacitance Measurement Capacitance Measurement Measurement Setup Selects measurement parameters Frequency and Oscillation level DC bias: -5 V to +5 V Integration time 1. Select the Cp-G mode, and enter the C Name and G Name. 2. Set the Start, Stop, and Step to specify the DC bias sweep condition. 3. Set the Frequency List to specify the measurement frequency. 4. Set the AC Level to specify the AC signal level (oscillation level). 5. Set the Integration Time as you like.
Module 8 Capacitance Measurement CMU Calibration Type Effectiveness Measurement terminals Phase Compensation Corrects phase error caused by extending measurement cables. Open terminals Perform before measurement Open Correction Corrects for stray admittance. Open terminals Perform before Effective for high impedance measurement measurement. Short Correction Corrects for residual Connect terminals Recommended impedance. Effective for low together impedance measurement.
Module 8 Capacitance Measurement CMU Calibration Calibration Opens dialog box to start correction/compensation. Open the Calibration window and click the CMU Calibration tab to perform the CMU calibration. At first, open the measurement terminals for CMUH and CMUL, and perform the Phase Compensation by clicking the Measure… button. After the phase compensation, perform the Open Correction by clicking the Measure… button.
Module 8 Capacitance Measurement SCUU – for IV/CV Switching B1500A with SCUU CMU Hcur/Hpot SMU N+1 Lcur/Lpot SMU N SCUU Output: Force1/CMUH Force2/CMUL CV Triaxial Cable IV CV Force Manipulator/Positioner Force IV N: SMU number, Integer. Guard Guard Switches CV/IV You have a very hard time switching between CV and IV measurements (you may actually devote separate probe stations to CV and IV just to avoid having to change cables).
Module 8 Capacitance Measurement SCUU Connection Example – Direct Docking CMUH or SMU5 Force CMUL or SMU4 Force CMU SMU5 SMU4 SMU3 SMU2 16442A/B Fixture SMU1 GNDU B1500A Rear View Before connecting the SCUU, turn the B1500A off. And restart the B1500A after connection is completed. The B1500A cannot recognize the SCUU without restart after connection. Use normal triaxial cables or Kelvin triaxial cables to connect between the SCUU and the test fixture.
Module 8 Capacitance Measurement SCUU Connection Example – SCUU Cable SMU CMU Unify Unit (SCUU) CMU Force1 or CMUH SMU Sense1 SMU Sense2 SCUU cable Force2 or CMUL To install the SCUU near the manipulators/positioners, use the N1301A-102 SCUU cable. To realize accurate capacitance measurement, use the N1301A-200/201/202 GSWU & cable. See the next section.
Module 8 Capacitance Measurement GSWU – for Accurate Capacitance Measurement CMU CMU cable or SCUU cable Extension cable Manipulator or Positioner Hc Hp DUT Lp Lc Return path Shielded 2T configuration 4TP configuration 3T configuration This slide shows the typical cable connections for the capacitance measurement. Note the following tips to perform the measurement accurately.
Module 8 Capacitance Measurement GSWU Connection Example B1500A with SCUU CMU Hcur/Hpot SMU N+1 Lcur/Lpot SMU N SCUU Output: Force1/CMUH Force2/CMUL CV Triaxial Cable IV CV Force Manipulator/Positioner Force IV N: SMU number, Integer. Guard Guard Switches CV/IV Clip wire Clip wire Switches CV/IV GSWU Simple direct connection between SMU/CMU and manipulator/positioner GSWU Control Cable CV IV CV: thru GSWU IV: open 1.
Module 8 Capacitance Measurement ASU – for IV/CV Switching CMUH or Force Sense To CMU Hpot/Hcur ASU 1 To HRSMU 1 CMUL or Force CMU return path To CMU Lpot/Lcur Sense ASU 2 To HRSMU 2 The ASU (Atto Sense and Switch Unit) is available for the B1500A installed with the HRSMU. Using the ASU permits use of the 1 pA range. Also the ASU can switch the measurement resources, HRSMU or an instrument connected to the AUX input connectors. The ASU has input connectors, one triaxial and two coaxial.
Module 8 Capacitance Measurement ASU to CMU/HRSMU Connection Example ASU1 Hcur Hpot SMU3 Force CMU SMU4 SMU3 SMU2 Lcur SMU2 Force SMU1 GNDU Lpot ASU2 B1500A Rear View To connect the ASUs, use the following cables. CMU cable (Agilent N1300A-001/002), 1 ea. Triax cable (a part of Agilent B5288A-001/002), 2 ea. D-sub cable (a part of Agilent B5288A-001/002), 2 ea. One side of the CMU cable forms the attachment used to join and fix it to the CMU.
Module 8 Capacitance Measurement ASU Switch Control Configuration ASU I/O Path: SMU (to use HRSMU) or AUX (to use CMU) To control the ASU switch connection, open the Configuration window and display the ASU tab screen. Then highlight the B1517A/B5288A row and set the ASU I/O Path, SMU or AUX by using the ASU I/O Path pull down menu. Set SMU when you use the HRSMU. Set AUX when you use the CMU or the other resource connected to the ASU’s AUX In.
9 Modifying Application Test Definitions
Module 9 Modifying Application Test Definitions In This Module • To Open Application Test Definition • To Modify Test Definition • To Use Debug Tools • To Use Built-in Functions • To Add Data Display • To Use Auto Analysis • To Use Test Setup Internal Variables • To Use Auto Analysis twice (as Class Exercise) • To Use Vector Data (as Class Exercise) 9-2
Module 9 Modifying Application Test Definitions Modification Overview 1. Open an application test definition to be modified 2. Open test definition editor 3. Save the definition as your test definition 4. Modify the definition as you like 5. Resave and close the definition 6. Export your test definition as your backup This module explains the modification example using the Vth Const Id test definition.
Module 9 Modifying Application Test Definitions To Open an Application Test Definition Example: Select Vth Const Id as template Click a test definition in Library list area, and click Select button to open the test definition. For example, open Vth Const Id.
Module 9 Modifying Application Test Definitions To Open Test Definition Editor Click Library>Open Definition of This Test… Cancel Define New Test… Open Definition of This Test… Delete Definition of This Test Import Test Definition… Export Test Definition… Click Library and select Open Definition of This Test… to open the test definition editor. The following pages show the modification example to display the gm-Vg curve given by the Vth Const Id test result.
Module 9 Modifying Application Test Definitions To Save Definition As Your Definition Save the definition as your definition (ex: Trng vth) Save Ctrl+S Close new test name new category Test Definition editor Create a new Category (ex. Exercise), and change the Test Name (ex. Trng Vth). After changing the test name, save the test definition. Saving the definition will change the window title to the new test name. Window title will be changed from Vth Const Id to Trng Vth in this example.
Module 9 Modifying Application Test Definitions To Modify Test Definition Change default values and add parameters (ex: Pcomp_d) This area sets the properties of the specified parameter. •Min •Max •Digits •Resolution •Unit •Typical Values •Symbols Test Definition editor On the Test Specification tab screen, you can add new parameters or change parameter settings.
Module 9 Modifying Application Test Definitions To Modify Test Definition Change or set test parameters (ex: Pcomp_d) Test Definition editor On the Test Contents tab screen, you can change the test execution flow (program flow), measurement conditions, display setup, and so on. To add the Pcomp_d parameter to the measurement setup, click the Vth Const Id line in the program list. And in the I/V Sweep setup editor, display the Measurement Setup tab screen. And enter Pcomp_d to the Pwr Comp entry field.
Module 9 Modifying Application Test Definitions To Modify Test Definition Change display setup and define external variables External variables must be defined before making the matching table. External variable Test setup internal variable Test Definition editor On the Display Setup tab screen, you can change the graph scale Min/Max values or add/delete the list parameters. This example makes the matching table between the External variables and the Measurement data.
Module 9 Modifying Application Test Definitions To Modify Test Definition Define Test Output and Analysis Parameters Test Definition editor This example defines the Test Output and the Analysis Parameters. 1. Display the Test Output screen. 2. Check the Define own Output Parameters. 3. Click the Define Analysis Parameters button. 4. Define the analysis parameters (ex. GM_data, VG_data, ID_data, and Vth_constID). 5. Define the X-Y Graph, List Display, and Parameters.
Module 9 Modifying Application Test Definitions To Modify Test Definition Add local variable (ex: Yes for Message box) Variable Yes is used in the message box. Test Definition editor Click Local Variables Definition line to display the local variable list. And define variables. This example defines Yes variable as follows. This variable is used in a message box. See the next page.
Module 9 Modifying Application Test Definitions To Modify Test Definition Define Message box This message box asks you clicking the OK button to display the gm curve. This setup displays the message “To display the gm curve, click OK.” on the message box. This setup makes the OK button on the message box. The value of the local variable Yes is set to 1 from 0 by clicking the OK button. Test Definition editor Click the Message line in the program list. And define the message box.
Module 9 Modifying Application Test Definitions To Modify Test Definition Example: Displaying Message box In this modification example, the message box opens after the Vth Const Id measurement is completed. This message box asks you clicking the OK button to display the gm curve.
Module 9 Modifying Application Test Definitions Class Exercise Perform the following modification example. 1. Open Id-Vd test definition. 2. Modify it as follows. If Yes is clicked after Id-Vd test, move marker and tangent line to Vdrain=1 point. If Yes is clicked, perform Vth gmMax test. 3. Use the debug tools. 4. Save the definition as a new one (ex. Trng IdVd Vth). 5. Perform the test. 6. Export the new definition, and import it. 1. Add the Yes variable to the Local Variable Definition. 2.
Module 9 Modifying Application Test Definitions To Use Debug Tools ReturnPort = SMU1 Break point ReturnCh = OUT1 Variable Inspector This slide shows an example of using the Variable Inspector for debugging. Confirm whether the correct values are passed to the variables properly. Set the break point, and click the Run button. After the program is paused, click the Inspect button. The Variable Inspector is displayed. You can check the values by using the variable display fields.
Module 9 Modifying Application Test Definitions To Use Debug Tools •Run •Abort •Stop •Break •Inspect The Debug tab menu provides the following buttons: •Run button starts the debug (executes the test flow). During execution, the label changes to Pause. Clicking Pause button pauses the execution, and changes the label to Run that is used to continue the debug (execution). •Abort button aborts the debug (execution). •Step button executes the highlighted line of the test flow.
Module 9 Modifying Application Test Definitions To Use Debug Tools Debug: Inspect button Break point Paused point The Variable Inspector is displayed by clicking the Inspect button after the program is paused, and is used to monitor or change the value of the device parameters, test parameters, analysis parameters, local variables, or system variables. For the vector variables, only data monitor is available. The Variable Inspector provides the following buttons to add the variable monitor area.
Module 9 Modifying Application Test Definitions To Resave and Close Your Test Definition Close the definition editor, and overwrite your test definition Save Ctrl+S Close Test Definition editor After you create your test definition, save the definition and close the Test Definition editor. Click File > Close. Confirm Test Definition Save dialog box is opened. Click Yes to save your test definition and continue the close operation. The Confirm Test Definition Overwrite dialog box is opened.
Module 9 Modifying Application Test Definitions To Export/Import Test Definition Click Library>Export Test Definition or Import Test Definition Cancel Define New Test… Open Definition of This Test… Delete Definition of This Test Import Test Definition… Export Test Definition… The test definition can be exported as the EasyEXPERT test definition file format or XML file format. And the file can be imported to the EasyEXPERT later.
Module 9 Modifying Application Test Definitions To Use Built-in Functions Absolute value: abs(A) Averaging: avg(A), mavg(A,B) Data conversion: string(A), value(A) Difference: delta(A) Differentiation, integration: diff(A,B), integ(A,B) Exponent, logarithm: exp(A), lgt(A), log(A) Maximum, minimum: max(A), min(A) Reading data : getNumericData(A), getVectorData(A) Square root: sqrt(A) Trigonometric function: acos(A), asin(A) , atan(A), atan2(A,B), cos(A), sin(A), tan(A) The EasyEXPERT soft
Module 9 Modifying Application Test Definitions To Use Built-in Functions User function setup example gm = diff(Id,Vg) gmMax = max(gm) VG=getVectorData(Vg) ID=getVectorData(Id) GM=getVectorData(gm) VTH=getNumericData(Vth) GM_MAX=getVectorData(gmMax) This is an user function setup example. This example uses the diff function to calculate gm values and the max function to get the maximum gm value.
Module 9 Modifying Application Test Definitions To Use Read Out Functions Marker index value: @MI X coordinate value: @MX, @CX Y coordinate value: @MY, @MYn, @CY, @CYn Regression line parameter: @L1CO, @L2CO Line slope: @L1G, @L1Gn, @L2G. @L2Gn Line X intercept: @L1X, @L2X Line Y intercept: @L1Y, @L1Yn, @L2Y, @L2Yn Intersection of lines: @IX, @IY, @IYn n: integer. 1 to 8.
Module 9 Modifying Application Test Definitions To Use Read Out Functions Analysis function setup example Vth = @L1X This is an analysis function setup example. This example uses the @L1X function to get the X intercept value of the line 1.
Module 9 Modifying Application Test Definitions To Add Data Display Analysis: Display Data Setup Measurement, data display, and data save Data display The test setup performs measurement, displays the test result, and stores the test result data to the test record. In addition to the default test result display, you can make additional data display by using the Display Data Setup statement.
Module 9 Modifying Application Test Definitions To Add Data Display Additional data display example This is a test result example displayed on the Data Display window. The auto analysis setup for this example is shown in the next page.
Module 9 Modifying Application Test Definitions To Use Auto Analysis Function Analysis: Auto Analysis • Line 1 • Line 2 • Marker GM=GM_MAX The Auto Analysis statement is used to apply the automatic analysis function to the last test result before this statement. When the test finishes, the function automatically draws lines, a marker, or both on the X-Y Graph of the Data Display window. This statement provides the same GUI as the Auto Analysis setup in the Classic Test.
Module 9 Modifying Application Test Definitions To Control Test Result Data Outputs Analysis: Data Display Control Data Display: OFF/ON Miscellaneous: Data Store Control Data Store: OFF/ON By the default setting, the results of the tests defined in your test definition are displayed on the Data Display window and are stored to the data record. You can control the data display of the tests by using the Data Display Control statement.
Module 9 Modifying Application Test Definitions To Use Test Setup Internal Variables From Display Setup screen of Classic Test setup Assign to external variables… Assign to external variables… Internal variable •Local variable •Device parameter •Test parameter •Analysis parameter External Variable Setup From Application Test setup You may want to read the parameters/variables used in Classic Test setup or Application Test setup defined in the Test Contents.
Module 9 Modifying Application Test Definitions To Use Test Setup Internal Variables Setup example Assign to external variables… This example makes the mapping table between the test setup internal parameters and the analysis parameters. •Define VTH, GM_MAX, VG, ID, and GM as the analysis parameters. •Set these analysis parameters to the display parameters. •Open the External Variable Setup dialog box. •Assign VTH to the internal parameter Vth. •Assign VG to the internal parameter Vg.
Module 9 Modifying Application Test Definitions To Use Test Setup Internal Variables Result example This is a result example of the test output setup shown in the previous pages.
Module 9 Modifying Application Test Definitions To Use Test Setup Internal Variables Using built-in functions Display parameters of the last Data Display window Local Variables Definition BLOCK IdVg Test setup VG = getVectorData(“Vg”) ID = getVectorData(“Id”) GM = getVectorData(“gm”) GM_MAX = getVectorData(“gmMax”) VTH = getNumericData(“Vth”) IdVd Test setup END BLOCK Vg, Id, gm, gmMax, and Vth must be the display parameters of IdVg.
Module 9 Modifying Application Test Definitions To Use Test Setup Internal Variables Using built-in functions, setup example This example sets the following test flow: Local Variables Definition ! Defiles Yes variable BLOCK Message ! Do you perform Id-Vg measurement? IF Yes=1 IdVg ! Classic test setup for Id-Vg measurement VG=getVectorData(“Vg”) ID=getVectorData(“Id”) GM=getVectorData(“gm”) GM_MAX=getVectorData(“gmMax”) VTH=getNumericData(“Vth”) END IF Message ! Do you perform Id-Vd measurement? I
Module 9 Modifying Application Test Definitions To Use Test Setup Internal Variables Using built-in functions, result example This is a result example of the test output setup shown in the previous pages.
Module 9 Modifying Application Test Definitions Class Exercise To use Auto Analysis twice You will: z z z Make two kinds of MOS threshold voltage (Vth) measurements Observe how the user functions and analysis functions are used in the analysis Observe how auto analysis works twice To Get Started: z z z z Use the standard MOS device and pin connections Get the Vth gmMax setup Open test definition editor Modify the definition for Vth measurement by using the constant current method.
Module 9 Modifying Application Test Definitions To Modify Test Definition Opening Vth gmMax test definition 1 3 4 2 1. Select the CMOS category. 2. Open the Vth gmMax test definition. 3. Click the Library button. 4. Select the Open Definition of This Test… menu. The test definition editor is opened with the Vth gmMax test definition.
Module 9 Modifying Application Test Definitions To Modify Test Definition Setting properties of numeric variable 1 1 3 2 1. Save the test setup as a new one. For example, save it as Vth gmMax and Id of the Exercise category. Click Add button to display the entry fields for the parameter. 2. Select the Id@Vth variable and the type of Numeric. 3. Set properties of the Id@Vth variable.
Module 9 Modifying Application Test Definitions To Modify Test Definition Analysis function setup 1 3 2 4 1. Display the Test Contents screen. 2. Highlight the Vth_gmmax line. 3. Click the function Setup tab. 4. Add the Analysis function. Set the following parameters. Vth@Id V @MX This is an analysis function setup example. This example uses the @MX function to get the X coordinate value.
Module 9 Modifying Application Test Definitions Auto Analysis Setup 1 Auto Analysis Setup 2 Check this box. 1. Click the Auto Analysis Setup tab to display the Auto Analysis setup screen. 2. Check the box to fix the Line 1. If the box is not checked, the line will be moved when the 2nd Auto Analysis is done. The 1st Auto Analysis is set in this slide.
Module 9 Modifying Application Test Definitions To Set Display Setup 1 Display Setup 2 3 1. Click the Display Setup tab. 2. Click Add button to display the entry fields for the parameter. 3. Select Vth@Id to display.
Module 9 Modifying Application Test Definitions Auto Analysis Setup The 2nd Auto Analysis Setup 1 3 2 5 4 6 Idrain=Id@Vth*Polarity 1. Display the Test Contents screen. 2. Click the Analysis Setup tab. 3. Highlight the Auto Analysis icon. 4. Hit Insert button. 5. Check the box of Interpolation Mode. 6. Check the box of Enable. Then enter Idrain=Id@Vth*Polarity to find the constant current Vth. The 2nd Auto Analysis is set in this slide.
Module 9 Modifying Application Test Definitions To Use Auto Analysis Twice Result example This is a result example of using two times Auto Analysis shown in the previous pages. Vth, gmMax and Vth@Id are automatically calculated.
Module 9 Modifying Application Test Definitions Class Exercise To Use Vector Data. 1. Open the Cgg-Vg test definition. 2. Modify it for the multiple frequency test using a vector variable. 3. Use the debug tools. 4. Save the definition as a new one (ex. Trng Cgg-Vg). 5. Perform the test. 6. Export the new definition, and import it. See the following pages which show an example to use a vector data. The Cgg-Vg test definition is used as the reference of this example.
Module 9 Modifying Application Test Definitions To Modify Test Definition Opening Cgg-Vg test definition 1 3 4 2 1. Select the CMOS category. 2. Open the Cgg-Vq test definition. 3. Click the Library button. 4. Select the Open Definition of This Test… menu. The test definition editor is opened with the Cgg-Vg test definition.
Module 9 Modifying Application Test Definitions To Modify Test Definition Setting properties of vector variable 1 1 3 4 2 1. Save the test setup as a new one. For example, save it as Trng Cgg-Vg of the Exercise category. 2. Select the FREQ variable and change the type from Numeric to Vector. 3. Click the Dimension… button. The Define dimensions dialog box appears. 4. Set the dimension of the FREQ variable. The example in this slide sets the one dimension and three elements vector variable.
Module 9 Modifying Application Test Definitions To Modify Test Definition Setting vector data 2 1 1. Click the Grid button of the FREQ variable. The Define vector data dialog box appears. 2. Define the vector values for the FREQ variable. The example in this slide sets the value 1 MHz, 2 MHz, and 3 MHz to the FREQ three elements vector variable.
Module 9 Modifying Application Test Definitions To Modify Test Definition Using the at( ) function to read vector data 1 3 2 1. Display the Test Contents screen. 2. Highlight the Cgg-Vg line. 3. Click the Measurement Setup tab and set the Frequency List using the at( ) functions.