
Technical data


1100 Series DAD and MWD Reference Manual 111
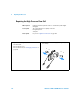
Repairing the Detector 4
8
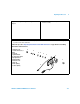
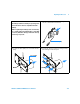
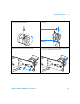
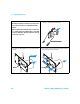
Insert a new gasket [6, 7] and the window assembly [1]
into the cell body. Assure, that the gasket is on the bottom.
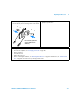
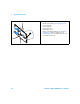
9 Using a 4-mm hex key, tighten the window screw hand
tight plus a quarter turn.
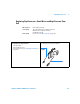
Next steps:
• Reconnect the capillaries, see “Exchanging a Flow Cell” on page 105.
• Perform a leak test.
• Insert the flow cell.
• Replace the front cover
• Perform a wavelength calibration, see “Wavelength Recalibration” on page 84 or holmium test, see “Holmium Oxide
Te s t ” on page 86 to check the correct positioning of the flow cell.
6
1
1
7
Do not mix the gasket #6
and # 7 (different hole
diameter)