
User`s manual
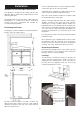


J. To Remove Upper Oven Elements
1. Isolate from electric supply.
2. Proceed as ‘TO REMOVE UPPER OVEN LINERS’.
3. Lift out oven base to gain access to the oven element.
4. Remove screw securing element to frame.
5. Carefully withdraw element from frame so that the
electric terminals can be disconnected, take care not to
allow the cables to drop down the back of the
appliance.
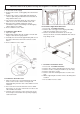
K. To Remove Fan Oven Element
1. Isolate from electric supply.
2. Proceed as ‘TO REMOVE OVEN LINERS’.
3. Remove 3 screws securing element to frame and
carefully withdraw element until access can be made
to the electrical terminals.
4. Disconnect terminals taking care not to allow the cable
to fall down the rear of the appliance.
5. Re-assemble in reverse order.
L. To Remove Oven Fan
1. Isolate from electric supply.
2. Proceed as ‘TO REMOVE OVEN ELEMENT’.
3. Remove 4 fixing screws securing fan assembly to
frame.
4. Withdraw fan assembly sufficiently to gain access to
motor electrical terminals and disconnect cables.
5. Remove fan blade.
NOTE: Fan blade fixing nuts is LH thread.
6. Remove motor from mounting plate screws.
7. Re-assemble in reverse order.
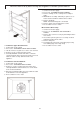
M. To Remove Oven Lamp
1. Isolate from electric supply.
2. Process as ‘TO REMOVAL TOP OVEN/GRILL
LINERS’.
3. Remove door seal if necessary by unhooking from the
four corners.
4. Lift out base panel to gain access to lamp electrical
terminals and disconnect cables.
5. Remove lamp lens.
6. The lamp body can now be removed by depressing
four retaining tags on the lamp body.
7. Re-assemble in reverse order.
SERVICING - WARNING
Disconnect from electricity before servicing. Check appliance is safe when you have finished
32