
User`s manual


To raise the cooker turn screw clockwise, to lower turn
screw anti-clockwise.
When the cooker is level and in the correct position, the
two feet at the front corners of the cooker MUST be
lowered to come into contact with the floor and support the
cooker (tighten the locknuts). The two front mobility
wheels must then be raised by at least one turn (anti-
clockwise of the adjusting screw) to ensure that the
cooker is locked in place and cannot accidentally roll out
of position.
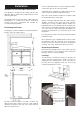
Fitting the splashback (optional)
To fit the splashback, the appliance must be moved out
slightly to gain access to the rear of the appliance.
Remove 2 screws as shown.
Fit splashback as shown.
Fitting a stability bracket
A stability bracket (not supplied with the cooker) should be
fitted. Any restraining device should be secured to the
fabric of the building and should also be released so that
the cooker can be pulled out for cleaning and
maintenance.
When fitting a stability bracket read these instructions
together with the leaflet supplied with the bracket.
a. Position and level the appliance.
b. Draw a pencil along the front edge of the base of the
cooker and along the right hand edge.
c. Remove the range.
d. Mark off 495mm from the RH side of the unit to indicate
the centre line for the bracket.
e. Mark off 415mm to locate the front edge of the lower
bracket. Fix bracket to floor.
f. Measure the height from floor level to the bottom of the
opening in the cooker back. Add 3mm to this
dimension and assemble the stability bracket to this
height (i.e. from floor level to underside of top
member).
28