
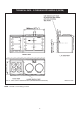
Technical data

10
COMMISSIONING (CONTINUED)
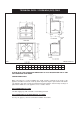
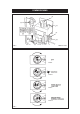
LIGHTING THE BURNER - FIG. 2.
CAUTION: NO SMOKING OR NAKED LIGHTS
Open the outer burner door to expose the gas control combination valve.
CAUTION: BEFORE LIGHTING: ENSURE THAT THE GAS VALVE CONTROL KNOB 2 IS
SET IN THE OFF POSITION (SEE FIG. 3A) AND COMBUSTION DISCHARGE SAFETY
DEVICE BUTTON 6 IS DEPRESSED.
1. Turn off union gas cock 1. Test the gas installation from the meter cock for soundness and
purge.
2. Turn on gas supply and open gas cock 1.
3. Turn the gas valve control knob 2 anti-clockwise to the position ( ) (See Fig. 3B). Press
down and hold the knob in the position while depressing the piezo ignitor 3 several times
until the pilot has lit. This can be observed through the burner housing aperture.
4. When the pilot has lit continue to hold the gas valve control knob for approximately 30
seconds. If it goes out, wait 3 minutes and repeat the procedure holding for a little longer.
5. With the pilot flame established, rotate the gas valve control knob 2 anti-clockwise to its low
fire position (See Fig. 3C). Where upon the main burner will automatically light. Leave in the
low fire position for at least 30 minutes.
6. After 30 minutes rotate the control knob further anti-clockwise to the mid-position of the
green band for normal running. (See Fig. 3D).
NOTE: AFTER SEVERAL HOURS THE HEAT INDICATOR SHOULD BE ON OR ABOUT THE
CENTRE OF THE SILVER SECTION.
IT MAY BE NECESSARY TO ADJUST THE CONTROL KNOB SLIGHTLY IN THE GREEN
BAND TO ACHIEVE THIS.
IF THE FLAME HAS EXTINGUISHED FOR WHATEVER REASON, WAIT THREE MINUTES
(MINIMUM) BEFORE RE-LIGHTING.
7. On the first lighting or if the cooker has been cold for a long time, moisture from the
insulation may run down the enamelled front of the cooker. This should be wiped off to
prevent staining.
8. Check the inlet gas pressure is as indicated in the data plate as follows.
(i) Turn the gas valve control knob 2 to OFF position (See Fig. 3A). Remove the inlet
pressure test nipple plug 4 and fit pressure gauge. Relight pilot (See No. 3 and 4) Turn
gas valve control knob 2 to the mid-position of the green band.
(ii) Check inlet pressure correctly corresponds to the data plate.
(iii)Check that the gas pressure is unaffected when other gas appliances are used.
(iv)Turn gas valve control knob 2 to ignition position (See Fig. 3B). Remove the pressure
gauge and replace gas nipple plug. Turn gas valve control knob 2 to the mid-position of
the green band for normal running.