
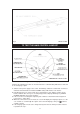
Technical data
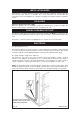


CAUTION: BEFORE LIGHTING: ENSURE KNOB (A) IS IN THE OFF POSITION (SEE FIG. 8).
ALSO ENSURE GAS SUPPLY TO COOKER IS ON, AND THE GAS SERVICE COCK (C) IS
IN THE ON POSITION (SEE FIG. 2), AND THE ELECTRICAL SUPPLY TO THE AGA IS
SWITCHED ON.
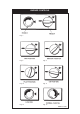
LIGHTING PROCEDURE: SEE FIGS. 7 - 13.
1. The main burner gas flow is set with the ‘temperature’ knob (B) (See Fig. 7). First, ensure
both knobs are turned fully clockwise. Knob (A) to the OFF position and knob (B) to the
minimum setting (thin end of the white band).
2. Turn ON/OFF knob (A) slightly anti-clockwise towards the IGNITION position ( ) until
reaching stop, press down and hold for 5 seconds (gas flows only to the pilot burner). (See
Fig. 9).
3. Continue pressing down knob (A) while turning further qnti-clockwise to the PILOT position
(this activates the piezo), continue to hold down for 10 seconds after pilot burner has
been lit. (If the pilot does not light, steps 2 and 3 can be repeated). (See Fig. 10).
4. Upon lighting, release knob and turn further anti-clockwise to the ON position (large flame
symbol) (See Fig. 11). Pilot gas flows and mains gas flows according to the temperature
setting (knob B).
5. Turn the temperature knob (B) slightly anti-clockwise into the white band (LOW FIRE
position). Leave in the low fire position for at least 30 minutes
(See Fig. 12).
NOTE: ‘LOW FIRE’ position is attained by turning knob (B) gradually into the white band, until
SMALL FLAME is observed through viewing window (F). (See Fig. 2).
6. After 30 minutes rotate control knob (B) anti-clockwise to the mid-position of the green band
for normal running (See Fig. 13).
NOTE: After several hours the heat indicator should be within the black band on the AIMS
handset ‘INFORMATION SCREEN’. It maybe necessary to adjust the control knob in the green
band to achieve this, this allows the cooker to stabilise for at least 4 hours before attempting any
further adjustment.
When the cooker is lit from cold, moisture may form on the enamel which should be wiped off to
prevent staining.
IF THE FLAME HAS EXTINGUISHED FOR WHATEVER REASON, WAIT THREE MINUTES
(MINIMUM) BEFORE RE-LIGHTING.
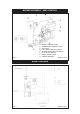
6. Check the inlet gas pressure is as indicated on the data plate (See Fig. 2).
(a) Turn knob (A) to the OFF position (Fig. 8). Unscrew the inlet pressure test nipple
plug (D), and fit pressure gauge. Light the burner, turn knob (A) to the ON position
(Fig. 11) and knob (B) to the mid-position of the green band (Fig. 13).
(b) Check inlet pressure correctly corresponds to the data plate.
(c) Check that the gas pressure is unaffected when other gas appliances are used.
(d) Turn knob (A) to OFF position. Remove the pressure gauge and replace test nipple
plug (screw plug back in, but take care not to overtighten).
(e) Relight burner as steps 1 to 6 and check pressure test nipple for gas tightness.
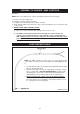
COMMISSIONING
12