
User and Installation Guide


8
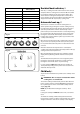
Table 2.2
Power level
Auomatic Heat-up Time at
100% (min:sec)
1 0:48
2 2:24
3 3:50
4 5:12
5 6:48
6 2:00
7 2:48
8 3:36
Residual heat indicator, H
After use, a cooking zone will remain hot for a while as heat
dissipates. When a cooking zone is switched o the residual
heat indicator symbol [H ], will appear in the display. This
shows that the cooking zone temperature is above 140 °F
(60 °C) and may still cause burns. Once the temperature has
dropped to below 140 °F (60 °C) the [ H ] will go out.
Automatic heat-up, A
This function is available on all of the cooking zones. It
allows rapid heating to bring the selected cooking zone up
to temperature. The zone will maintain 100 % power (level
9) for the specied time and then automatically reduce
power to the preset level. The function is selected by turning
the control knob to the ‘A’ position. This can be selected by
turning the control knob momentarily counter-clockwise
from the zero position until the symbol [ A ] is shown on the
cooktop control display.
Once the [A ] is displayed, turn the control knob to the level
of your choice (1 to 9). The pan will heat up at 100% power
for a specied time before the power is reduced to the level
selected.
When the Automatic Heat-up function is activated, the
cooktop control display will ash alternately between the [A ]
setting and the chosen power level.
Once the Automatic Heat-up time has ended the cooktop
display will stop ashing and will show the chosen power
level.
The Automatic Heat-up function can be stopped by either
turning the control knob back to the “0” power setting or
turning the control knob to the “9” power setting.
For your guidance Table 2.2 shows the time available at
100% power depending on the power level selected in the
Automatic Heat-up mode.
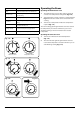
Child lock, L
To prevent the unwanted use by children, the cooktop can be
locked.
n
IMPORTANT: This can only be activated when all the
cooking zones are switched o.
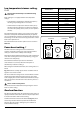
To lock the cooktop, simultaneously turn the two left-hand
burner controls counter-clockwise (Fig. 2.7) and hold until
the L symbol appears in the centre of the cooktop control
display (Fig. 2.8).
NOTE: [A ] will ash when locking the cooktop – this is
normal.
Locking the cooktop will NOT aect the oven; it can still be
used.
To unlock the cooktop, simultaneously turn the two left-
hand controls counter-clockwise and hold until the L symbol
disappears from the centre of the cooktop control display.
Fig. 2.7
Fig. 2.8