Aga ACIM-15 For models with serial number 20070608001 and higher
S TA RT I N G O U T Remove Packaging Your ice machine has been packed for shipment with all parts that could be damaged by movement securely fastened. Before installing the ice machine, be sure all packing materials and tape have been removed. Important Save the carton packaging until your ice machine has been thoroughly inspected and found to be in good condition. If there is damage, the packaging will be needed as proof of damage sustained in transit.
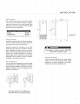
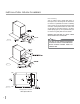
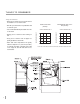
I N S TA L L AT I O N : D R A I N P L U M B I N G Drain Plumbing Your ice machine uses a gravity drain, (figure 1) that requires 5/8" I.D. tubing from the back of the ice machine to a plumbed connection to a sanitary sewer. Remove the access panel to plumb in drain connection. Gravity drain location for built-in units can be within the area shown in figure 3. An optional drain pump, (figure 2) can be purchased for your ice machine if a gravity drain is not accessible.
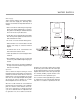
WAT E R S U P P LY Water Supply This ice machine must be connected to a potable, active cold water supply line delivering water pressure at a minimum of 20 psi and maximum of 120 psi. • Water connection is made through a right angle garden hose fitting supplied with ice machine. See garden hose fitting for detailed instruction sheet. Do not use any thread sealers. • A water filter can be used with this unit. A quality filter can help remove particles as well as remove taste and odors from water.
CARE OF THE UNIT Care of Unit 1. Avoid leaning on the cabinet door. You may bend the door hinge or tip the unit. 2. Exercise caution when sweeping, vacuuming, or mopping near the front of the unit. Damage to the grille and/or switch can occur. 3. Periodically clean the inside of the ice machine components and inside of unit (see Cleaning Your Ice Machine section). 4. Periodically check and/or clean the front grille and condenser coils as needed. 5.
CARING FOR YOUR ICE MACHINE Cleaning Your Ice Machine Some impurities will remain and build up in the ice machine and stick to the ice machine's parts over time. This build-up must be removed for proper ice production, ice quality, and ice machine life. Your ice machine is equipped with a cleaning mode that will help in cleaning out these impurities. 7. After the cleaning cycle has ended, remove the front panel again and check that the build-up has been removed.
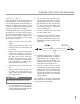
T H I N G S TO R E M E M B E R Things to Remember • Allow your ice machine to run for 24-48 hours to accumulate ice in ice machine's bin. • Keep your ice machine clean for proper ice quality, production, and unit life. • Room and water temperatures will greatly affect the output of ice in your unit (see table). Ice will also melt away, especially at the start of an empty bin, but will slow down as ice accumulates.
O B TA I N I N G S E RV I C E Before Calling for Service Before calling for service, check the following items: • Make sure unit is plugged into outlet. • Check the outlet for power. Test outlet with lamp to make certain outlet has power. • Make sure ice machine's switch is in the "ON" position. • Make sure that there is cold water supplied to the ice machine. • Make sure drain plug on bottom of reservoir is inserted. • Make certain unit is level from front to back and side to side.
TROUBLESHOOTING ONE PROBLEM POSSIBLE CAUSE CORRECTION Unit does not operate. The unit is unplugged. Breaker is tripped or fuse is blown. Plug in the unit. Reset breaker or replace fuse. Check to make sure there is not a short in the electrical circuit. Set the rocker switch on the grille of the ice machine to the "ON" position. Ice machine selector switch is in the "OFF" position. Unit operates but does not produce any ice. The unit has just been started and it has been less than 6 hours.
TROUBLESHOOTING TWO PROBLEM POSSIBLE CAUSE CORRECTION Ice cubes are too small (less than 1/2 inch thick). Low ice consumption. Ice is slowly melting in the ice bin and will affect the size of the ice cube. This is normal operation. When the ice bin needs to be replenished, cubes will return to regular size. Make sure that the reservoir drain plug is installed properly. Check the water line to the unit to make sure there are no restrictions or kinks in the line.
TROUBLESHOOTING THREE PROBLEM POSSIBLE CAUSE CORRECTION Ice is not clear. Low water level in reservoir. Make sure that the reservoir drain plug is installed properly. Check the water line to the unit to make sure there are no restrictions or kinks in the line. Check all filters to make sure they are not restricted or plugged. Make certain that water line is not connected to the water softener. Move the unit to an area where room temperature is above 55° F. Softened water supply.
TROUBLESHOOTING FOUR PROBLEM POSSIBLE CAUSE CORRECTION Ice cubes are sticking together. Ice consumption is low. Use the ice in the bin frequently. Ice will stick together if left in insulated bin over long periods of time. Move the unit to an area where temperature is below 90° F. Room temperature is too warm. The ice machine is not level. Ice level is too high. Room temperature is too warm. Ice deflector is not in place or secured properly. Bin level sensing tube needs adjusted.
41010396 Rev A