
Users Manual User Manual


27
GPS
GPS
GPS
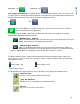
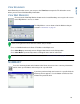
During your field operation, the GPS icon/button in the upper left-hand side of the Map
Screen should appear as green, which means you are receiving a differential GPS
signal. If this icon appears yellow, you are still receiving GPS but are not receiving a
differential signal. If it appears gray then you have lost GPS. In either case, you should
check your GPS settings.
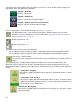
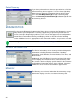
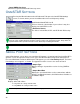
GPS GENERAL TAB
At the Home screen, press the Wrench Button to go to the Setup Screen. Press the GPS
button, and the GPS General Tab appears, as shown.
- If using a GPS 2500 receiver, see“OmniSTAR Settings — GPS 2500” on page 29.
• Differential Source
Select choice of WAAS/EGNOS, Satellite (OmniSTAR®) or
Beacon (Coast Guard) differential sources.
• Wrench button
Pressing the Wrench button opens different settings screens,
depending on whether you are using OmniSTAR®, Beacon, or
WAAS.
• If using OmniSTAR
see
“OmniSTAR Settings” on page 28
.
• GPS Rate (Hz)
The GPS Position Rate drop-down menu represents the cycles per second that the display receives
guidance information from the GPS receiver. Select one of the available Hz rates from the drop-down menu.
• Age of Differential
Displays the elapsed time since reception of last differential correction signal. The Age of Differential button
is only functional when GPS is connected.
• Port Settings button
Displays the Serial Port Settings screen, where you can adjust GPS output. For more information, see
“Serial Port Settings” on page 28.
• Force TSIP Connection button
Forcibly connects to TSIP GPS receiver. Pressing this button will force the port to TSIP communication.
Note: This button is functional only if the TSIP GPS receiver is physically connected.
• Reset to Defaults button
Press this button to restore receiver settings to the factory default. This will remove all custom settings.
Note: Differential settings and NMEA messages will need to be configured for the system to function properly
after resetting factory defaults.