AFG SERIES FOR MODEL : 3.
INTRODUCTION IN T R O D U C T I O N IMPORTANT PRECAUTIONS CONGRATULATIONS and THANK YOU for your purchase of this AFG treadmill! ASSEMBLY Whether your goal is to win races or simply enjoy a fuller, healthier lifestyle, a AFG treadmill can help you attain it – adding club-quality performance to your at-home workouts, with the ergonomics and innovative features you need to get stronger and healthier, faster.
INTRODUCTION I M P O R TA N T PRECAUTIONS SAVE THESE INSTRUCTIONS IMPORTANT PRECAUTIONS Read all instructions before using this treadmill. When using an electrical product, basic precautions should always be followed, including the following: Read all instructions before using this treadmill. It is the responsibility of the owner to ensure that all users of this treadmill are adequately informed of all warnings and precautions.
INTRODUCTION IMPORTANT PRECAUTIONS WARNING To reduce the risk of burns, fire, electrical shock or injury to persons: TREADMILL OPERATION BEFORE YOU BEGIN ASSEMBLY • Never use the treadmill before securing the safety tether clip to your clothing. • If you experience any kind of pain, including but not limited to chest pains, nausea, dizziness, or shortness of breath, stop exercising immediately and consult your physician before continuing.
INTRODUCTION AS S E M B LY IMPORTANT PRECAUTIONS IMPORTANT: READ THESE SAFETY INSTRUCTIONS BEFORE USE! WARNING ASSEMBLY During the assembly process of the treadmill there are several areas that special attention must be paid. It is very important to follow the assembly instructions correctly and to make sure all parts are firmly tightened.
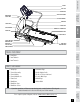
INTRODUCTION CONSOLE IPOD® DOCK READING RACK IMPORTANT PRECAUTIONS SAFETY KEY PLACEMENT HANDLEBAR CAP CONSOLE MAST GRIP PULSE HANDRAILS HANDLEBAR ON/OFF SWITCH MOTOR COVER CIRCUIT BREAKER POWER CORD ASSEMBLY RUNNING BELT / RUNNING DECK SIDE RAIL ROLLER END CAP HANDLEBAR COVER WHEEL LOCKS FOOT LOCK LATCH TRANSPORT WHEELS BEFORE YOU BEGIN CONSOLE MAST BOOT REAR ROLLER ADJUSTMENT BOLTS TREADMILL OPERATION TOOLS INCLUDED Screw Driver 5 mm T-Wrench 8 mm T-wrench TROUBLESHOOTING & MAINTENANCE 5 Ha
INTRODUCTION PR E - A S S E M B LY IMPORTANT PRECAUTIONS Disassemble box and remove the cardboard packaging that is not beneath the treadmill. Do not attempt to lift the treadmill at this time. Remove plastic wrap from console masts. *Note: During each assembly step, ensure that ALL nuts and bolts are in place and partially threaded in before completely tightening any ONE bolt. A light application of grease may aid in the installation of hardware. Any grease, such as lithium bike grease is recommended.
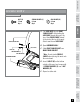
INTRODUCTION AS SEMBLY S T E P 2 ARC WASHER (D) 8.2 mm Qty: 6 ASSEMBLY SPRING WASHER (C) 8.2 mm Qty: 6 RIGHT CONSOLE MAST BEFORE YOU BEGIN A Pull LEAD WIRE through RIGHT CONSOLE MAST. After pulling the lead wire through the mast, the top of the console WIRE should be located at the top of the mast. Detach and discard lead wire. B Open HARDWARE BAG 2. *Note: Do not pinch CONSOLE CABLES when placing the mast onto the main frame.
INTRODUCTION AS S E M B LY S T E P 3 IMPORTANT PRECAUTIONS HARDWARE BAG 3 CONTENTS : BOLT (E) 10 mm Qty: 4 SPRING WASHER (C) 8.2 mm Qty: 4 A Open HARDWARE BAG 3. ASSEMBLY LEFT SIDE RIGHT SIDE B Attach CONSOLE MAST CAPS onto the bottom of CONSOLE using 2 BOLTS (E) and 2 SPRING WASHERS (C). BEFORE YOU BEGIN C Repeat on other side.
INTRODUCTION AS SEMBLY S T E P 4 SPRING WASHER (C) 8.2 mm Qty: 4 ARC WASHER (D) 8.2 mm Qty: 4 ASSEMBLY BOLT (B) 15 mm Qty: 4 IMPORTANT PRECAUTIONS HARDWARE BAG 4 CONTENTS : A Open HARDWARE BAG 4. B Slide CONSOLE through MAST RINGS. CONSOLE CONSOLE MAST TREADMILL OPERATION MAST RING *Note: Do not pinch CONSOLE CABLES when placing the console onto the mast. D Connect CONSOLE to RIGHT CONSOLE MAST using 2 BOLTS (B), 2 SPRING WASHERS (C) and 2 ARC WASHERS (D).
INTRODUCTION A S S E M B LY S T E P 5 IMPORTANT PRECAUTIONS HARDWARE BAG 5 CONTENTS : SCREW (F) 15 mm Qty: 18 A Open HARDWARE BAG 5. ASSEMBLY B Align LEFT HANDLEBAR with CONSOLE as shown. CONSOLE HANDLEBAR CAP HANDLEBAR BEFORE YOU BEGIN SCREWS (F) TREADMILL OPERATION D To attach LEFT HANDLEBAR to MAIN FRAME, place 2 SCREWS (F) through the side and 2 through the top of the frame and lightly tighten to the MAIN FRAME. E Repeat on other side.
INTRODUCTION AS SEMBLY S T E P 6 IMPORTANT PRECAUTIONS HARDWARE BAG 5 CONTENTS : SCREW (F) 15 mm Qty: 18 ASSEMBLY A Continue using HARDWARE BAG 5. B Attach HANDLEBAR COVER to LEFT HANDLEBAR using 3 SCREWS (F). BEFORE YOU BEGIN C Repeat on other side.
INTRODUCTION B E F O R E Y O U BEGIN IMPORTANT PRECAUTIONS CONGRATULATIONS! on choosing your treadmill. You’ve taken an important step in developing and sustaining an exercise program! Your treadmill is a tremendously effective tool for achieving your personal fitness goals. Regular use of your treadmill can improve the quality of your life in so many ways.
INTRODUCTION PROPER USAGE Do not operate the treadmill if the power cord or plug is damaged. If the treadmill appears to not be working properly, do not use the treadmill. ASSEMBLY WARNING IMPORTANT PRECAUTIONS Your treadmill is capable of reaching high speeds. Always start off using a slower speed and adjust the speed in small increments to reach a higher speed level. Never leave the treadmill unattended while it is running.
INTRODUCTION TENSIONING THE RUNNING BELT IMPORTANT PRECAUTIONS The running belt has been properly adjusted at the factory before it was shipped. At times the belt can move off-center during shipment. CAUTION: Running belt should NOT be moving during tensioning. Over-tightening the running belt can cause excessive wear on the treadmill as well as its components. Never over-tighten the belt.
INTRODUCTION TR E A D M I L L O P E R AT ION BJ AJ CJ BJ TREADMILL OPERATION BEFORE YOU BEGIN ASSEMBLY IMPORTANT PRECAUTIONS DJ K EJ J J I J G TROUBLESHOOTING & MAINTENANCE CONDITIONING GUIDELINES WORKOUT PROFILE DISPLAY: Displays workout profiles. Additional display windows: Time and Distance. ALPHANUMERIC DISPLAY window: Displays Incline, Heart Rate, Speed, Calories and proFILE™ information. CLOCK / DATE window: Displays either Clock or Date.
INTRODUCTION M O N I T O R D I S P L AY IMPORTANT PRECAUTIONS Speed • Shown as MPH. Indicates the speed of the treadmill belt. Time • Shown as Minutes:Seconds. Indicates the time remaining or the time elapsed in your workout. Pulse • Shown as Beats Per Minute. Indicates your heart rate (displayed when contact is made with both pulse grips). Distance • Shown as Miles. Indicates distance traveled during your workout. Incline • Shown as Percent. Indicates the incline of the treadmill deck surface.
INTRODUCTION GETTING STA R T E D / S E L E C T I N G A P R O G R A M IMPORTANT PRECAUTIONS Check to make sure nothing is on or will hinder the movement of the treadmill. Plug in the power cord and turn the treadmill ON. Stand on the side rails of the treadmill. Attach the safety key clip to part of your clothing. Insert the safety key into the safety keyhole in the console.
INTRODUCTION PR O G R A M I N F O R M AT I O N PR O G R A M : M A N U A L ( P 1 ) IMPORTANT PRECAUTIONS Allows ‘On The Fly’ manual speed and incline changes. Time-based goal. PR O G R A M : S P E E D I N T E R VA L S ( P 2 ) Walk or run a series of alternating speed levels. Time-based goal with 10 difficulty levels to choose from. Warm-up and cool-down last 4:00 minutes each and are included in program times. :90 WARM-UP :30 :90 :30 1 2 3 4 Level 1 1.0 1.5 2.0 4.0 2.0 4.0 Level 2 1.
INTRODUCTION IMPORTANT PRECAUTIONS PROGRAM: I N C L I N E I N T E R VA L S ( P 3 ) Walk or run a series of alternating speed and INCLINE levels. Time-based goal with 10 difficulty levels to choose from. Program Segments Level 4 Level 5 Level 6 Level 7 Level 8 Level 9 Level 10 1:30 :30 1:30 :30 4 5 6 7 8 2:00 2:00 COOL DOWN Elevation 1.0 1.5 1.0 2.0 1.0 2.0 1.0 2.5 1.0 2.5 1.5 1.0 Speed 1.0 1.5 2.0 4.0 2.0 4.0 2.0 4.5 2.0 4.5 1.5 1.0 Elevation 1.0 1.5 1.0 2.5 1.
INTRODUCTION PR O G R A M : W E I G H T L O S S ( P 4 ) IMPORTANT PRECAUTIONS Walk or run a series of alternating speed and INCLINE levels. Time-based goal with 10 difficulty levels to choose from. Warm-up and cool-down last 4:00 minutes each and are included in program times.
INTRODUCTION IMPORTANT PRECAUTIONS PROGRAM: P A C E R ( P 5 ) Trains you to run at a steady “race pace” Enter in the distance plus the time limit, and the program calculates a steady pace. PROGRAM: M O U N TA I N C L I M B ( P 6 ) ASSEMBLY Simulates climbing a mountain by automatically varying incline. 10 difficulty levels to choose from.
INTRODUCTION PR O G R A M : T H R Z ON E ( P 7) IMPORTANT PRECAUTIONS Automatically adjusts incline to maintain your Target Heart Rate. Perfect for simulating the intensity of your favorite sport or everyday activity. Time-based goal. 1. Once the THR ZONE program has been chosen, press enter. 2. Choose the desired time using the arrow keys and press enter. 3. Choose a target heart rate using the arrow keys on the programming button and press enter.
INTRODUCTION PROGRAM: I N T E R VA L S H R ( P8 ) IMPORTANT PRECAUTIONS Automatically adjusts peak and valley incline levels within your desired heart rate. Perfect for providing an intense workout with recovery bursts. Time based goal. 1. Set WORK interval time using programming BUTTON, KEYPAD or arrow keys and press enter. 2. Set WORK interval target heart rate using programming BUTTON, KEYPAD or arrow keys ASSEMBLY and press enter. 3.
INTRODUCTION PR O G R A M : C U S T O M 1 & 2 ( P 9- P 1 0 ) IMPORTANT PRECAUTIONS Lets you create and reuse a perfect workout for you with specific speed, incline and time combination. The ultimate in personal programming. Time-based goal. 1. Once the CUSTOM 1 or 2 program has been chosen, press enter 2. Choose the desired time using the programming BUTTON, KEYPAD or arrow keys and press enter. ASSEMBLY 3.
INTRODUCTION proFILE ™ P E R F O R M A N C E TR A C K E R Introduction IMPORTANT PRECAUTIONS Research shows that those who journal their fitness routines or workouts, on average, achieve greater success than those who do not. Because your new treadmill is equipped with AFG’s exclusive proFILE™ Performance Tracker, you’ve taken an important step towards achieving your fitness goals.
INTRODUCTION pr o F I L E ™ O P E R AT I O N C O N T I N U E D IMPORTANT PRECAUTIONS 4) WEEKLY TOTAL: View your accumulated data from the last Sunday to the present day. Note: This data is based on week to date NOT the previous seven days. For instance, if you have not used the machine since Sunday, the console will read zeros. The following information will be shown in each display window: INCLINE - Average incline level. TIME - Total time of workout. CALORIES - Average calories burned.
INTRODUCTION CO N D I T I O N I N G G U I DELINES IMPORTANT PRECAUTIONS Always consult your physician before beginning an exercise program. HOW OFTEN? (Frequency of Workouts) ASSEMBLY The American Heart Association recommends that you exercise at least 3 to 4 days per week to maintain cardiovascular fitness. If you have other goals such as weight or fat loss, you will achieve your goal faster with more frequent exercise.
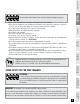
INTRODUCTION TA R G E T H E A R T R AT E Z O N E C H A R T IMPORTANT PRECAUTIONS What is Target Heart Rate Zone? 10 0% 75 BEFORE YOU BEGIN 60 % % 15 12 0 0 TREADMILL OPERATION BEATS PER MINUTE ASSEMBLY Target Heart Rate Zone tells you the number of times per minute your heart needs to beat to achieve a desired workout effect. It is represented as a percentage of the maximum number of times your heart can beat per minute.
INTRODUCTION STRETCHING IMPORTANT PRECAUTIONS TIPS STRETCH FIRST ASSEMBLY Before using your product, it is best to take a few minutes to do a few gentle stretching exercises. Stretching prior to exercise will improve flexibility and reduce chances of exercise related injury. Ease into each of these stretches with a slow gentle motion. Do not stretch to the point of pain. Make sure not to bounce while doing these stretches. 1.
INTRODUCTION IMPORTANT PRECAUTIONS TIPS THE IMPORTANCE OF WARM UP & COOL DOWN WARM UP The first 2 to 5 minutes of a workout should be devoted to warming up. The warm-up will limber your muscles and prepare them for more strenuous exercise. Make sure that you warm-up on your product at a slow pace. The warm up should gradually bring your heart rate into your Target Heart Rate Zone.
INTRODUCTION W E E K LY L O G S H E E T S DAY WEEKLY GOAL D ATE DISTANCE CALORIES TIME IMPORTANT PRECAUTIONS WEE K # COMMENTS SUND AY MON D AY TUES D AY WED N E S D AY ASSEMBLY THUR S D AY FRID AY SATU R D AY WEE K # DAY BEFORE YOU BEGIN WEE K LY T O TA L S : WEEKLY GOAL D ATE DISTANCE CALORIES TIME COMMENTS SUND AY MON D AY TREADMILL OPERATION TUES D AY WED N E S D AY THUR S D AY FRID AY SATU R D AY WEE K # DAY CONDITIONING GUIDELINES WEE K LY T O TA L S : WEEKLY GOAL D ATE DISTA
INTRODUCTION M O N T H LY L O G S HEETS IMPORTANT PRECAUTIONS MONTH WEEK # ASSEMBLY D I S TANCE MONTHLY GOAL CALORIES TIME D I S TANCE MONTHLY GOAL CALORIES TIME D I S TANCE MONTHLY GOAL CALORIES TIME M O N T H LY T O TA L S : BEFORE YOU BEGIN MONTH WEEK # TREADMILL OPERATION M O N T H LY T O TA L S : CONDITIONING GUIDELINES MONTH WEEK # TROUBLESHOOTING & MAINTENANCE LIMITED WARRANTY M O N T H LY T O TA L S : 34
INTRODUCTION TR O U B L E S H O O T I N G IMPORTANT PRECAUTIONS COMMON PRODUCT QUESTIONS ARE THE SOUNDS MY TREADMILL MAKES NORMAL? All treadmills make a certain type of thumping noise due to the belt riding over the rollers, especially new treadmills. This noise will diminish over time, although may not totally go away. Over time, the belt will stretch, causing the belt to ride smoother over the rollers.
INTRODUCTION PROBLEM: Operating speed appears inaccurate. SOLUTION: Auto-calibrate the treadmill: IMPORTANT PRECAUTIONS • Power on the treadmill and have the safety key in position on the console. Press and hold the elevation “+” and speed “-” buttons for approximately 5 seconds to enter the Engineering Mode. The console will beep and “ENG0” appears in the display. • Press the Speed “+” or “-” button until “ENG2” appears in the display. • Press, “ENTER” to select. Press, “START” to begin.
INTRODUCTION M A I N T EN A N C E IMPORTANT PRECAUTIONS Cleanliness of your treadmill and its operation environment will keep maintenance problems and service calls to a minimum. For this reason, we recommend that the following preventive maintenance schedule be followed. ASSEMBLY AFTER EACH USE (DAILY) Clean and inspect, following these steps: • Turn off the treadmill with the on/off switch, then unplug the power cord at the wall outlet.
INTRODUCTION L I M I T E D H O M E-USE WARRANTY Weight Capacity = 350 LBS IMPORTANT PRECAUTIONS FRAME • LIFETIME ASSEMBLY MOTOR • LIFETIME AFG warrants the frame against defects in workmanship and materials for the lifetime of the original owner, so long as the device remains in the possession of the original owner. (The frame is defined as the welded metal base of the unit and does not include any parts that can be removed.
C U S T O M ER TECH SUPPORT For fast and friendly service, please contact one of our trained customer technicians via phone, email or our website. Customer Tech Support Hotline: 1 - 877 - G O A F G 5 5 Email: comments@advancedfitnessgroup.com Website: www.advancedfitnessgroup.com Every employee at AFG takes pride in providing you with a high quality product. We want to know if you have a problem and we want to have an opportunity to correct it for you.