
User manual
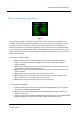


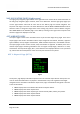
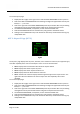


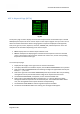
Table Of Contents
- PBY Catalina
- Introduction
- System requirements
- Credits
- Copyrights
- Contact support
- Models and versions
- Limitations
- Failure model and special features
- Aerosoft Sound Control
- Flight model
- Using the switches and knobs
- Interactive Checklist
- Avionics, 1940’s military cockpit
- Avionics, modern cockpit
- Engine Settings
- Mission
- Appendix A: Simplified checklist
- Appendix B: KX 165A TSO
- Appendix C: KLN-90B User Manual
- INTRODUCTION
- OVERVIEW
- DEFINITIONS:
- SYSTEM USE
- NAV: NAVIGATION PAGES
- CALC: CALCULATOR PAGES
- STAT: STATUS PAGES
- SETUP: SETUP PAGES
- OTHER: OTHER PAGES
- TRIP: TRIP PLANNING PAGES
- MOD: MODE PAGES
- FPL: FLIGHT PLAN PAGE
- NAV: NAVIGATION PAGES (right screen)
- APT: AIRPORT PAGES
- NEAREST Airport Pages
- VOR: VOR Page
- NDB: NDB Page
- INT: INTERSECTION PAGE
- SUPL: SUPPLEMENTAL PAGE (SUP)
- CTR: CENTER WAYPOINT PAGE
- REF: REFERENCE WAYPOINT PAGE
- ACTV: ACTIVE WAYPOINT PAGE (ACT)
- D/T: DISTANCE/TIME PAGES
- MESSAGE PAGE
- DIRECT-TO PAGE

Aerosoft PBY Catalina 1.00 Manual
Page 79 of 100
• Line 1: Displays the airport identifier code.
• Line 2: The left side of this line displays the magnetic orientation of the runway in degrees
magnetic north. The right side of the line displays runway lighting information. The choices
and their annunciations are as follows:
o blank -no runway lighting
o L -lighting from sunset to sunrise
o LPC -lighting is pilot controlled
o LPT -lighting is part-time or on request
• Line 3: The left side of line 3 displays the runway length in ft. The right side displays the
surface type of the runway. The choices and their annunciations are as follows:
o HRD -hard surfaces (asphalt, concrete, tarmac, brick and bitumen)
o TRF -turf
o DRT -dirt
o GRV -gravel
o SND -sand
o ICE -ice
o MAT -steel matting
o SHL -shale
o SNW -snow
o Blank -runway surface type unknown
To use this airport page:
1. Display the APT 3 page on the right screen. The first screen, or default screen, is displayed.
Zoom in or out by clicking on the LEFT CURSOR BUTTON and then using the LEFT INNER
KNOB to zoom in (letter J) or out (letter I).
2. Click the RIGHT INNER KNOB to the in position, and then click on its right side (letter H) to
display the second screen.
3. Click on the RIGHT CURSOR BUTTON and a blinking rectangle will appear behind the airport
ICAO (or "----") on Line 1.
4. Click on the right side of the RIGHT INNER KNOB (Letter H) to activate data entry. A blinking
rectangle will now be present behind the first digit of the airport ICAO code name.
5. Use the RIGHT INNER KNOB, or keyboard, to enter the desired ICAO code.
6. To view all runways present, click on the RIGHT OUTER KNOB to change the data entry field
so the rectangle covers the runway orientation display (left side of Line 2).
7. Now click on the RIGHT INNER KNOB to view the popup screen, and then to scroll through
the runways to choose one for display.
8. Click the ENTER BUTTON twice to exit data entry and go back to the second screen.
9. Click the left side of the RIGHT INNER KNOB (letter G) to go back to the default screen.
10. Clicking on the CLR BUTTON at any time will exit the data entry mode without entering any
newly added data.