
User manual
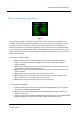


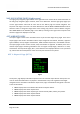
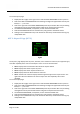


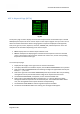
Table Of Contents
- PBY Catalina
- Introduction
- System requirements
- Credits
- Copyrights
- Contact support
- Models and versions
- Limitations
- Failure model and special features
- Aerosoft Sound Control
- Flight model
- Using the switches and knobs
- Interactive Checklist
- Avionics, 1940’s military cockpit
- Avionics, modern cockpit
- Engine Settings
- Mission
- Appendix A: Simplified checklist
- Appendix B: KX 165A TSO
- Appendix C: KLN-90B User Manual
- INTRODUCTION
- OVERVIEW
- DEFINITIONS:
- SYSTEM USE
- NAV: NAVIGATION PAGES
- CALC: CALCULATOR PAGES
- STAT: STATUS PAGES
- SETUP: SETUP PAGES
- OTHER: OTHER PAGES
- TRIP: TRIP PLANNING PAGES
- MOD: MODE PAGES
- FPL: FLIGHT PLAN PAGE
- NAV: NAVIGATION PAGES (right screen)
- APT: AIRPORT PAGES
- NEAREST Airport Pages
- VOR: VOR Page
- NDB: NDB Page
- INT: INTERSECTION PAGE
- SUPL: SUPPLEMENTAL PAGE (SUP)
- CTR: CENTER WAYPOINT PAGE
- REF: REFERENCE WAYPOINT PAGE
- ACTV: ACTIVE WAYPOINT PAGE (ACT)
- D/T: DISTANCE/TIME PAGES
- MESSAGE PAGE
- DIRECT-TO PAGE

Aerosoft PBY Catalina 1.00 Manual
Page 72 of 100
4. Click on the ENTER BUTTON 3 times to enter the waypoint.
5. Now click on the LEFT CURSOR BUTTON to enter the remaining data. A rectangle will be
present behind the first digit of the GS data field (left side of Line 3) at this time.
6. Use the LEFT INNER KNOB to change the current value if desired. Use the LEFT OUTER KNOB
to change cursor location, and then use the LEFT INNER KNOB to change the value. Repeat
this process until all desired numbers have been entered.
7. Click on the LEFT CURSOR BUTTON to exit data entry. The unit will now display the ETE and
fuel required for the trip based on the data entered.
TRIP 2: Trip Planning 2 Page (TRI 2)
Fig5.3
The trip planning 2 page displays the same type of information as the TRI 1 page, however on this
page you can plan a trip from your present position to anywhere in the world. Unlike on the TRI 1
page, you enter the distance and direction to a destination point instead of a waypoint. The KLN 90B
then calculates the information based on the entered data. If you set the GS or fuel flow on the TRI 1
page, they will be displayed when you enter this page and can be used in the calculations, or you can
enter different values directly. If you choose to enter the GS on this page yourself, you do not have
to enter any values on the TRI 0 page. There are 6 Lines of information.
• Line 1: Display to show the planned trip goes from your present position to a set position.
The annunciation "S.POS" listed on the right side of the line stands for "set position", and
indicates this is the TRI 2 page.
• Line 2: Displays the distance in nm (left side) and the direction in degrees magnetic north
(right side) to the entered destination point.
• Line 3: Displays the GS in knots (left side) and the time enroute in an hh:mm format to the
entered point.
• Line 4: Displays the user-entered fuel flow rate in gallons per hour.
• Line 5: Displays the user-entered amount of fuel to be used as a reserve in gallons. The
amount of fuel in reserve is added to the amount required.
• Line 6: Displays the amount of fuel required for the trip in gallons.
To use this trip planning page:
1. Display the TRI 2 page on the left screen. Click on the LEFT CURSOR BUTTON and a rectangle
will appear behind the first digit of the GS display on line 3.