
User manual


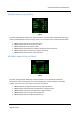


Table Of Contents
- PBY Catalina
- Introduction
- System requirements
- Credits
- Copyrights
- Contact support
- Models and versions
- Limitations
- Failure model and special features
- Aerosoft Sound Control
- Flight model
- Using the switches and knobs
- Interactive Checklist
- Avionics, 1940’s military cockpit
- Avionics, modern cockpit
- Engine Settings
- Mission
- Appendix A: Simplified checklist
- Appendix B: KX 165A TSO
- Appendix C: KLN-90B User Manual
- INTRODUCTION
- OVERVIEW
- DEFINITIONS:
- SYSTEM USE
- NAV: NAVIGATION PAGES
- CALC: CALCULATOR PAGES
- STAT: STATUS PAGES
- SETUP: SETUP PAGES
- OTHER: OTHER PAGES
- TRIP: TRIP PLANNING PAGES
- MOD: MODE PAGES
- FPL: FLIGHT PLAN PAGE
- NAV: NAVIGATION PAGES (right screen)
- APT: AIRPORT PAGES
- NEAREST Airport Pages
- VOR: VOR Page
- NDB: NDB Page
- INT: INTERSECTION PAGE
- SUPL: SUPPLEMENTAL PAGE (SUP)
- CTR: CENTER WAYPOINT PAGE
- REF: REFERENCE WAYPOINT PAGE
- ACTV: ACTIVE WAYPOINT PAGE (ACT)
- D/T: DISTANCE/TIME PAGES
- MESSAGE PAGE
- DIRECT-TO PAGE

Aerosoft PBY Catalina 1.00 Manual
Page 64 of 100
7. Exit the data entry mode at any time by clicking on the LEFT CURSOR BUTTON. All data
entered in the session will be retained. All data entry fields can be scrolled through forwards
and backwards.
SETUP 6: Setup 6 Page (SET 6)
Fig3.6
The setup 6 page is used to toggle the barometric pressure readout on the initial page, and the CAL 1
and 2 pages, between units of inches of Hg and millibars pressure. There are 4 Lines of information.
• Lines 1and 2: Indicates the page viewed is used to set the barometric pressure readout
units.
• Line 3: Displays an ' " ' annunciation if the setting is for unit readout in inches of Hg; displays
MB if the readout is in millibars pressure.
• Line 4: Display to show if the barometric pressure readout is set for "INCHES" or
"MILLIBARS".
To use this setup page:
1. Display the SET 6 page on the left screen and click on the LEFT CURSOR BUTTON. A long
rectangle will appear behind the current annunciation at the bottom.
2. Use the LEFT INNER KNOB to toggle between the 2 choices.
3. Click on the LEFT CURSOR BUTTON to exit data entry. The rectangle disappears and the
choice displayed at the bottom is used for readout values.
SETUP 7: Setup 7 Page (SET 7)