
User manual

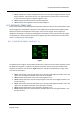


Table Of Contents
- PBY Catalina
- Introduction
- System requirements
- Credits
- Copyrights
- Contact support
- Models and versions
- Limitations
- Failure model and special features
- Aerosoft Sound Control
- Flight model
- Using the switches and knobs
- Interactive Checklist
- Avionics, 1940’s military cockpit
- Avionics, modern cockpit
- Engine Settings
- Mission
- Appendix A: Simplified checklist
- Appendix B: KX 165A TSO
- Appendix C: KLN-90B User Manual
- INTRODUCTION
- OVERVIEW
- DEFINITIONS:
- SYSTEM USE
- NAV: NAVIGATION PAGES
- CALC: CALCULATOR PAGES
- STAT: STATUS PAGES
- SETUP: SETUP PAGES
- OTHER: OTHER PAGES
- TRIP: TRIP PLANNING PAGES
- MOD: MODE PAGES
- FPL: FLIGHT PLAN PAGE
- NAV: NAVIGATION PAGES (right screen)
- APT: AIRPORT PAGES
- NEAREST Airport Pages
- VOR: VOR Page
- NDB: NDB Page
- INT: INTERSECTION PAGE
- SUPL: SUPPLEMENTAL PAGE (SUP)
- CTR: CENTER WAYPOINT PAGE
- REF: REFERENCE WAYPOINT PAGE
- ACTV: ACTIVE WAYPOINT PAGE (ACT)
- D/T: DISTANCE/TIME PAGES
- MESSAGE PAGE
- DIRECT-TO PAGE

Aerosoft PBY Catalina 1.00 Manual
Page 100 of 100
DIRECT-TO PAGE
Fig18.1
The Direct-To page is used to enter the Direct-To mode of navigation, whereby the aircraft will start
to track directly to the waypoint selected on this page. The Direct-To mode can be entered
regardless of whether a flight plan was previously active or not. Simply click on the DIRECT-TO
BUTTON, enter the identifier of the waypoint you want to go to, and the KLN 90B will navigate you
there. There is a Direct-To feature for the ENROUTE LEG and OBS modes. As discussed previously,
the mode to be used is chosen on the Mode pages.
To use the Direct-To page:
1. Click on the DIRECT-TO BUTTON and the Direct-To page will be displayed on the left screen
(Fig18.1). A blinking rectangle highlights the waypoint identifier field.
2. Click the RIGHT INNER KNOB to the in position and click once on the RIGHT INNER KNOB to
activate data entry. A smaller, blinking rectangle appears behind the first data field to be
changed at this time.
3. Use the RIGHT INNER and OUTER KNOBs, or your keyboard, to enter the desired waypoint
identifier.
4. Click the ENTER BUTTON 3 times to enter the data and begin tracking to the selected
waypoint. The Direct-To page will disappear and the original page will again be displayed on
the left screen. The information on the FPL 0 page will change accordingly.