
Step by Step Guide

A318/319/320/321
Profesional
Step-By-Step Tutorial
Vol
6
06-01- 56
11. Dezember 2018
172.
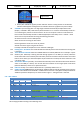
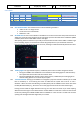
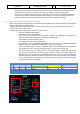
BARO REF: As we are flying higher than the “transition altitude” it should already be set to “Standard”
i.e. nothing has to be done.
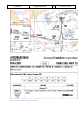
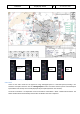
EGLL Chart – STAR LAM 3A/TAWNY 3A
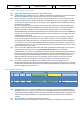
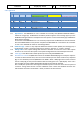
5.19 Descent
DESCENT
NO.
PANEL
ACTION
REMARK
TYP
PART (Name)
PART (No.)
PF (PILOT FLYING)
PM (PILOT MONITORING)
229
FCU
ALT
3
INSERT NEW HEIGHT
INSERT
= 4.000
230
FCU
ALT
3
INITIATE DESCENT
PUSH KNOB
231
MAIN PANEL
PFD
1
DESCENT
MONITOR
232
PEDESTAL
SP BRAKES
6
SET
AS REQUIRED
233
Vert. Mode = DES / Desc.Prep.CL = compl.
Starts next Checklist / Co-Pilot - if selected
234
MAIN PANEL
PFD
1
FMA
CHECK
235
PEDESTAL
TCAS
10
TCAS = TILT BELOW
CHECK and SET
CoP
236
At 10.000 feet:
237
OVERHEAD
EXT. LIGHTS
9
LANDING LIGHTS
ON
CoP
238
EFIS
FD / ILS
3
ILS LOCALIZER (LS)
PUSH
CoP
EFIS
239
At Transition Level
= 7000
240
EFIS
A PRESSURE
2
BARO REF to actual pressure value
SET / X CHECK
CoP
Checklist complete
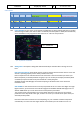
173.
Descent to Altitude: Before the T/D (Top of Descent) point is reached (marked on the ND flight path
by a white arrow showing down), the altitude should be set to 2.500 feet. But do not push the knob
before T/D is not reached
174.
Initiating Descent: There are various methods for descent but we will use:
Managed Mode: Reaching T/D or if the T/D marker disappears or DECELERATE is displayed on the PFD
(whatever happens first): Just push the knob. The aircraft will now start to descend automatically
according to the flight path calculated in the MCDU – F-PLN.
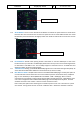
Once the descent started press the CSTR button on the EFIS control panel to bring the constraints back
up.