
User's Manual


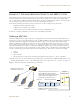

Table Of Contents

Deployment Guide 95
EXAMPLE 1: MAPPING LOCATIONS AND INSTALLING HIVEAPS
Using MAC Addresses
With this approach, you write down the MAC address labelled on the underside of each HiveAP and its location while
installing the HiveAPs throughout the buildings. The MAC address on the label is for the mgt0 interface. Because the
MAC addresses of all HiveAPs begin with the Aerohive MAC OUI 00:19:77, you only need to record the last six
numerals in the address. For example, if the MAC OUI is 0019:7700:0120, you only need to write "000120" to be able
to distinguish it from other HiveAPs later.
1. Make copies of the maps you uploaded to HiveManager, label them, and take them with you when installing the
HiveAPs.
2. When you install a HiveAP, write the last six digits of its MAC address at its location on the map.
When HiveAPs automatically connect with HiveManager, HiveManager displays them in the Access Points > New
HiveAPs > Automatically Discovered window. You can differentiate them in the displayed list by MAC address (node
ID), which allows you to match the HiveAPs in the GUI with those you noted during installation so that you can
properly assign each one to a map, a WLAN policy, and two radio profiles.
How HiveAPs Connect to HiveManager
If HiveAPs are in the same layer-2 broadcast domain (and same VLAN) as HiveManager, they broadcast CAPWAP
(Control and Provisioning of Wireless Access Points) Discovery Request messages to discover and establish a secure
connection with HiveManager automatically. There is no need for any extra configuration on your part.
When HiveAPs and HiveManager are in different subnets, the HiveAPs will not be able to discover HiveManager by
broadcasting CAPWAP Discovery Request messages. In this case, you can use one of the following methods to
configure HiveAPs with the HiveManager IP address or configure them so that they can learn it through DHCP or DNS.
When HiveAPs have the HiveManager IP address, they then send unicast CAPWAP Discovery Request messages to that
address.
• Log in to the CLI on each HiveAP and enter the HiveManager IP address with the following command, in which
the variable ip_addr is the address of the interface through which HiveManager communicates with HiveAPs:
hivemanager ip_addr
• Configure the DHCP server to supply the HiveManager domain name as DHCP option 225 or its IP address as
option 226 in its DHCPOFFER. (If you use a domain name, the authoritative DNS server for that domain must also
be configured with an A record that maps the domain name to an IP address for HiveManager.) HiveAPs request
DHCP option 225 and 226 by default when they broadcast DHCPDISCOVER and DHCPREQUEST messages.
• If HiveManager continues to use its default domain name ("hivemanager"), configure the local authoritative DNS
server with an A record that resolves that name to an IP address. If the HiveAPs do not have a static IP address
configured for HiveManager and do not receive an address or domain name returned in a DHCP option, then they
try to resolve the domain name "hivemanager" to an IP address.
Within the framework of the CAPWAP protocol, HiveAPs are CAPWAP clients and HiveManager is a CAPWAP server.
The client proceeds through a series of CAPWAP states. These states and the basic events that trigger the client to
transition from one state to another are shown in Figure 6 on page 96.
Note: If you need to change the DHCP option number (perhaps because another custom option with that
number is already in use on the DHCP server), enter this command on each HiveAP with a different
option number for the variable number:
interface mgt0 dhcp client option custom hivemanager number { ip | string }
Note: To illustrate all possible CAPWAP states, Figure 6 on page 96 begins by showing a HiveAP and HiveManager
already in the Run state. When a HIveAP first attempts to discover a HiveManager—after the HiveAP has an
IP address for its mgt0 interface and has been configured with (or has discovered) the HiveManager IP
address—it begins in the Discovery state.