
User's Manual
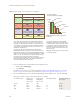


Table Of Contents

Deployment Guide 139
EXAMPLE 10: ASSIGNING CONFIGURATIONS TO HIVEAPS
6. Select the HiveAPs whose configurations you want to update, select one of the following options for controlling
when the uploaded configurations are activated (by rebooting the HiveAPs), and then click OK:
• Activate at: Select this option and set the time when you want the updated HiveAPs to activate their
new configuration. This is a good choice if you want to stagger the activation, or if you want to load the
configuration now but activate it when the network is less busy. To use this option accurately, both
HiveManager and the managed HiveAPs need to have NTP enabled.
• Activate after: Select this option to load the configuration on the selected HiveAPs and activate it after
a specified interval. The range is 0 – 3600 seconds; that is, immediately to one hour. The default is 60
seconds.
• Activate at next reboot: Select this option to load the configuration and not activate it. The loaded
configuration is activated the next time the HiveAP reboots.
HiveManager pushes the configuration to all the selected HiveAPs. After they reboot to activate their new
configurations, they reconnect with HiveManager. To check the status of their CAPWAP connections, see the
Status and CAPWAP columns on the Access Points > Managed HiveAPs page. From this point, you can upload
delta configurations, which do not require the HiveAPs to reboot to activate a configuration update.
7. To check that the HiveAP is using the new files for its captive web portal, make an association with the HiveAP
using the guest SSID and then open a browser as described in step 2 to step 3 on page 109.
Note: When choosing which option to use, consider how HiveManager connects to the HiveAPs it is updating.
See "Updating HiveAPs in a Mesh Environment" on page 88.
Note: If you still see the default .html and .jpg files, try clearing your browser cache and then closing and
reopening the browser.
If you customize captive web portal pages and then later want to return to the default set of files,
enter this command: reset web-directory <string>
where <string> is the name of the directory whose contents you want to return to the default files.