
User's Manual


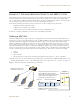

Table Of Contents

Chapter 8 HiveManager Configuration Examples
94 Aerohive
Preparing the HiveAPs
There are several approaches that you can take when mapping the location of installed HiveAP devices. Two
possible approaches are presented below. With the first approach ("Using SNMP"), HiveManager automatically assigns
HiveAPs to maps. This approach does require a small amount of configuration of each HiveAP up front, but after the
HiveAPs form a CAPWAP connection with HiveManager, the automatic assignment of HiveAPs to their appropriate
maps on HiveManager occurs without any further effort. The second approach ("Using MAC Addresses" on page 95)
allows you to install HiveAPs without needing to do any extra configurations, but you later have to match each
HiveAP with the right map in HiveManager manually.
Using SNMP
This approach makes use of the SNMP (Simple Network Management Protocol) sysLocation MIB (Management
Information Base) object, which you define on HiveAPs. HiveManager can use this information to associate a HiveAP
with a map and provide a description of where on the map each HiveAP belongs.
1. Make copies of the maps you uploaded to HiveManager, label them, and take them with you for reference when
installing the HiveAPs.
2. For each HiveAP that you install, do the following:
1. Make a serial connection to the console port, and log in (see "Log in through the console port" on page 150).
2. Enter the following command, in which string1 describes the location of the HiveAP on the map (in open
format) and string2 is the name of the map:
snmp location string1@string2
For example, if you install a HiveAP in the northwest corner on the first floor of building 1, enter
snmp location northwest_corner@HQ-B1-F1. If you want to use spaces in the description, surround
the entire string with quotation marks: snmp location "northwest corner@HQ-B1-F1".
If the name of a map is not unique, then include the map hierarchy in the string until the path to the map is
unique. For example, if you have two maps named "floor-1", and the one you want to use is nested under a
higher level map named "building-1" while the other is nested under "building-2", then enter the command
as follows: snmp location northwest_corner@floor-1@building-1. Similarly, if there are two
maps named "building-1" nested under higher level maps for two different sites ("campus-1" and "campus-2",
for example), then include that next higher level in the string to make it unique:
snmp location northwest_corner@floor-1@building-1@campus-1
3. Mount and cable the HiveAP to complete its installation. (For mounting details, see "Mounting the HiveAP
20" on page 29. For information about the PoE port on the HiveAP, see "Ethernet and Console Ports" on
page 26.)
When a HiveAP connects to HiveManager, HiveManager checks its SNMP location. When you accept the HiveAP for
management, then HiveManager automatically associates it with the map specified in its SNMP location description.
You can then click the icon to see its location and drag it to the specified location on the map. Also, on the Access
Points > New HiveAPs > Automatically Discovered window in the HiveManager GUI, you can sort detected HiveAPs by
map name to assign them more easily to WLAN policies and radio profiles.
Note: For a summary of how HiveAPs use CAPWAP to discover and connect to HiveManager, see "How HiveAPs
Connect to HiveManager" on page 95.